Installing a New Subpanel is a multi-part series article, broken into Part 1, Part2, Part 3, Part 4 and Part 5.
ABSTRACT
In this article, I will show you how to properly determine the subpanel and feeder (a.k.a. service entrace) cable sizes.
ELECTRICAL LOAD REQUIREMENT
There were several factors to consider when determining the electrical load requirement:
- Number of appliance(s)
- Number of outlets (must meet current NEC code)
- Distance between the main panel to sub panel
My future kitchen remodeling meant that I had to dedicate new circuits to support a dishwasher, refrigerator, small appliances, oven as well as dedicated circuits for the counter-top outlets per NEC code. In addition, I had to anticipate a certain voltage drop because the distance between my main panel to sub panel was approximately 75-100 feet.
There are three ways to compute the electricity load requirement:
- I got this nifty Residential Load Calculator some time ago (sorry, I forgot where so if you know the author, please let me know so that I can give proper credit). If you are very new, it may be slightly complicated but give it a try (ResidentialLoadCalculations)
- Use this nifty online calculator
- Follow my simple (but manual) instructions below
First, before anything else, please remember this formula: Wattage = Voltage x Amperage. This will help you to understand when calculating a circuit load requirement
Second, all circuits should never exceed the 80% of the circuit capacity. This creates a safety margin to minimize circuit overloading (less trip to the circuit breaker to reset). That means for 120 volts, a :
- 15 amp (1,800 watts) circuit – Plan on max utilization of 12 amps or 1,440 watts
- 20 amp (2,400 watts) circuit – Plan on max utilization of 16 amps or 1,920 watts
- 30 amp (3,600 watts) circuit – Plan on max utilization of 24 amps or 2,880 watts
Third, look at the tags on all appliances and lighting fixtures and try to evenly distribute across different circuits. Amperage heavy appliances like refrigerator should be on its dedicated circuit.
TIP: Check with your township’s electric inspector. Some states use NEC codes that is NOT the latest and also may interpret NEC codes in their own ways.
For my project, I planned on renovating my kitchen in the near future so I wanted to future-proof my electrical load requirements as much as possible. That meant I had to place new dedicated circuits to support a dishwasher, refrigerator, small appliances, gas oven as well as well as dedicated circuits for the counter-top outlets and lighting fixtures as per current NEC code.
In the end I chose to go with Square D 100 Amp Subpanel (Why Square D? Read my comparison review of Square D and Homeline model)
SUBPANEL SIZE
Although 60 amp subpanel was sufficient based on my load requirement, I decided to spend extra $60 to upgrade to a 100 amp sub panel. This upgrade gave me confidence that I can handle any future power growth, whether it be a kitchen upgrade, or finishing my basement (on a side note, most basement remodels will require a dehumidifier to run during the spring and summer months; humidifier has a large amperage requirement)
The panel I chose was Square D QO 100 amp Value Pack (why?). It came with main panel with 32 circuit spaces, pre-installed 100 amp breaker, and five, and 20 amp circuit breakers.
There were other good choices like Cutler Hammer and Siemens brands out there, but in my opinion, Square D was THE BEST choice due to its design, engineering and quality and wide availability of various breakers at Home Depot / Lowes / Local electrical parts store.
In addition to the sub panel, I had to purchase a separate Square D 100 amp circuit breaker for the main panel.
TIP: If you plan on using the Square D solution as I have, please avoid using the 70 amp sub panel solution. Square D makes 70 amp circuit breakers, but Square D does not manufacture sub panels with 70 amp main circuit breakers pre-installed. In addition, the cost of a 70 amp circuit breaker was higher than the 100 amp circuit breaker
FEEDER OR SERVICE ENTRANCE CABLE SIZE
My next step was to determine the wire size. In the US, a standard acronym is American Wire Gauge (AWG). For your project, you should look at the current NEC Section 316.15 code (below) dwelling column and find a corresponding amperage requirement. Then look at the AWG column to determine the wire size requirement.
TIPS: I cannot stress enough that you SHOULD CONTACT your township’s electrical inspector to ensure that you can use either the aluminum or copper feeder cables! Certain towns do not allow the use of aluminum feeder cables.
Aluminum Cable
| Aluminum Conductor |
Stranding | Allowable Capacity (1) |
||||
| Size (AWG) | Phase Conductor & Neutral |
Equipment Ground Conductor |
60 oC | 75 oC | 90 oC | Dwelling |
| SER Three Conductor with Bare Ground (a.k.a. “Four Conductor”) |
||||||
| 8-8-8-8 | 1 | 1 | 30 | 40 | 45 | – – |
| 6-6-6-6 | 7 | 7 | 40 | 50 | 60 | – – |
| 4-4-4-6 | 7 | 7 | 55 | 65 | 75 | – – |
| 3-3-3-5 | 7 | 7 | 65 | 75 | 85 | – – |
| 2-2-2-4 | 7 | 7 | 75 | 90 | 100 | 100 |
| 1-1-1-3 | 18 | 7 | 85 | 100 | 115 | 110 |
| 1/0-1/0-1/0-2 | 18 | 1 | 100 | 120 | 135 | 125 |
| 2/0-2/0-2/0-1 | 18 | 1 | 115 | 135 | 150 | 150 |
| 3/0-3/0-3/0-1/0 | 18 | 1 | 130 | 155 | 175 | 175 |
| 4/0-4/0-4/0-2/0 | 18 | 1 | 150 | 180 | 205 | 200 |
|
(1) Allowable ampacity based on National Electrical Code (NEC) 2005, Section 310.15: |
||||||
Copper Cable
| Conductor | Ground Wire | Allowable Ampacity | |||
| Size (AWG) | # of Conductors in Cable | # of Strands in Conductors |
Size (AWG) | # of Strands | |
| Two Conductors | |||||
| 14 | 2 | 1 | 14 | 1 | 15 |
| 12 | 2 | 1 | 12 | 1 | 20 |
| 10 | 2 | 1 | 10 | 1 | 30 |
| 8 | 2 | 1 | 10 | 1 | 40 |
| 6 | 2 | 1 | 10 | 1 | 55 |
| Three Conductors | |||||
| 14 | 3 | 1 | 14 | 1 | 15 |
| 12 | 3 | 1 | 12 | 1 | 20 |
| 10 | 3 | 1 | 10 | 1 | 30 |
| 8 | 3 | 7 | 10 | 1 | 40 |
| 6 | 3 | 7 | 10 | 1 | 55 |
| 4 | 3 | 7 | 8 | 1 | 70 |
| 2 | 3 | 7 | 8 | 1 | 95 |
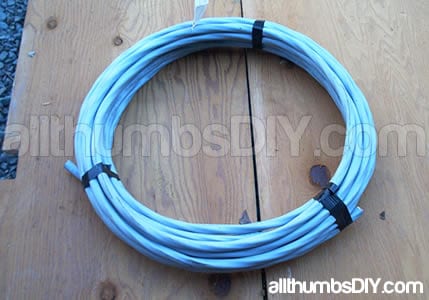
For me, I decided to use Aluminum 2-2-2-4 (also known as 4 conductor)cable.
(Figure 1.6 is the cable I purchased). Copper was my first choice, but I made a mistake of buying the wrong sized copper cable (you can read more about my mini-saga here.
Please note that copper cable is more expensive and it’s quite a bit heavier than aluminum. In my township, I was not required to use conduit system, but again, you need to check with your township.
SUBPANEL TYPE
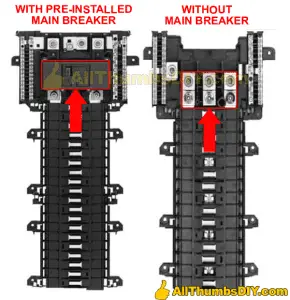
There are two types of sub panels : a panel with main-lugs only (Figure 2.2) and panel with a pre-installed main breaker (Figure 2.1). The difference between the two types is that a main lug panel DOES NOT come with a main breaker installed.
Although the current NEC does not require a main breaker to be installed at the sub panel, I decided to add it anyway (extra $70 on top of the panel cost) because I wanted to have the flexibility to turn off the power from my sub panel.
You should check with your township’s electrical inspector before deciding for or against this option.
NEXT >> Installing a new Subpanel – Part 3
RELATED ARTICLES
- Installing a new Subpanel – Part 1
- Installing a new Subpanel – Part 2
- Installing a new Subpanel – Part 3
- Installing a new Subpanel – Part 4
- Installing a new Subpanel – Part 5


Installing a New Subpanel – Part 5
Sunday 15th of July 2012
[...] Installing a new Subpanel – Part 2 [...]
Installing a New Subpanel – Part 4
Saturday 14th of July 2012
[...] Installing a new Subpanel – Part 2 [...]
Installing a New Subpanel – Part 3
Saturday 14th of July 2012
[...] Installing a new Subpanel – Part 2 [...]
Installing a new Subpanel – Part 1
Saturday 14th of July 2012
[...] Installing a new Subpanel – Part 2 [...]