
Building a free standing swing set is not as difficult as one might think. With decent sets costing over $1,500, I decided to build one myself to my own specifications.
This project is lengthy, so I broke up the article into 3 parts:
- Part 1 – Overview / Design / Material list (You Are Here)
- Part 2 – Construction
- Part 3 – Installing Accessories
BACKGROUND
With my kids rapidly growing, I wanted to buy them a sage and sturdy play swing set. With most main beams weighing over 100 pounds, the last thing I want is a shoddy swing set with poor design.
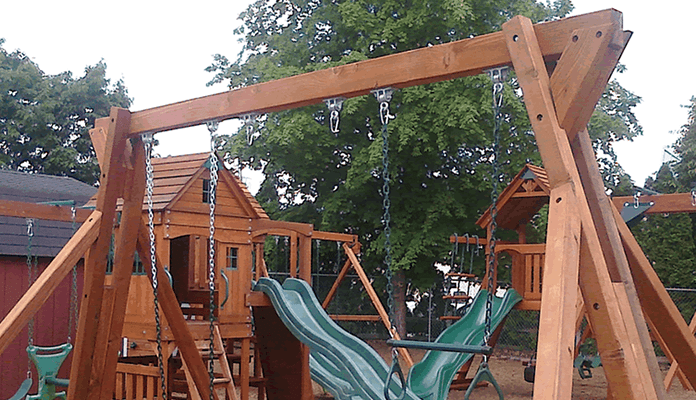
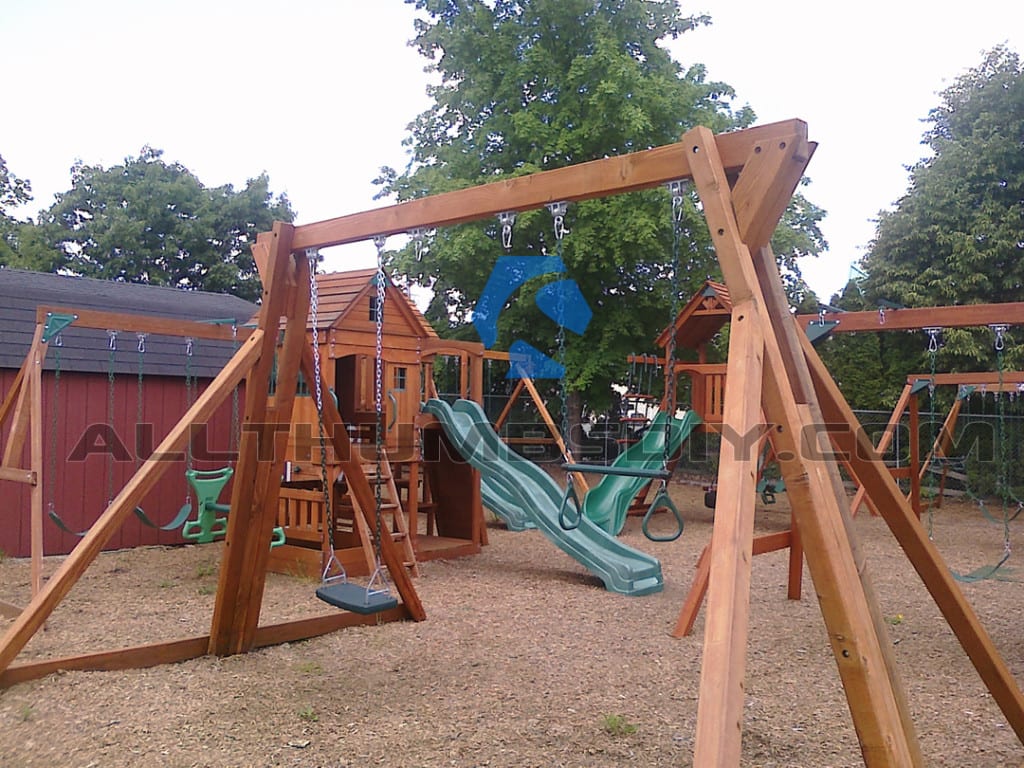
I checked 6 or 7 dealers and found that most decent sets were priced well over the $1,500+ range, including sets made from metal, PVC and other materials. I found a really nice swing set made from red cedar (the same one that is pictured at the beginning of this article) but that was priced over $2,700!
SAFETY FIRST
Kids are amazingly talented pushing design limits to put themselves in to danger. To minimize the risk of injury:
- We should create a buffer zone that should be roughly twice the height of the swing. For example, if the height of the swing is 6 feet, the front buffer zone should be approximately 12 feet. Rear buffer zone should also be approximately 12 feet;
- The distance between seats should be 24 inches or greater (to avoid hitting each other while swinging);
- The distance between a seat and the nearest support structure should be be 30 inches or greater;
PLANNING
First of all, if you can afford it, go with red cedar. Red cedar is naturally resistant to rot and has minimal splinter risk, but it is super expensive (about 5 times the cost of a pressure-treated lumber where I live).
Second, with a $500 budget, I decided to use pressure treated (PT) lumber because it is inexpensive. I was not concerned with PT lumber because unlike the play gym, I didn’t expect kids to touch the frame of a swing set that often, if at all.
PT 4x4s come with sharp corner edges so to minimize the risk of getting splinters, I will need to round off the edges using a router.
Lastly, I originally intended to build a backyard play gym that was attached to the swing set. However, due to the size of my lot (100 x 385), I just could not make the configurations work without sacrificing features that my son and daughter wanted.
Instead, we decided to build and locate them separately. So my goals were to:
- Build a simple but rustic looking swing set that can take a beating;
- Handle up to 4 children, using 3 rides (third one being a Mega Rider Swing Seat that supports 2 kids)
DESIGN
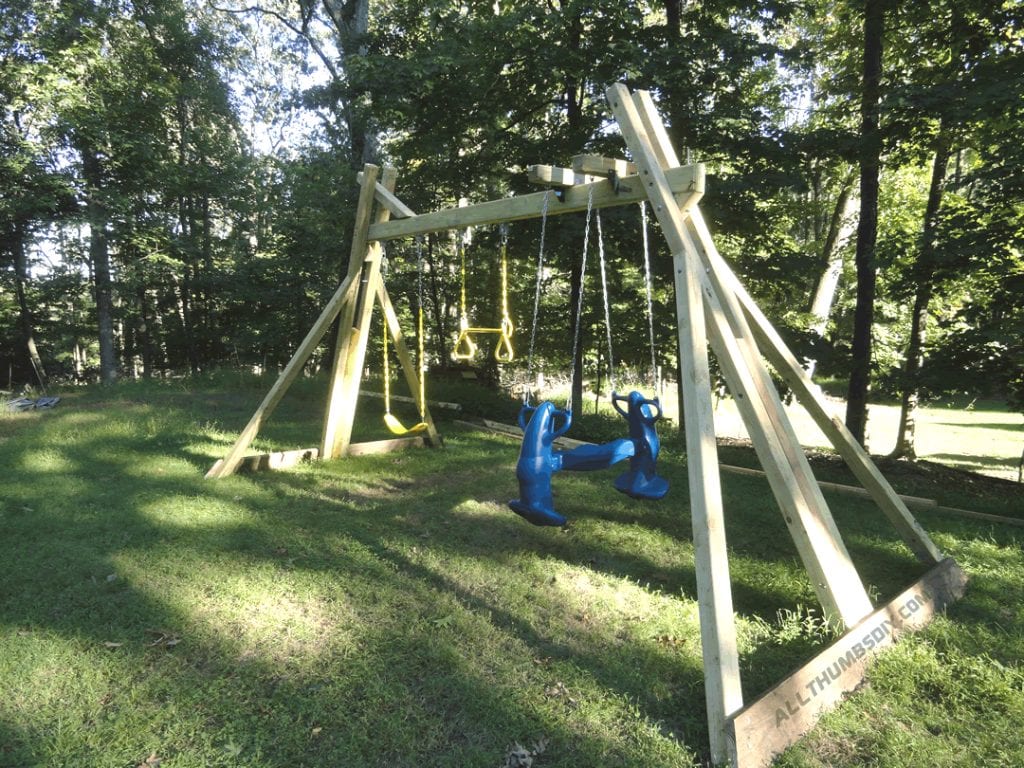
I really liked the this swing set (pix below) I found at a local store but at $2700, it was just too expensive. Instead, I am going to try to create a slightly different version of it.
My version:
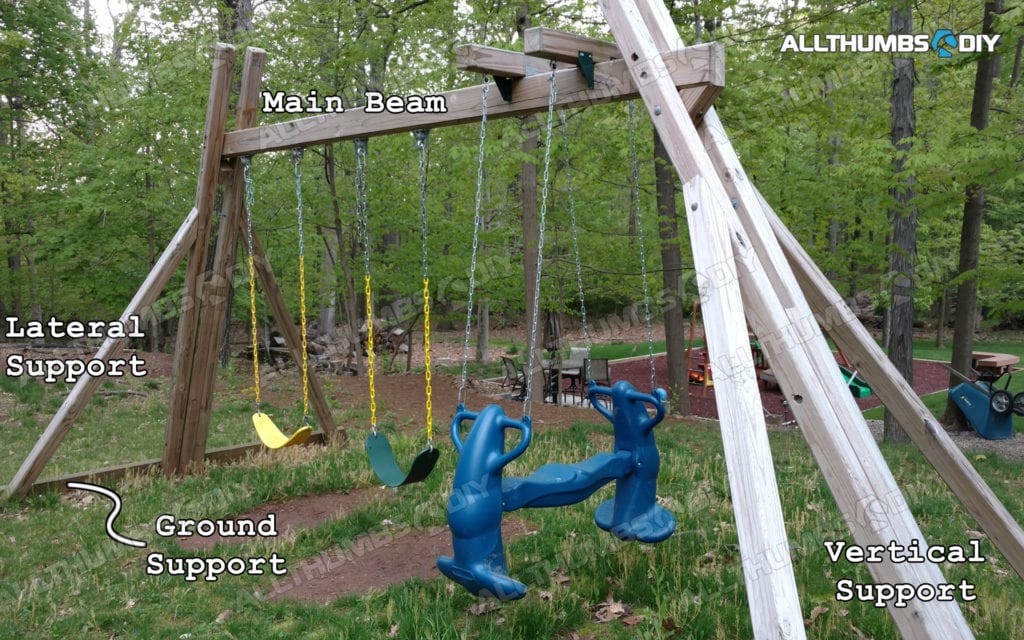
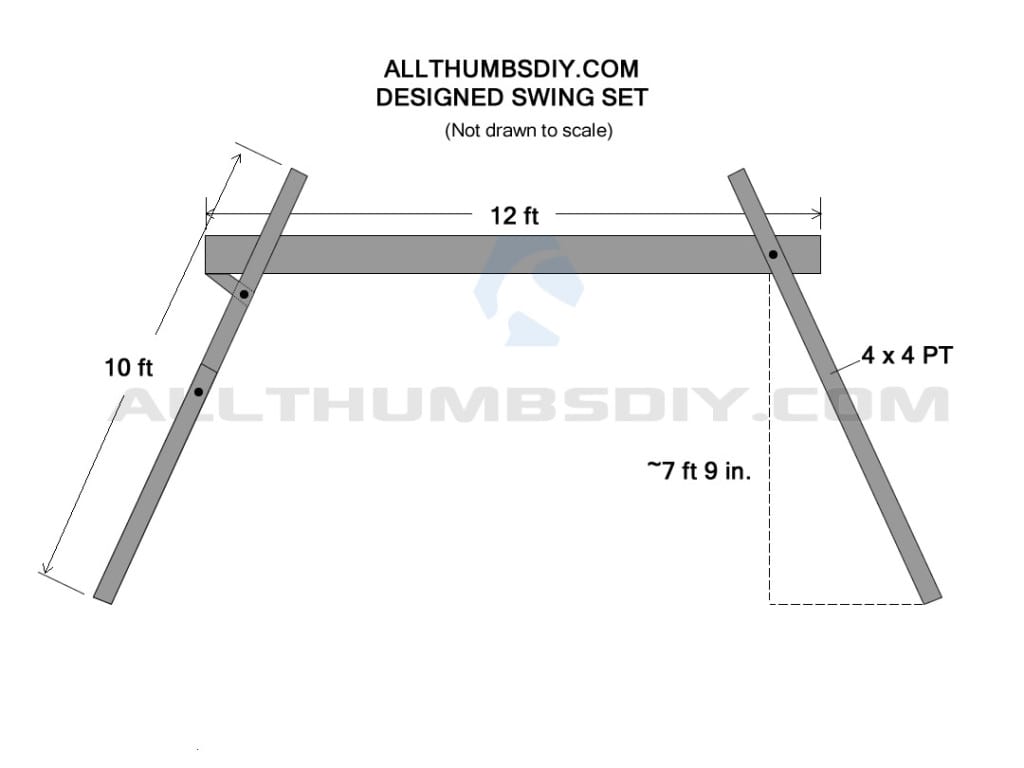
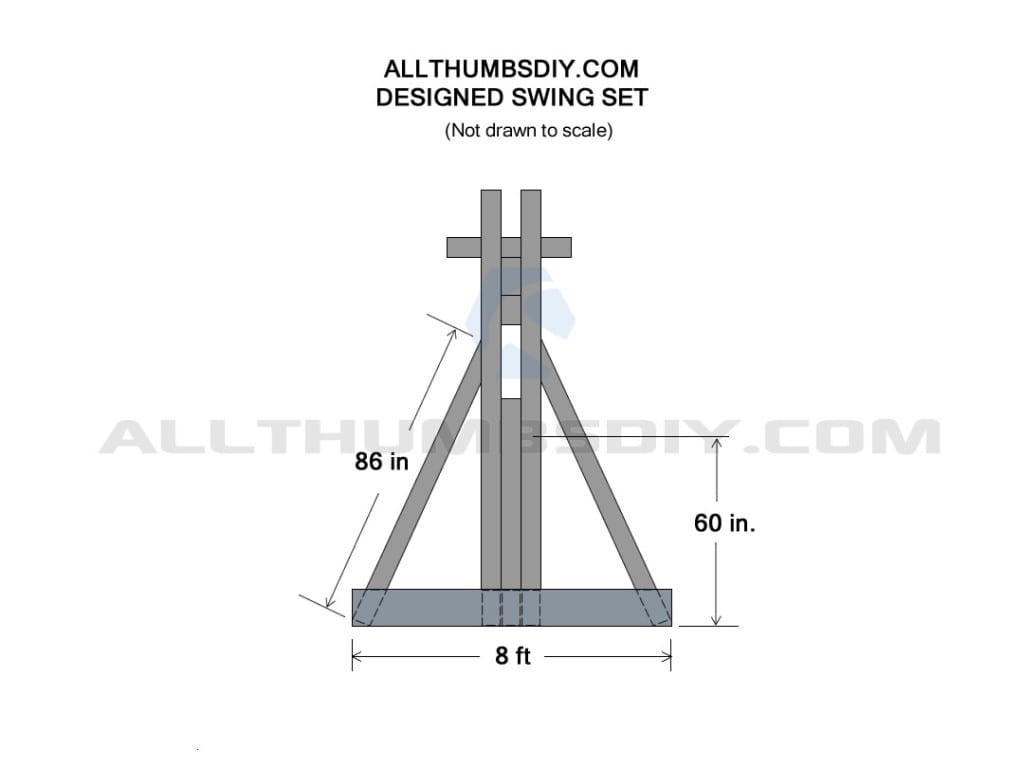
- Main Beam – This is the horizontal beam that will carry the bulk of the swinging weight. It needs to resist the vertical and angular forces as well as to provide torsional rigidity (i.e. twisting). I’ve elected to utilize a 4 x 6 x 12 ft long PT lumber (12 extra inches on either side so the effective span would be about 10 ft)
- Vertical + Horizontal Supports – Use 4 x 4 x 10 ft PT lumber with contiguous load-bearing beams, attached to a 30-degree triangular base for stability;
- Ground Support Braces – 2 x 6 PT to tie in vertical pieces
- Connectors – All connections will be made with galvanized bolts, washers and nuts from Simpson-Strong. The only exception is for the ground support braces which will be secured to the veritical and horizontal braces Simpson-Strong structural lag screws.
PARTS
| Qty | Item | Where to Buy |
| 1 | 4 x 6 x 12, Pressure Treated, SYP | Local Lumber Yard |
| 9 | 4 x 4 x 10, Pressure Treated, SYP | Local Lumber Yard |
| 2 | 2 x 6 x 8, Pressure Treated, SYP | Local Lumber Yard |
| 4 | 1/2″ galvanized carriage bolts x 6.5″ | Local Lumber Yard |
| 4 | 1/2″ galvanized carriage bolts x 10″ | Local Lumber Yard |
| 8 | 1/2″ galvanized carriage bolts x 12″ | Local Lumber Yard |
| 16 | 1/2″ galvanized washers | Local Lumber Yard |
| 16 | 1/2″ galvanized nuts | Local Lumber Yard |
| 1 box | Simpson 1/4″ x 3″ structural screws | Link |
| 1 | Swing-N-Slide Extra-Duty Swing Seat (green) | Link |
| 1 pair | Swing-N-Slide – Extra-Duty Swing Hangers Model #4888 | Link |
| 1 pair | Congo Play – Commercial Swing Hanger Galvanized Model # SH-04; | Link |
| 1 | Swing-N-Slide – Mega Rider | Link |
| 1 | Swing-N-Slide – Extra-Duty Swing Seat (green) | Link |
| 1 | Swing-N-Slide – Heavy-Duty Trapeze Swing Bar | Link |
*SYP = Southern Yellow Pine (commonly found at local large box retailers)
*PT = Pressure Treated
REQUIRED TOOLS
Other than few drill bits, rest of the tools are pretty standard. If you don’t own most of them, you will need to borrow them but as a DIY, it’s a good idea to start buying them couple at a time as you will need them to build things like decks and tree houses in the future.
- Hammer
- Cordless Drill
- Metal Hacksaw; to trim off the excess bolt
- Compound Miter Saw or Chop Saw (Like this one);
- Sawhorses (Like this Stanley Folding Sawhorse);
- Drill bit; I would not recommend using a long-shafted speedbor/spade bits because they are very difficult to drill a straight hole (I use this black oxide drill bit);
- Router; not a must but highly recommended to round out 4×4 supports to minimize splinters (I suggest this DeWalt DWP611PK 1.25 HP Max Torque Variable Speed Compact Router Combo Kit with LED);
- Router bit (Like this 1/2″ Radius Rounding Over Bit (Quadra-Cut));
- Spade/Boring Kit; to counter-sink bolt heads (Like this Milwaukee 6-Piece Universal Quik-Lok Stubby Flat Boring Bit Set);
When cutting 4x4s, I placed the miter saw on the ground which is really bad on my back. If you have a saw horse roller (like this Craftsman Roller Stand 11-1/2″ Roller Steel Support Stand), you can use your saw horses as a workbench.
NEXT STEPS
In How I Built My Own Backyard Swing Set – Part 2 post, I will show you how I built the swing set frame.
If you found this article to be useful, would you please do me a favor and sign up for my newsletter (form is found on the upper right screen)? I promise it will be spam free.
Thanks and good luck!

Cliff
Wednesday 14th of April 2021
I’m wondering if this is overbuilt. Has anyone use a 2x8 for the cross beam and 2x4 or 2x6 for the triangular base? 4x4 for the veritable supports seems like the right choice.
Cam
Sunday 13th of September 2020
Hi, this looks great! I'm planning to do something similar. But I'd like to add one more swing - a disk swing like this - https://www.amazon.ca/gp/product/B07RYV7HNK/ref=ppx_yo_dt_b_search_asin_title?ie=UTF8&psc=1 So, I was hoping I could just use a longer 15' main beam. Maybe thicker too, if I can find the lumber. But is there a calculation you used for tolerances and angles? Thanks!
Kirk Ohly
Wednesday 19th of August 2020
Kevin, Thank you so much for posting these plans, with all of the steps and the tips. I was able to build mine over two weekends, and my kids have been using it daily over the summer. With the pandemic and needing to stay as close to home as possible, it has made a difference in their day to day happiness and allows them a chance to get out and get some exercise. Thank you again for your efforts and the attention to detail, super helpful! Kirk
Demetri
Monday 25th of May 2020
Do you have a link to your e-book? Our current playset was purchased by the prior home-owners and it is getting long in tooth. Given covid production delays, I want to remove the metal bracket and just go with wood. Two additional questions, how high is the 4x6 from the ground? I apologize if i missed this detail in your post. Lastly, did you let the wood dry out after you purchased? I've read pros/cons o doing this as the wood might warp during the drying. Any by drying i mean sit in my garage for a week. Bonus question, did you use an specific sealer or did you not bother given the wood was pressure treated? Thanks for the detailed instructions. Be well
kevin
Friday 29th of May 2020
Hi Demetri-
I will try to find that link for you... As far as your questions:
1) The set was originally designed for 5-7 year olds so I used 4 x 4 x 10ft long pieces for side support. With the angle, the mainbeam came to be about 7 1/2 ft from the ground (not too high, not too low)
2) My structure was VERY sturdy so absolutely no warp at all;
3. No sealer; looking back, I probably would have applied a nice coat of red cedar like sealer though..
I will be in touch soon!
Dan
Wednesday 29th of April 2020
Do you recall how many hrs to fabricate and setup?
kevin
Monday 18th of May 2020
Hi Dan-
With all parts on site and prepped, it took me about 8 hours to assemble (by myself).
If you have friends help out, it will obviously go much faster.
Send me some pix once you are done building!
Kevin