

My Porter Cable Pancake Air Compressor has been a workhorse, flawlessly performing in cabinet trim work and even helping me build a deck frame. Sadly, it started to leak air but rather than visiting a service center/shop ($100 min charge), I decided to see if I can repair it myself.
If you arrived at this page via a search engine, This is a 2 part article. Part 1 shows you how to identify the replacement part. Part 2 shows you step-by-step instruction to replace the faulty compressor drain valve.
Introduction
I purchased my Porter Cable Pancake Air Compressor as a bundle set for $249. The set included 3 different nailing guns and I have been very happy with its performance.
Although my pancake air compressor is made by Porter Cable (model c2002, type 3*), the information presented here will most likely apply to other brands as well since most of compressors are made by a handful of manufacturers located in Mexico and China.
* Type 3 – Type 3 indicates a version number for a particular model. That means Model c2002, type 3 may have different components than Model c2002, type 4, etc.
Problem
The compressor’s inability to hold the pressure (PSI) started after I used it heavily to build my deck (read here). Because of tight spaces, I used a compressor-driven palm nailer (worked great) for a period of 2 days out in the sun and the compressor worked really hard.
Faint hissing sounds started soon after with air slowly leaking out. Initially, I thought maybe the drain valve was not closed completely, but within weeks, this hissing sound got louder and louder and my motor was having trouble keeping up with the air leak.
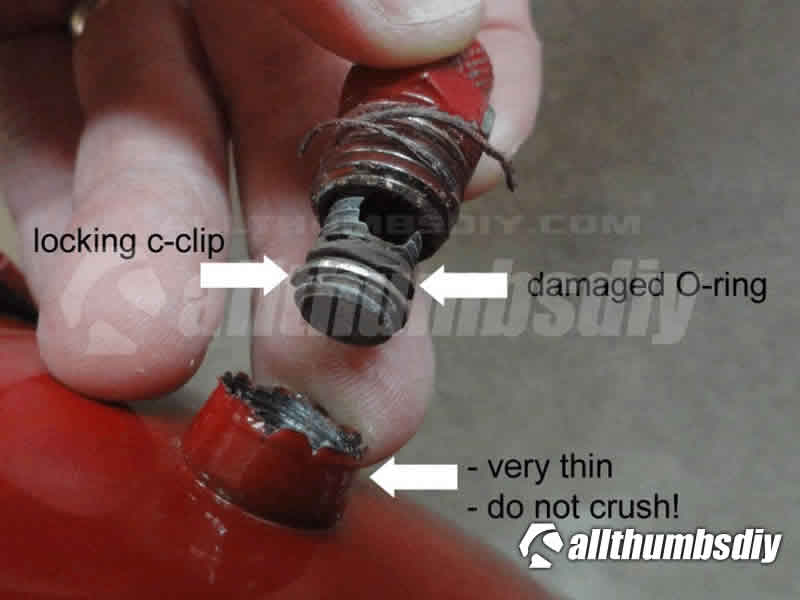
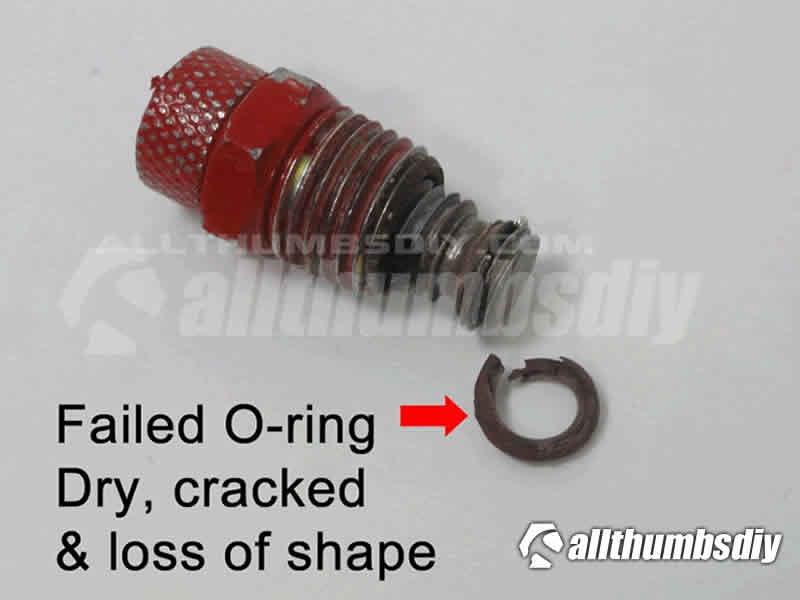
Although there are multiple possible failure points, I decided to check was the drain valve first because this drain valve uses a single compression O-ring to seal the air in. Based on my experience with various plumbing parts, I guesses that this O-ring failed due to heat when I built my deck. Besides, the drain valve is relatively easy and inexpensive to fix!
By the way, c-clip ring shown in the picture prevents the screw from being removed from the drain valve assembly.
Repair Options
To fix the air leak caused by a faulty drain valve, there are three choices:
- Option 1 – replace the O-ring (UPDATE: One reader suggested “…a packet of two O-rings…in Canada…O-rings they sell are 1/4 ID, 3/8 OD…They are known as o10 in the O ring industry specifications…; I wasn’t able to find the equivalent one in US, but found this – O-Ring Assortment Kit for Pneumatic Air Rubber Hydraulic Tools)
- Option 2 – replace it with an identical part (Porter-Cable C2002/C2005 Air Compressor OEM Replacement Drain Valve – Part N286039)
- Option 3 – replace it with a new ball valve type from another brand (Why? Read more about my Brand Decoding post). You can either buy:
- BOSTITCH Ball valve Compressor Ball Type Drain Valve or
- BOSTITCH Ball Type Drain Valve – Part BTFP72327
- Either drain valve will fit, though the BTFP valve will give you slightly less ground clearance.
Option 1 would be the easiest way to go, except the O-ring is next to impossible to find.
Option 2 would also be acceptable, but I as I said before, I am not a fan of compression style valves due to its O-ring design.
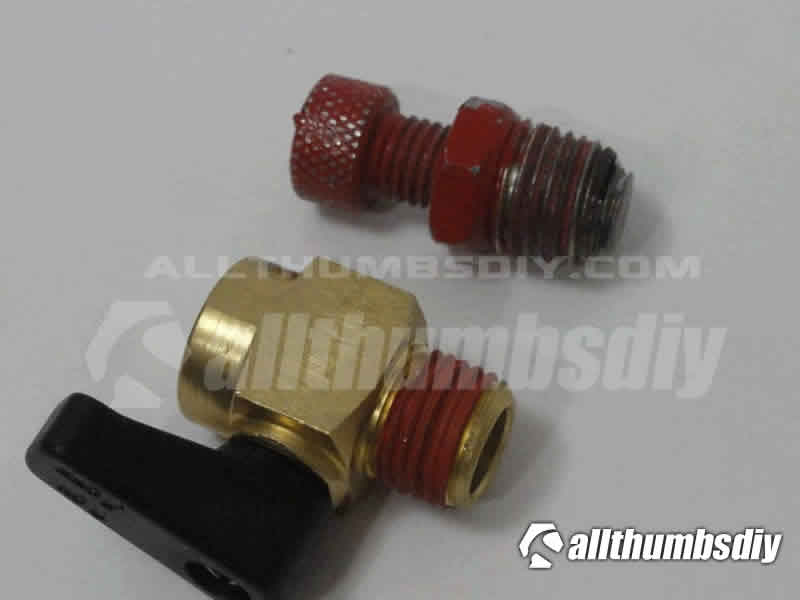
Which Ball-Valve Type Drain Valve?
In the end, I decided to go with a ball valve type drain valve from Bostitch for reliability because I know ball valves are very durable and are not susceptible to heat damage like O-rings.
It also allows me to quickly dump the air out (I personally chose the Bostitch unit over DeWalt/Porter Cable unit because it seems to be made of higher quality material).
If you want to read more detailed information, you may want to read Which Ball-Valve Type Drain Valves for Air Compressors Is The Best post.
Required Tools and Parts
You can complete this project if you have some basic tools but it would make your life a lot easier if you had the right tools and supplementary parts:
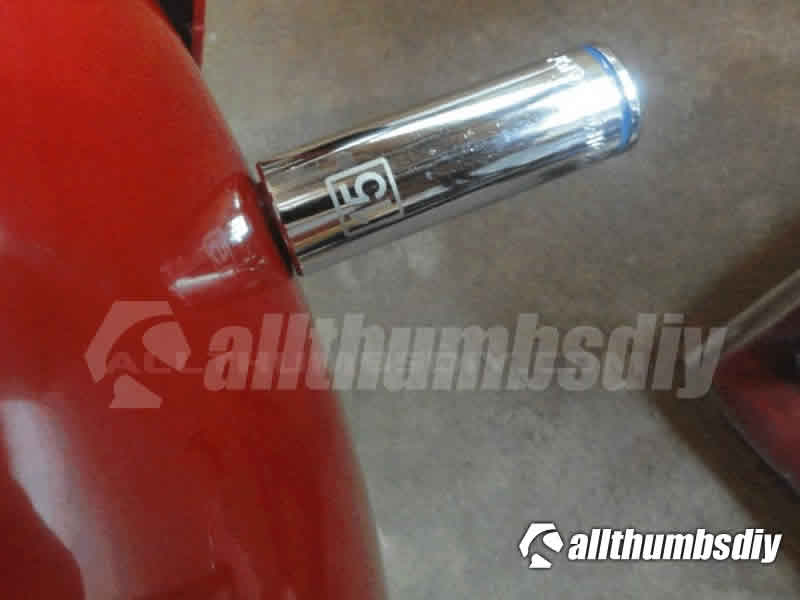
- Deep socket wrench
- Adjustable pliers
- Plumber’s silicone (if you are replacing the O-ring)
- Thread sealant tape (if you are installing a new drain valve)
- Old toothbrush
- Eye protection safety glasses
Wrench set with deep sockets
- Kobalt 11-Piece Metric 3/8″ Drive 12-Point Socket Set – I personally own this set but only because I paid $14 during a Black Friday sale couple of years ago
- DEWALT DWMT73812 20-piece Deep Socket Set – 3/8 in Drive Metric SAE – this is the set I would purchase if I didn’t already own the Kobalt set; comes with twenty sockets and an organizer
Adjustable Pliers
- I recommend a Channellock GS-3S Set – 3 Pieces and a Screwdriver or IRWIN Vise-Grip Pliers and Wrench 4-Piece Set
- If you want to read more about my selection, please read my post, Must-Have-Tool for your DIY Toolbox – Adjustable Pliers
Plumber’s Silicone
- Recommended if you replacing an O-ring to prevent drying out (cracking)
- Handy to have when working on other plumbing projects (i.e. replacing various rubber gaskets like a toilet tank gasket)
- I recommend either Oatey 40610 Hercules Plumber’s Silicone Grease or Danco Silicone Grease
Pipe Thread Sealant Tape
- Recommended if you are installing a new drain valve
- Both compression and ball valve replacement drain valves come with pre-applied thread sealant so you won’t have to apply any TEFLON thread tapes.
- If you have attempted to install a new valve but had to remove it several times, the built-in tape is probably no good so it would be best to replace add some new sealant tape
- You can purchase Oatey Gas-Line Thread Seal Tape, 1/2 inch x 260 in (approximately 21.7 feet)
- To learn how to properly install a thread sealant tape, pleas read my post, “When to use PTFE Teflon Yellow or White tapes or Pipe Dope“
Old Toothbrush
- Handy to have to clean the pipe thread without marring
Eye Protection – Safety Glasses
- I always wear eye protection, especially when working with compressed air
- I own a pair of DEWALT DPG55-11C Clear Anti-Fog Protective Safety Glasses with Dual-Injected Rubber Frame and Temples. It is far more comfortable and durable than the ones with hard plastic hinges
Conclusion
I placed an order through Amazon so once I get it, I will publish a follow up article.
I wrote a follow up article to show you how I replaced my drain valve – How to Repair a Leaky Pancake Air Compressor – Part 2.

Reference Links
- Porter Cable – Product Page (Model C2002, Type 3)
- Porter-Cable Technical Assistance – Toll Free 888-848-5175 <—- This toll free number is hard to find!
- Porter Cable Parts Diagram
- Porter Cable Instruction Manual
Josh
Sunday 5th of January 2020
Hi Kevin, thanks for the quality content. Did you ever figure out the other leak that developed around the plastic housing?
David L
Sunday 7th of January 2018
I bought the Bostitch ball valve, replaced the old screw valve, which had no O-ring left, and it works like a charm! The Bostitch valve is easier to use and higher quality! Thorough article, Thanks for the insight!
kevin
Monday 8th of January 2018
@ David-
awesome! just make sure to bleed out the moisture when you are done with your compressor.
kevin
Paul C.
Friday 23rd of September 2016
This is an excellent article. I just repaired my Pancacke Compressor by replacing the defective screw-type drain valve with the ball valve spec'd out in the article - easy as pie fix with the instructions given. The ball valve is a welcome upgrade from the problematic screw type valve! Thank You!!
kevin
Friday 23rd of September 2016
Thanks Paul for your kind feedback.
Mine actually developed another leak, this time around the plastic shroud housing so I will need to write up another article about it.
Check back soon!
kev
dennis
Thursday 28th of April 2016
have a porter cable pancake compressor 150 psi ,how do you remove the console cover ?
kevin
Saturday 28th of May 2016
@ dennis-
can't tell you because I haven't done it yet. but as it turns out, i have another leak somewhere inside so i will post a new article on that. stay tuned.
Adriana
Wednesday 6th of January 2016
I cannot seem to remove the drain valve from the threaded female port. I took half off but part that screws in port is stuck real good. Any tips?.
kevin
Monday 25th of January 2016
@Adriana-
If you are able to remove the screw half-way, I suggest squirting in something like WD-40 and work the screw back and forth. If the thread (either on the screw or the tank) is damaged, I think your only option is to cut it off and tap or weld a new nut. With a new compressor costing around $90 bucks, it might not be worth it.
Good luck!