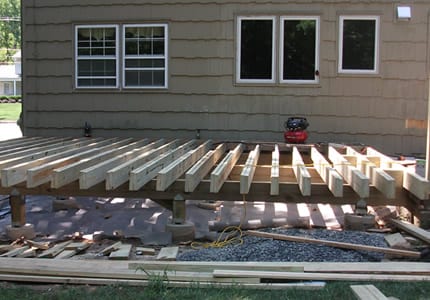
How to Build a Free Standing Deck on the Cheap is a multi-part series article, broken into Part 1, Part 2 and Part 3 (coming soon)
ABSTRACT
With 2 young children with their hyperactivity, we needed a safe, play-pen like area for them to play. With our existing deck being somewhat small with built in benches without any deck rails, I thought it was good time to add a new deck.
INTRODUCTION
Before I can get started with my deck, I needed to get some other projects out of the way like replacing my basement windows as well as replacing my rotted rim joist and sills because a new deck would prevent me from doing those projects later.
Obviously your situation will be different, but my advice would be to identify and resolve any potential issues or projects before installing a new deck, even if that means the deck will be delayed.
As with any large DIY projects, building a deck involves macro and micro project tasks. Here is my rough project plan/tasks:
- Research – framing, attached vs. free-standing, decking, , etc.
- Design – framing specs, cantilever specs, etc.
- Obtain zoning and building permits
- Purchase Materials
- Work on footings + obtain inspection approval
- Work on framing + obtain inspection approval
- Work on decking, rail guards and final trims + obtain inspection approval
RESEARCH
My existing deck was built sometime in the late 90s with built-in benches that were failing.
However, the overall decking surface was in decent condition so I decided to keep them in place. That meant I had to build my deck with pressure-treated decking lumber to match the old deck.
To further maintain the uniform look (and to keep my toddlers corralled in once place), I decided to extend the guard rails to the old deck as well.
My decision to go with a freestanding deck design (over ledger attached design was) was pretty simple by the sole fact that I was still ANGRY about having to replace my rotted rim joist and sill plates due to improper (or non-existent) deck flashing. As a freestanding deck, I would never have to worry about flashing/counter-flashing/water penetrations, though admittedly, I had to spend extra $$$ to make it more rigid.
My overall budget for the deck was approximately $2,800 building it myself, which was lot less than most quotes I got from local contractors that were in excess of $15,000.
I figured going full tilt during weekend days for 4 weeks straight would be enough to complete the project (LOL, I was way off the mark).
I will post an update on this project soon but in the meantime, you may want to consider picking up a copy of Building a Deck: Expert Advice from Start to Finish (Taunton’s Build Like a Pro)
Although this book was originally published way back in 2002, it still contains tons of valuable tips and tricks that I used to get my deck built.
However, one thing to keep in mind is that the building code has changed since 2002 so you need to double check any information you plan on using from the book with your township’s building inspector. For example, some of the information that I deem to be inaccurate are:
- Page 54-55 – the author used lag bolts to secure a deck ledger to the house. This practice is no longer acceptable. In my township, I had to use bolts and nuts to secure the ledger to my rim joist
- Page 75 – the author showed three ways of bolting beams to posts. The third method where beams are side straddled to a post via bolts is no longer acceptable. In my case, to allow maximum structural rigidity, I mounted my beams on top of my 6×6 and jointed them via metal bracket
- The author used 4×4 support posts sitting on top of what looks like an 8″ sono or concrete tubes. I am not sure if this is an acceptable practice or not but I decided to use 6×6 posts with 16″ sono tubes
- The author mounted guard rail posts and in some examples showed balusters mounted on the outside. For maximum protection, I mounted my guard post rail inside the rim joist (without any notching) and surface mounted balusters on the inside.
Check out your local library first to see if you can borrow a copy. If not, buy yourself a copy from Amazon. I guarantee those 14 bucks will be money well spent (you know I am a frugal person by now, don’t you?).
RELATED ARTICLES
- How to Build a Free Standing Deck on the Cheap – Part 1
- How to Build a Free Standing Deck on the Cheap – Part 2 (coming soon)
- How to Build a Free Standing Deck on the Cheap – Part 3 (coming soon)
- How to Build a Free Standing Deck on the Cheap – Part 4 (coming soon)
REFERENCES
- USP connectors (http://www.uspconnectors.com/pdf-full-line-2010/155-157.pdf)
- The Voice of the Deck & Railing Industry (http://members.nadra.org/photo_gallery/displayimage.php?album=32&pos=4)
- American Wood Council – Prescriptive Residential Wood Deck Construction Guide (http://www.awc.org/publications/DCA/DCA6/DCA6-09.pdf)
- Attaching rim joist to a free standing deck (http://www.diychatroom.com/f19/freestanding-deck-rim-joist-connection-111618/)
- Deck Failures – http://woodworking.about.com/gi/o.htm?zi=1/XJ&zTi=1&sdn=woodworking&cdn=hobbies&tm=109&f=10&su=p504.6.342.ip_&tt=11&bt=1&bts=1&zu=http%3A//www.deckfailure.com/


Donna
Monday 26th of May 2014
Hi Kevin. I'm just wondering how the deck project is coming? I don't see Part 2 or 3. I don't know when you began, as you didn't post a year on your date. Today is 5-26-14 ~ so it's been at least 10 months. Looking forward to hearing about the rest of your adventure.
kevin
Thursday 29th of May 2014
@Donna-
Hi Donna. Yes, a draft of the deck article will be published within next 2 weeks. Thanks!
HighHopes
Saturday 10th of August 2013
one of the best ways to building on the cheap is to really know your span tables (or have software) so you can optimize your wood sizing vs. bearing lenths & loads (both dead&live loads), number/location of posts.