
NOTE: This is an old article. An updated post can be found here – Complete Guide to Making Your Own Window Sill

How to Make Your Own Window Sill is a multi-part series article ( Part 1, Part 2, Part 3).
WOOD SELECTION & CUTTING
You can use any type of wood, as long as they are kiln dried with the exception of pressure treated (PT) wood. Although PT lumber provides superior resistance to rot, it also gives off volatile organic compound (VOC) gas. Couple that with part of the sill being inside, I do not want to take a chance that my family will breath in VOC gas . The wood must also be absolutely dry so that a primer + paint will properly adhere to the sill’s surface. Although bit pricey, I chose cedar (fig.7.1) because of its natural resistance to rot (and they smell good!)
Step 1 – Because the width of a sill is rather narrow while working with a circular saw (not a problem if you are using a table saw), I purchased a 6 ft long piece so that I can secure the piece with deckmate screws to my workbench. I planned to cut off the ends with screw holes at the end of the project.


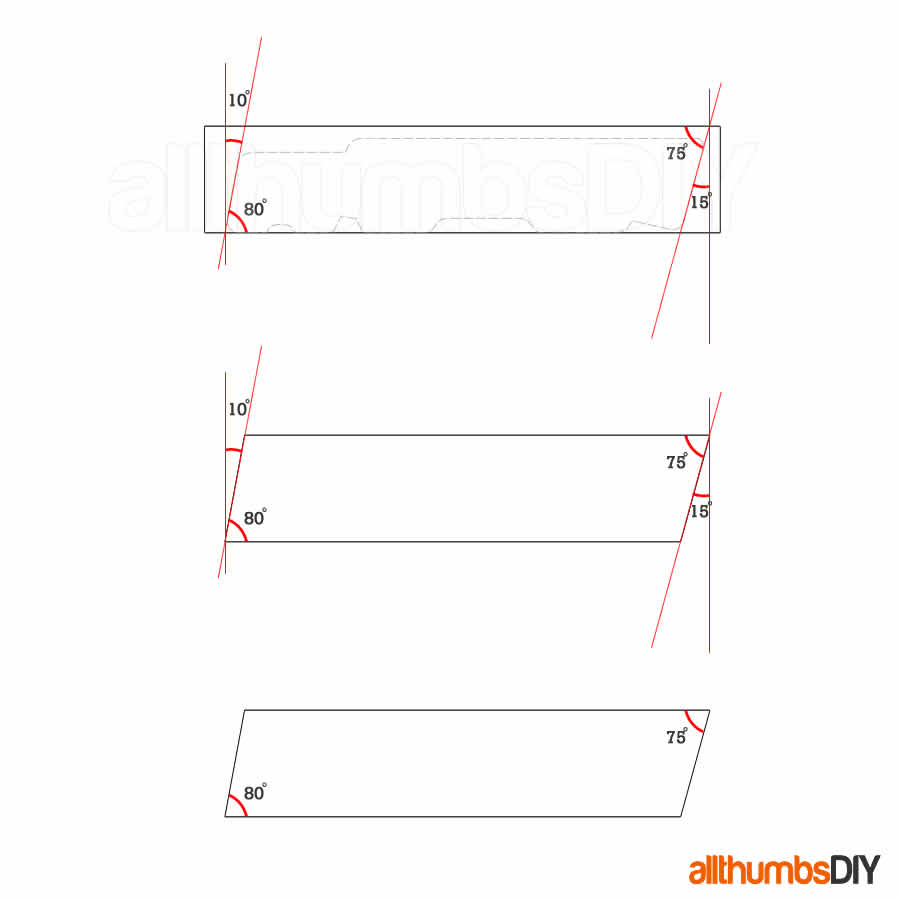
Step 2 – To cut the nose angle, I adjusted the angle on my circular saw that will yield a 10 degree angle (fig.7.4).
Step 3 – To cut the rear angle, I adjusted the angle on my circular saw that will yield a 15 degree angle (fig.7.4).
Step 4 – A true dimension for a 2×6 lumber is 1.5″ x 5.5″. The height of the sample sill was 1″ 5/16″ (fig.7.5) so you can either remove 3/16″ via wood planer or leave it as is. Since I did not own a planer and the 3/16″ height is relatively negligible, I chose not to remove it.


Step 5 – The bottom profile on my sample sill had 4 grooves or channels to make prevent water from wicking up (fig.7.2). To replicate all of these profiles, you would need a router with various router bits. Since I only had a “dovetail” router bit, I chose to carve out this profile near the nose and not bother with the other ones.
Step 6 – To prevent water from wicking up from the top side of sill, my sample sill had a 3/4″ wide by 1/4″ deep “indentation” (fig.7.5). To replicate this indentation, I simply set my circular saw to 1/4″ depth and scored the length. One tip was to clamp down a metal ruler to use it as a router guide. I then used a chisel to knock out the high points and used a sander to smooth it out.
By the way, if you print these scaled drawings, you need to make sure that they are printed in actual size. If you don’t know how to setup your printer to do that, read this article
Torb
Tuesday 18th of October 2022
Thank you very much for your very detailed, but easily understood, how to article, this has given me the confidence to have a go myself.
Questions: 1) If I don't have a storm window then I assume that I don't need to profile the upside of the sill surface right? Ie; the top of the sill will be one level. 2) What is missing in your otherwise excellent cross sections is where we fasten the window sill to the framing. Could you please describe this?
Thanks
kevin
Thursday 27th of October 2022
Hi Torb,
1. Yes, although a 2-level profile make it look nicer and will give you extra protection against capillary action 2. Place shims at left and right (about 2" away from the wall) and use some Deckmate screws to secure it. You probably will want to drill a countersink hole to hide the screw head.
Good luck!
Dave
Wednesday 13th of December 2017
Maybe I missed something, but the difference between 15/16" and 1.5" isn't 3/16" it's 9/16".
That's a bit more than negligible, IMO.
kevin
Monday 9th of April 2018
@dave
not 15/16".. it should read 1" 5/16"
Jim
Thursday 28th of August 2014
"How to make a window sill" article was very helpful but, where can I purchase an already made replacement sill?? Thanks for any help you can provide.
Jim
kevin
Thursday 28th of August 2014
@Jim-
Thanks for your kind words. If you live in Central NJ, I would recommend Somerville Lumber in Somerville, NJ.
Otherwise, you would need to call around the local lumber yard as Lowes and/or Home Depot probably will not have the one that matches your existing sill.
Have you thought about making your own?
Kevin
Window Sill, Make Your Own Window Sill, Kerf, Inclinometer, Replacement Windows, Replacement Sill, Replace Window Sills
Monday 9th of July 2012
[...] How to Make Your Own Window Sill is a multi-part series article to show you how I got the project done ( Part 1, Part 2, Part 3). [...]
How To Make Your Own Window Sill – Part 2
Wednesday 22nd of February 2012
[...] How To Make Your Own Sill – Part 3 Be Sociable, Share! TweetRelated posts: [...]