
Schwinn Ascension Mountain bikes were sold in large retailers like Walmart and Target on or about 2012.
I created this post because the going rate to change brake pads by local bike shops was about $150 and although I want to support local businesses, I found some to be just downright untrustworthy so I decided to do it myself (pre-pandamic going rate is around $40 per wheel to change the brake pads)
I will show you exactly where and which brake parts to buy and outline a detailed step-by-step instructions on replacing the worn out brake pads.
If you have the parts and tools I describe on hand, it should take no longer than 20 minutes per wheel.
As always, you are ultimately responsible for the work mentioned here. If you are ever in doubt, see a qualified bicycle mechanic.
Intro
Unlike traditional mountain bikes at the time of purchase, Schwinn Ascension mountain bikes came with a disc braking system.
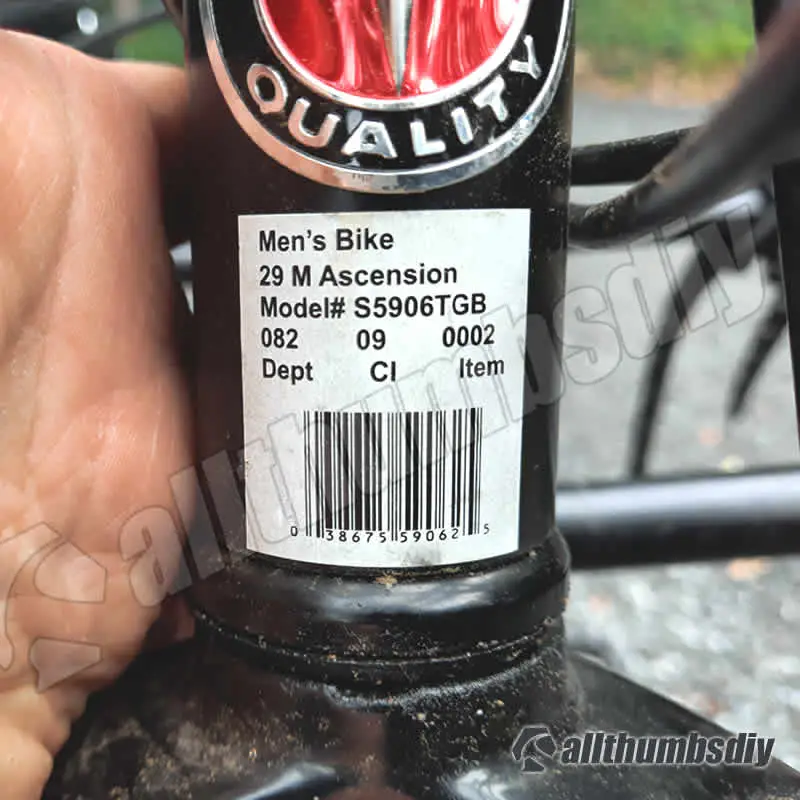
Methods outlined in this post is specifically for the Schwinn Ascension -29 Model # S5906TGB using the HL-160 brake setup but other bikes (i.e. Schwinn models, Trek 3500 Disc, X-Caliber and other Trek models) uses similar systems with identical brake pads so you can generally follow the same instructions.
You can find your Schwinn model information at two locations: label just above the front wheel fork or the label on the frame next to the derailleur (near the paddles)
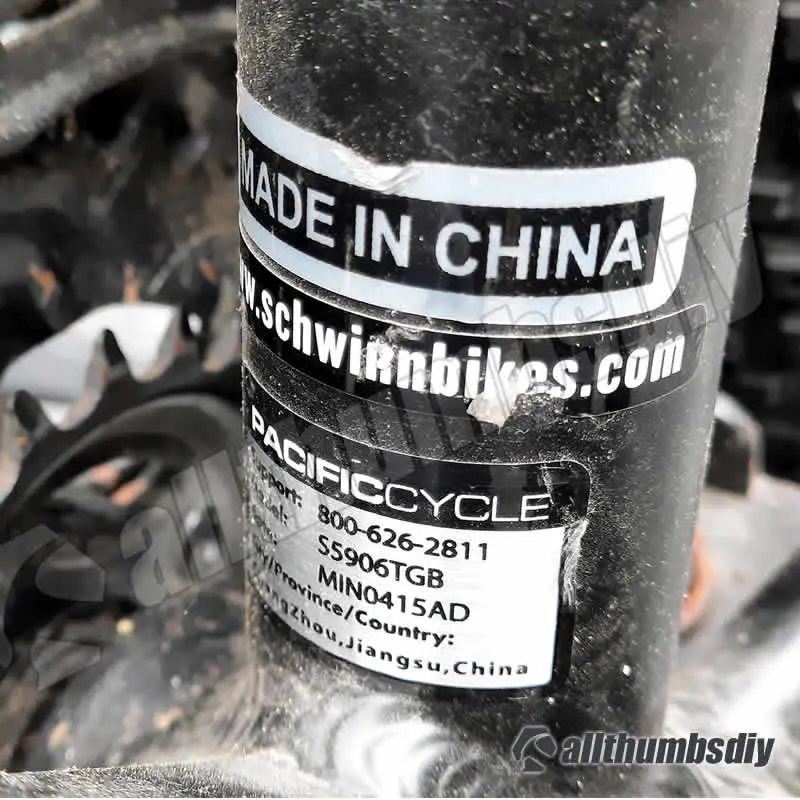
Please note that Schwinn bikes are made by its parent company, Pacific Cycle. Pacific Cycle also owns Mongoose, Kid Trax and inStep bike brands so certain parts can be used across these brands as well.
Bicycle Braking 101
Before proceeding with the repair, it is important to understand what the system is and why it is setup to operate in a particular way. If you are in a hurry and just want to get it done, you can just skip to down the PARTS AND MATERIALS
Brake System Types
There are two primary braking systems used by bicyclists:
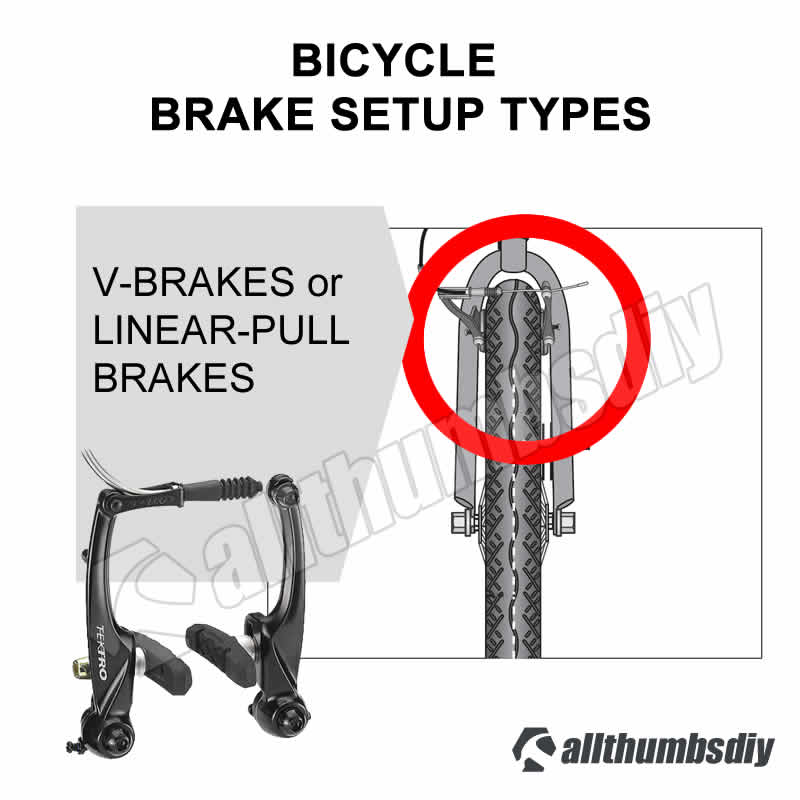
- Rim Braking – brake pads (usually made from rubber) clamp down on the metal rim to slow down a bike; caliper, cantilever and V-brakes are all classified as rim brakes; they are simple to operate and maintain but note that all rim brakes with rubber pads have a tendency to gather dust, sand or mud in the softer rubber pads; this causes delayed braking in wet or muddy conditions; in high speed slow down situations, rims will heat up which will negatively impact the life of the tires
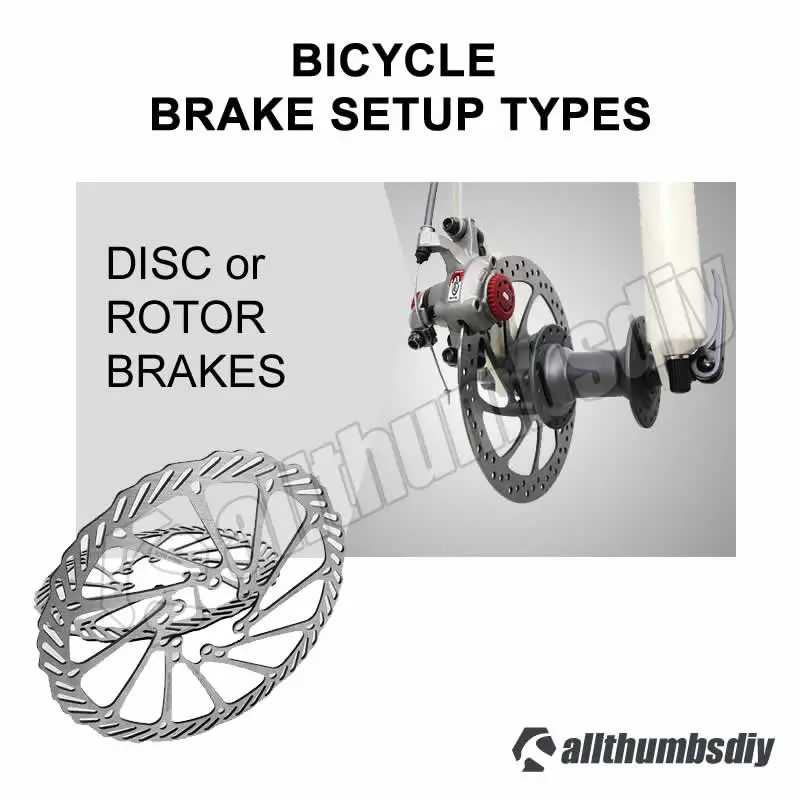
- Rotor (disc) Braking – brake pads (usually made from a composite, sintered metallic materials) attached to “calipers” clamp down on the hub-fixed disc rotor; unlike rim brakes, rotor brake pads will quickly remove water and mud off the rotor and maintain great strength and braking pressure; due to disc design, it can also cool a lot faster than rim brakes so it is relatively immune to heat from friction caused by use.
Brake Mechanism Types
There are many different brake designs but the most common ones are:
- Caliper (a.k.a. “side-pull”) – uses a rim brake setup; caliper / side-pull brakes operate via mechanical pull; this is standard on almost all road bikes and most youth bikes; please note that the term “caliper” is used to describe a brake component of a rotor or disc setup;

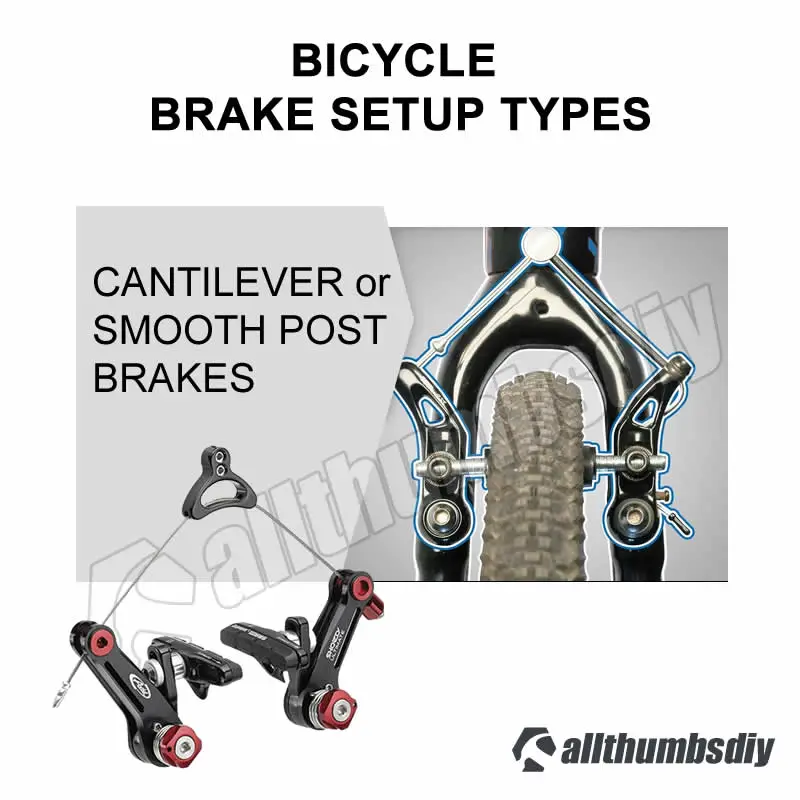
- Cantilever (a.k.a. “smooth post brakes”)– uses a rim brake setup; this setup is known for applying even pressure on the rim, though it requires more maintenance;
- V-brakes (a.k.a. “linear or direct pull”) – uses a rim brake setup; linear-pull or direct-pull brake terminologies were coined by Shimano, one of the largest maker of bike gears and brakes;
- Disc brakes (a.k.a. rotor brake) – operated by either a mechanical cable-pull or hydraulic “cable”; “calipers apply pressure to brake pads which in turn clamp down on discs / rotors;
Schwinn Braking Setup
Schwinn Ascension Mountain bike Model #S5906TGB comes with an un-branded disc brake setup that identical to ZOOM HL-160 (calipers are marked “F-160” for front and “R-160” for rear which have identical specs as branded ZOOM’s HL-160).
It it a single piston mechanical braking system which means when you squeeze the braking handle, the cable pushes one braking pad against the rotor which in turn bends slightly to make contact with the second braking pad on the opposite side.
| SINGLE VS DUAL PISTONS |
|---|
| You can replace the existing setup with a dual piston setup where the rotor remains stationary while brake pads from both side clamps down on the rotor for superior braking performance (I will have a separate article when I tackle this project). |
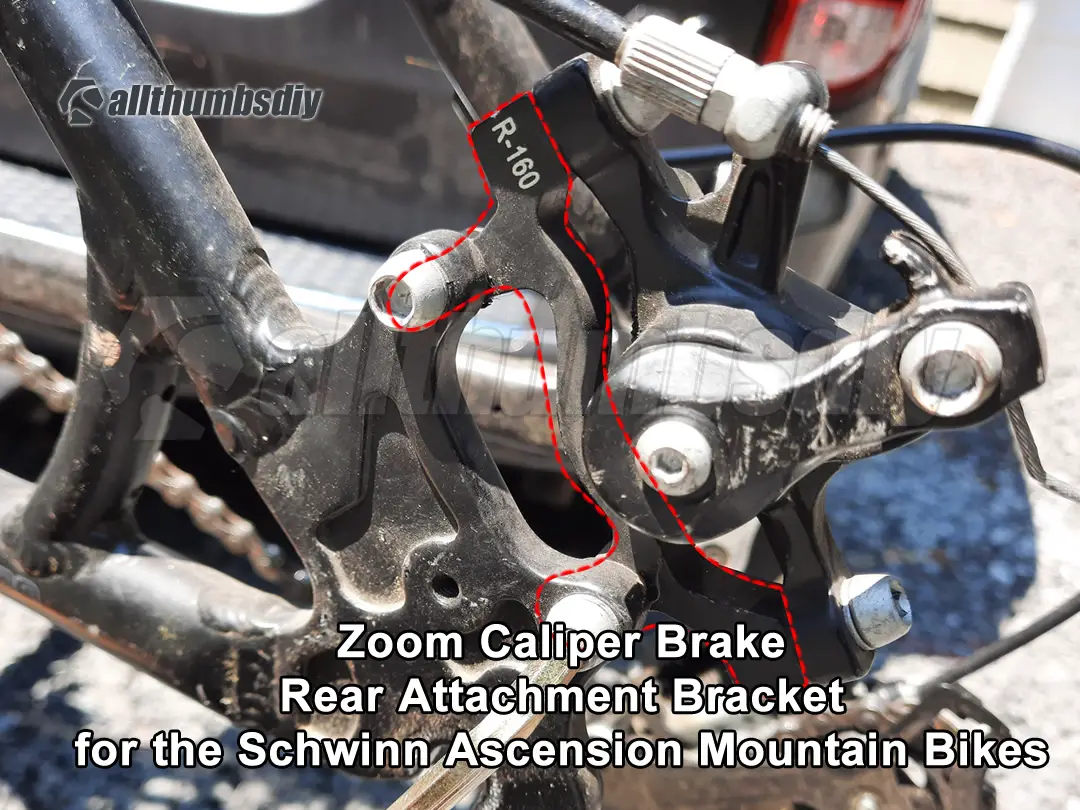
The caliper size is the same for front and rear but the attachment bracket (highlighted in the red dotted line below) are in different shapes.
Note that the front attachment bracket has a flat profile whereas the rear attachment bracket is much taller.

Brake Pad Types
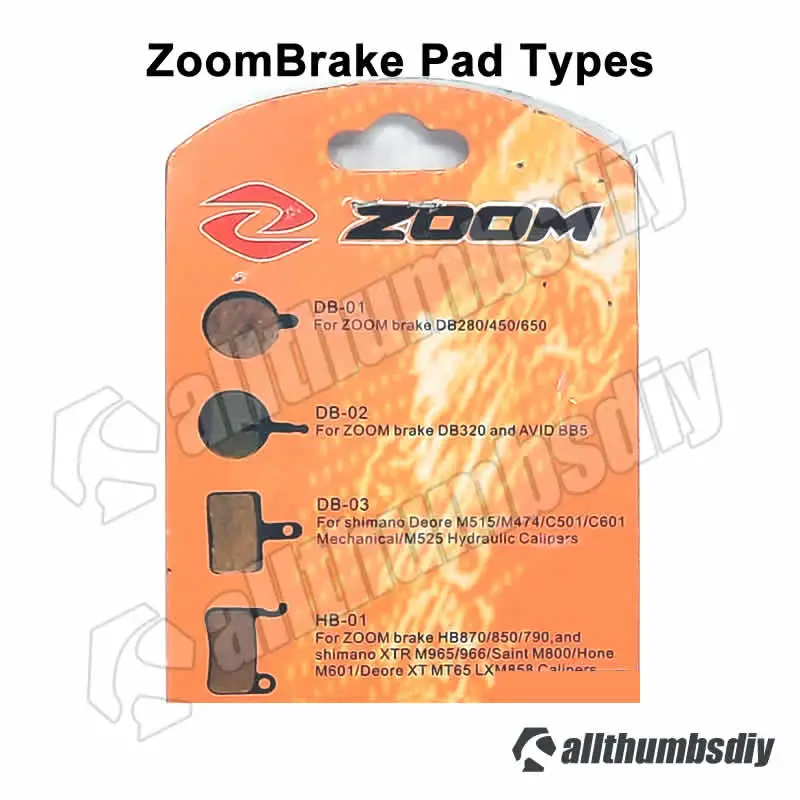
ZOOM disc brakes are broken into 4 categories:
- DB-01(round shape with a short stub) – For ZOOM brakes for DB280, DB350, DB450 and DB550
- DB-02 (round shape with a long stub) – For ZOOM brakes for DB320 and AVID BB5
- DB-03 (rectangular shape with a long stub in the middle) – For Shimano Deore M515, M474, C501, C601, Mechanical/M525 Hydraulic Calipers
- HB-01 (curved rectangular shape with hook stub and secondary stub with a hole) – For ZOOM brake HB870, HB850, HB790, Shimano XTR M965, M966, Saint M800, Hone M601, Deore XT MT65 LXM858 Calipers
ZOOM Brake Models
The “160” designation found in Schwinn Ascension mountain bikes is short for ZOOM HL-160 but ZOOM no longer makes this particular model. Fortunately, the pad dimension is universal you can safely use ZOOM pads marked for DB-280, DB450, DB-550 and DB-650 series as well as third party brake pads.
- DB-280 brake pads can handle high temperatures and also resists brake fade so the braking power lasts longer; it is designed more for high speed bikes and infrequent mountain/trail riding
- DB-550 brake pads are suited for extreme conditions like mud, sand and water; it is designed for mountain / trail riding
Brake Pad Materials
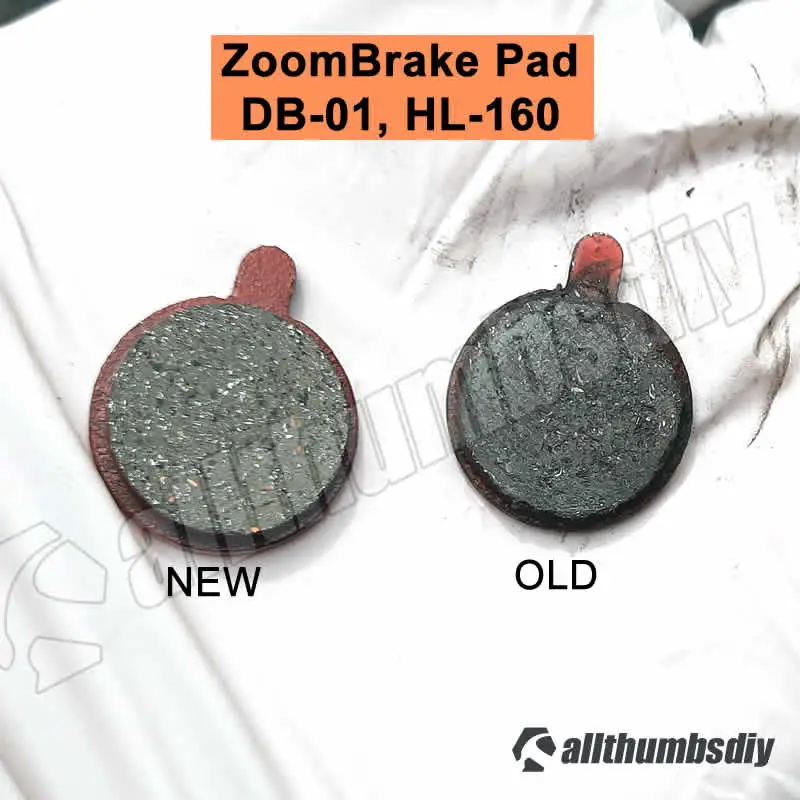
High quality DB01 and DB02 round braking pads are made from sintered metallic pads. Sintered brake pads offer higher friction braking performance than semi-metallic or resin pads, which results in superior stopping power in all weather conditions
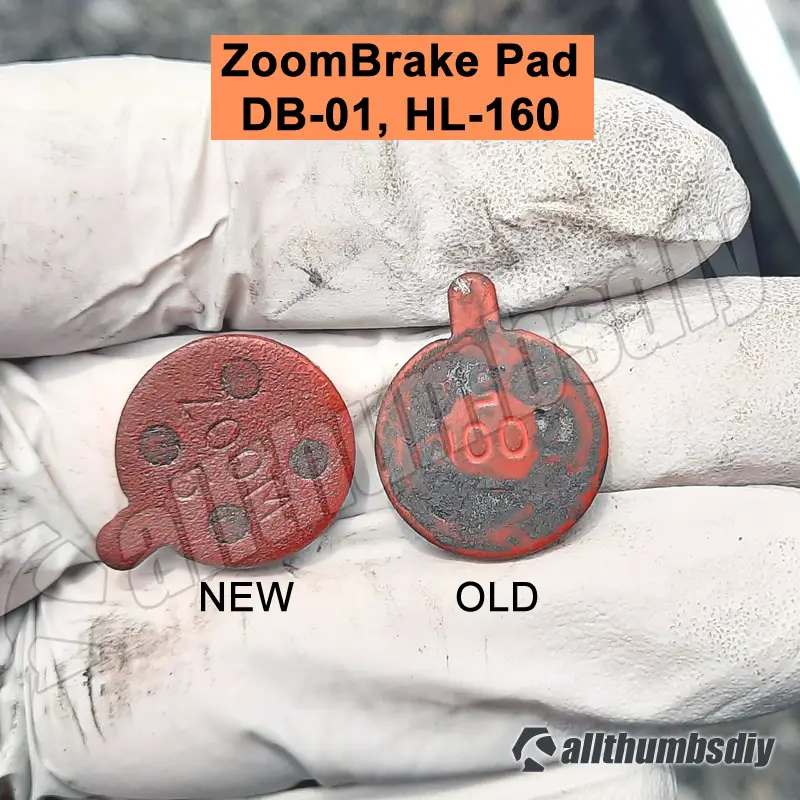
Brake pads are the same for both the front and rear brakes. The color is usually red (although it can be black) with a marking “ZOOM 5”
Parts and Materials
Unlike car brakes, the rear brake pads will wear out first on bicycles so if you have to choose between replacing the front or rear brakes, replace the rear brakes first. Better yet, do the right thing and replace both pads at the same time.
You also will need to apply Loctite on post screws when re-attaching calipers mounting brackets back to the bike frame.
Replacement Brake Pads
As stated previously, HL-160 is no longer manufactured so I will be using the pads designed for HL-280.
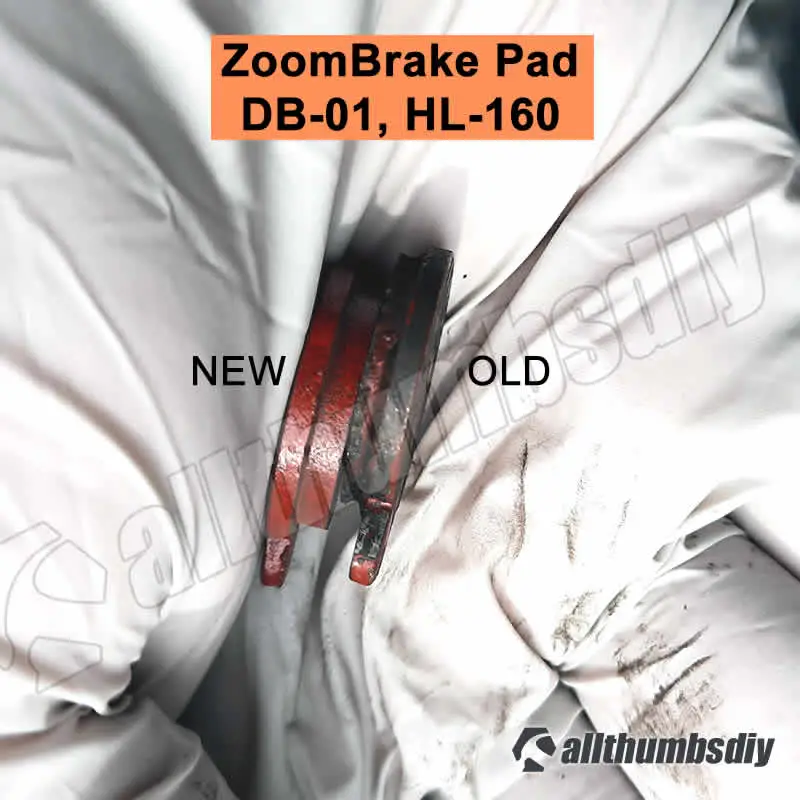
The diameter of a brake pad is 3/4″ with the “nipple” sticking out 3/16″. The design of this particular brake pad is universal so there are lots of third-party pads. Good ones fit well and pads wear at a constant rate. Bad ones have poor fitting and pad may wear our prematurely. You can choose ONE of the following (most come with two pads per package):
- ZOOM OEM Brake Pads (ebay) – Model # DB1, Part # W318499, UPC # 768682250921, HL-280 ($, least expensive)
- ZOOM OEM Brake Pads (Trek website) – Model # DB1, Part # W318499, UPC # 768682250921, HL-280 ($$$, most expensive)
- Dymoece non-OEM Brake Pads (Amazon) – compatible with ZOOM DB280, DB350, DB450 and DB350 ($$, average cost)
- Road Passion non-OEM Brake Pads (Amazon) – compatible with ZOOM DB280 DB350 DB450 DB550 DB650 ($$, average cost); also fits Alongha, SNG, Apse, Apollo, Shockwave, X-Rated ZSP04-02, Swagtron EB-7, Terratrike, Trek 3000 bikes
Other Items You Will Need
- Loctite (Amazon) – to prevent bolts from backing out (usually results from severe vibrating or slamming like when you are mountain biking)
- Wire end caps, also referred to as cable end crimps (Amazon) – end caps are used to prevent brake cables from coming apart (each cable consists of multiple thin wires twisted together); you most likely will accidentally pop off some of these while working on the brakes so you want to have some on hand
- Q-tips – to clean the magnetic surface
- Paperclip (medium size) – to air you in removing the old brake pad from the caliper
- Paper towels – to clean the magnetic surface
- Nitrile or latex gloves – I cook a lot so I don’t like to have oil residue embedded in my fingers
- WD40 – to loosen stuck bolts
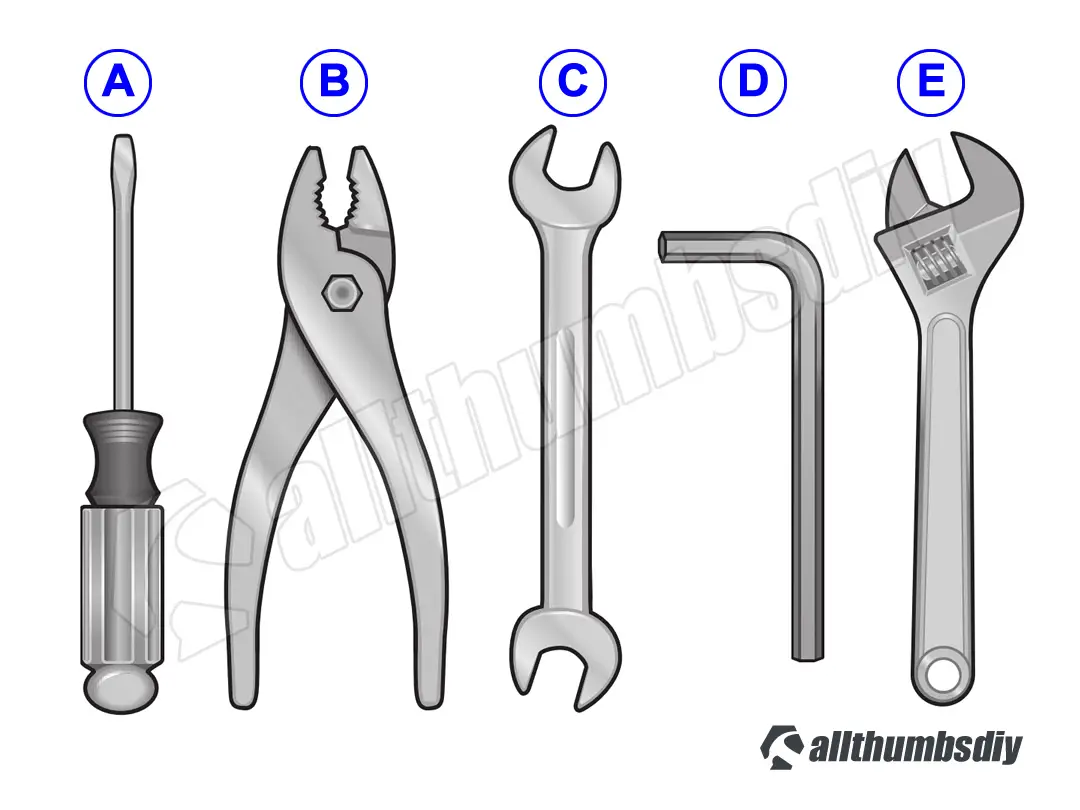
Tools
- Allen wrench (you will need either 1/4″, 5/16″ or 7/8″ or 2.5mm, 4mm, 5mm, 6mm and 8mm hex wrenches) – if you don’t own one, you should buy a set like this Tekton Hext 30 piece set (click here to check the latest price) as you will use this tool for other DIY projects. Whatever you decide to buy, it needs to be a hardened steel with some type of black oxide coating to prevent rust. Cheapo Allen wrenches come in soft brass type of metal which will snap off when you add stress to them
- Adjustable wrench (may need this to use as a “breaking bar”)
- Adjustable pliers
- Toothpick / small thin piece of metal – to aid in extracting old brake pads

Step-by-Step Instructions (Brake Pad Replacements)
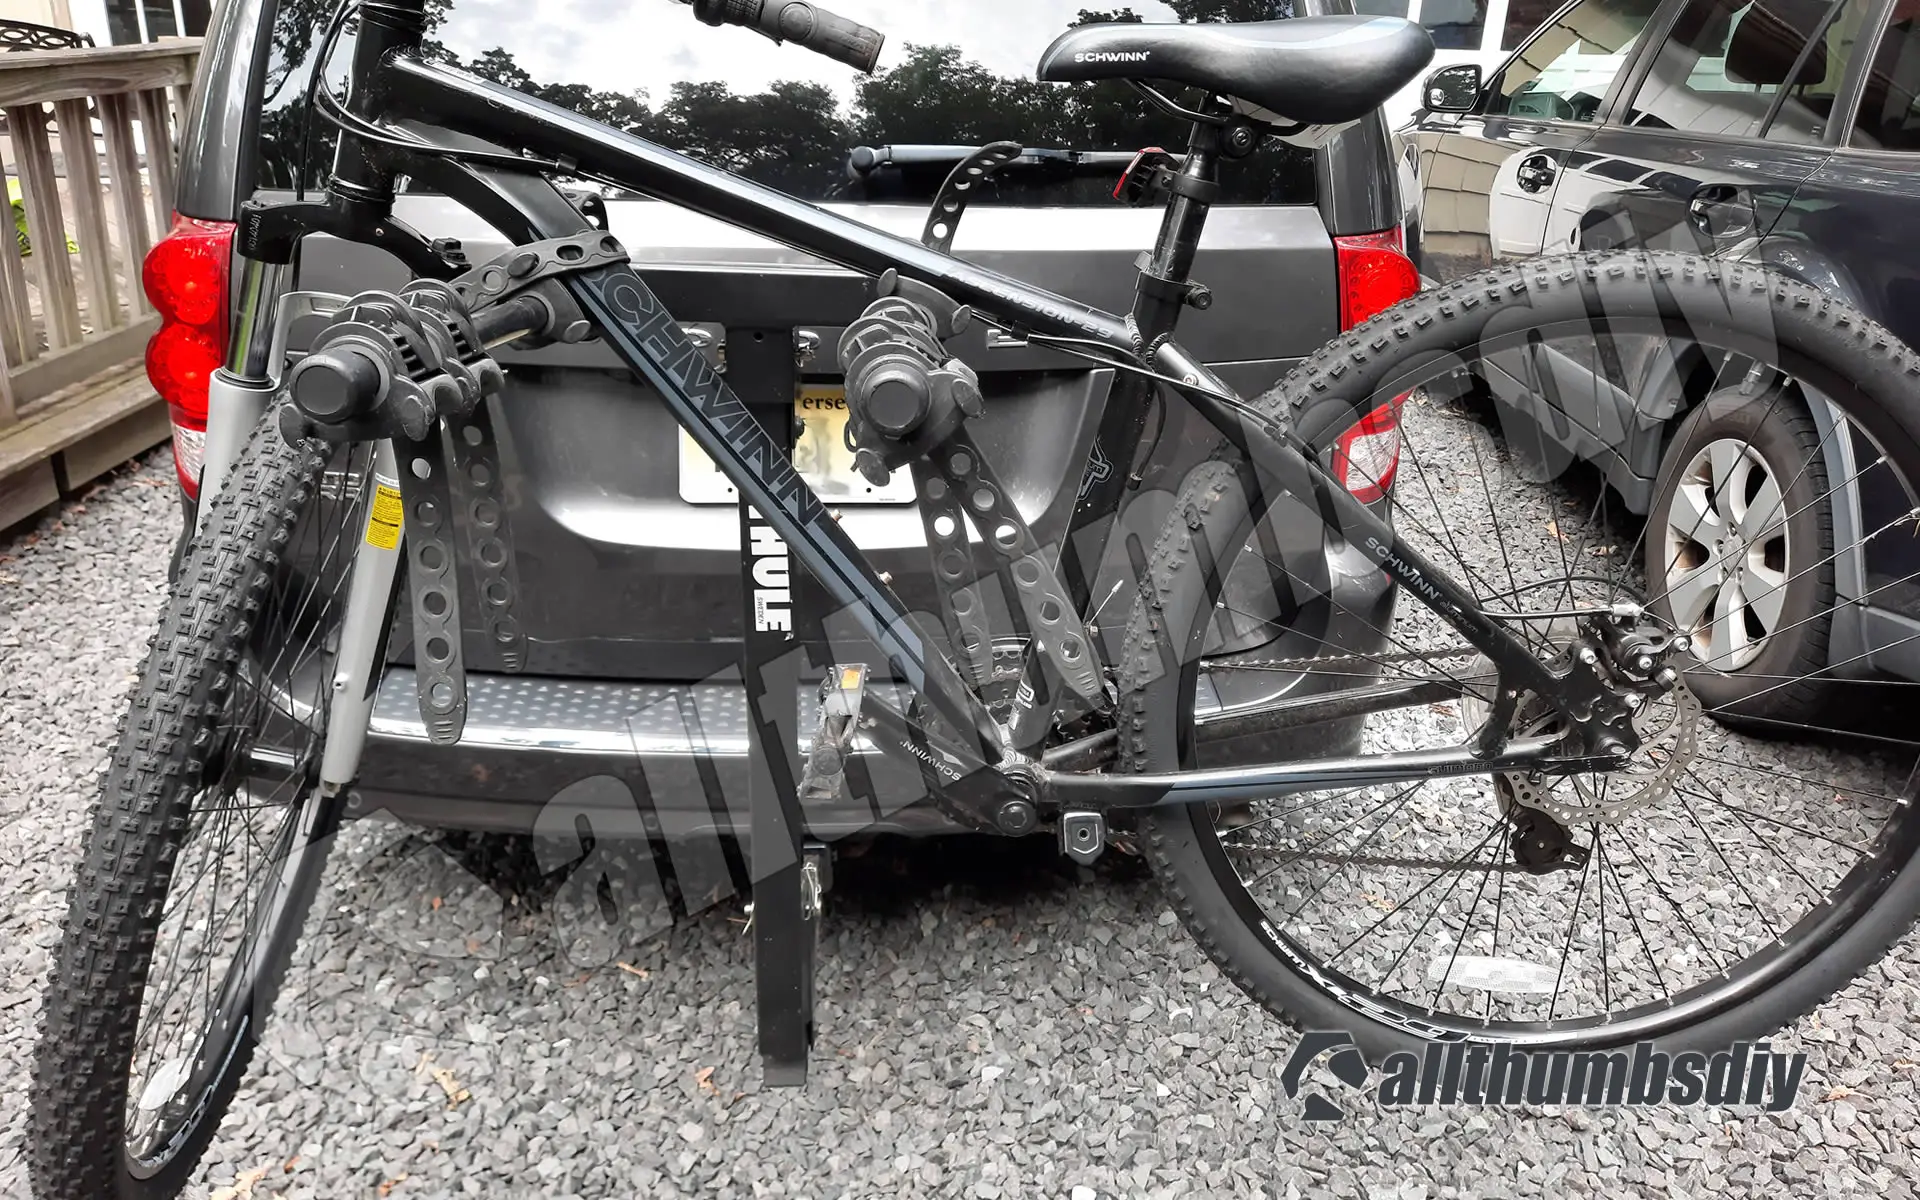
Step # 1 – in order to work on the rear brake assembly, you need to mount the bike before taking off the wheel. I chose to use my Thule bike carrier as a temporary work station

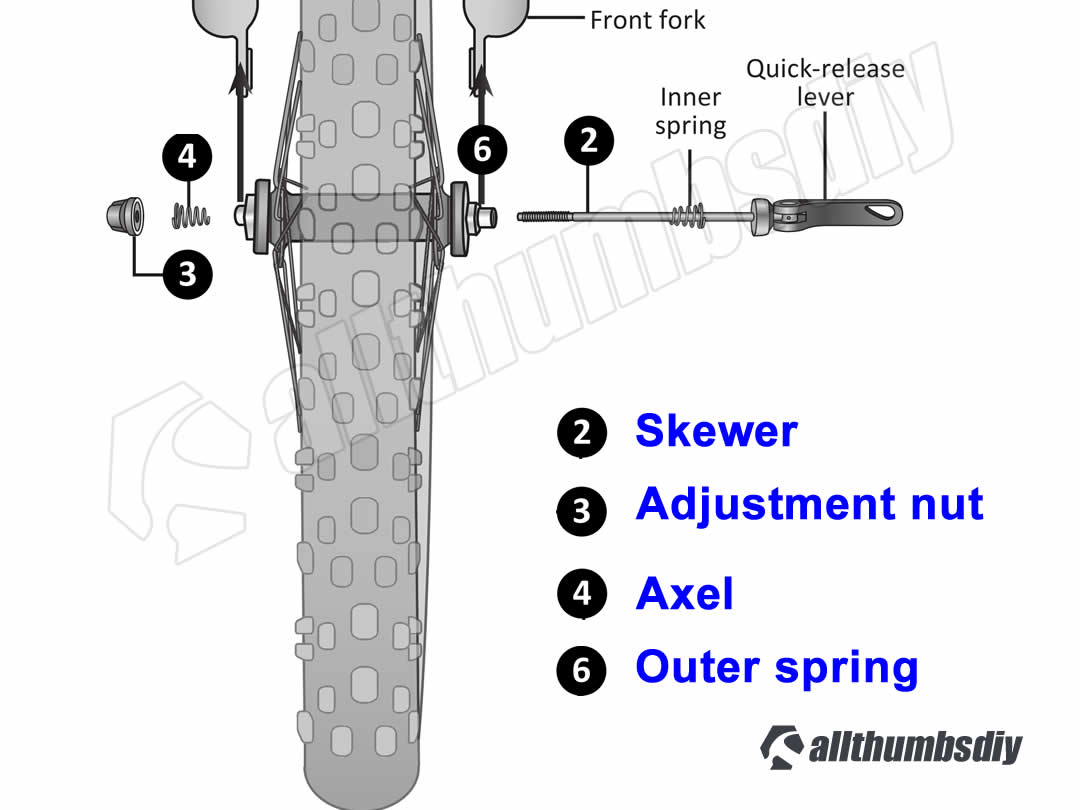
Step # 2 – To remove the wheel, simple lift up the quick release lever (into the open position) near the brake assembly to unlock the tire. You will need to hold the lever while turning the nut on the opposite side counter-clockwise to loosen the bolt. You do not have to pull out the skewer to remove the wheel. If the lever is too tight and you cannot pop it up, you will need to use your adjustable pliers to gently lift the lever. Please note that this quick release lever is made from aluminum so it is relatively soft metal and can snap off if you put too much pressure so take your time!
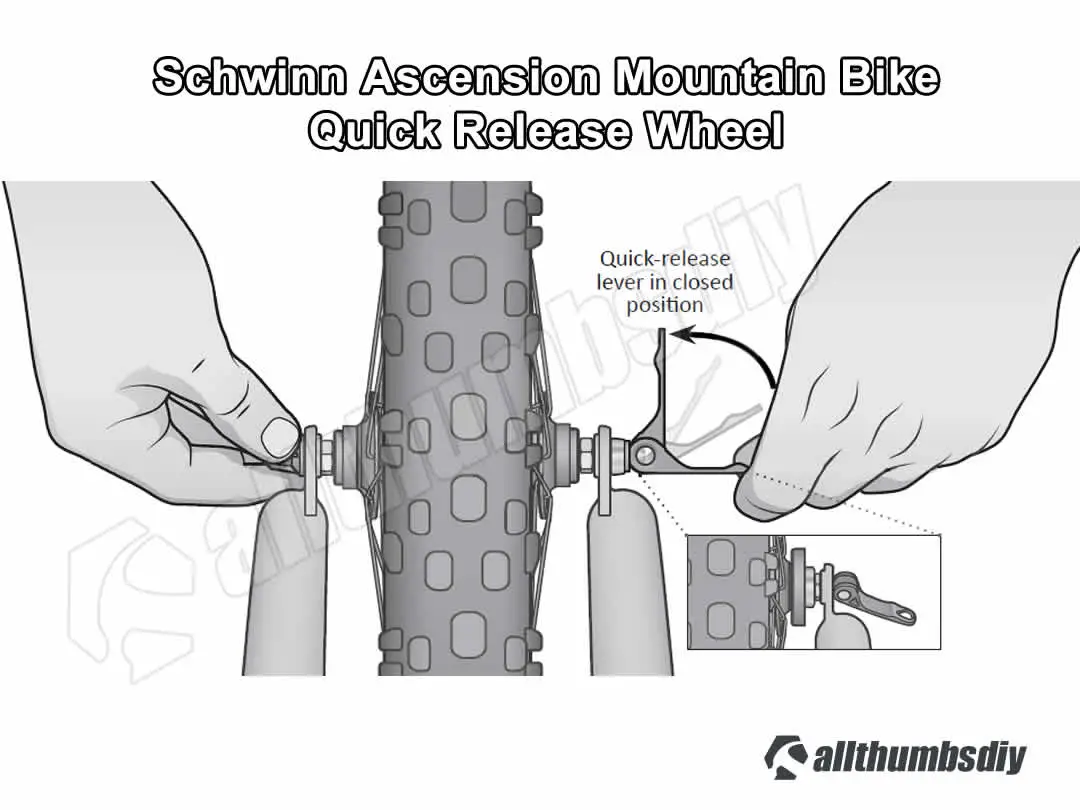
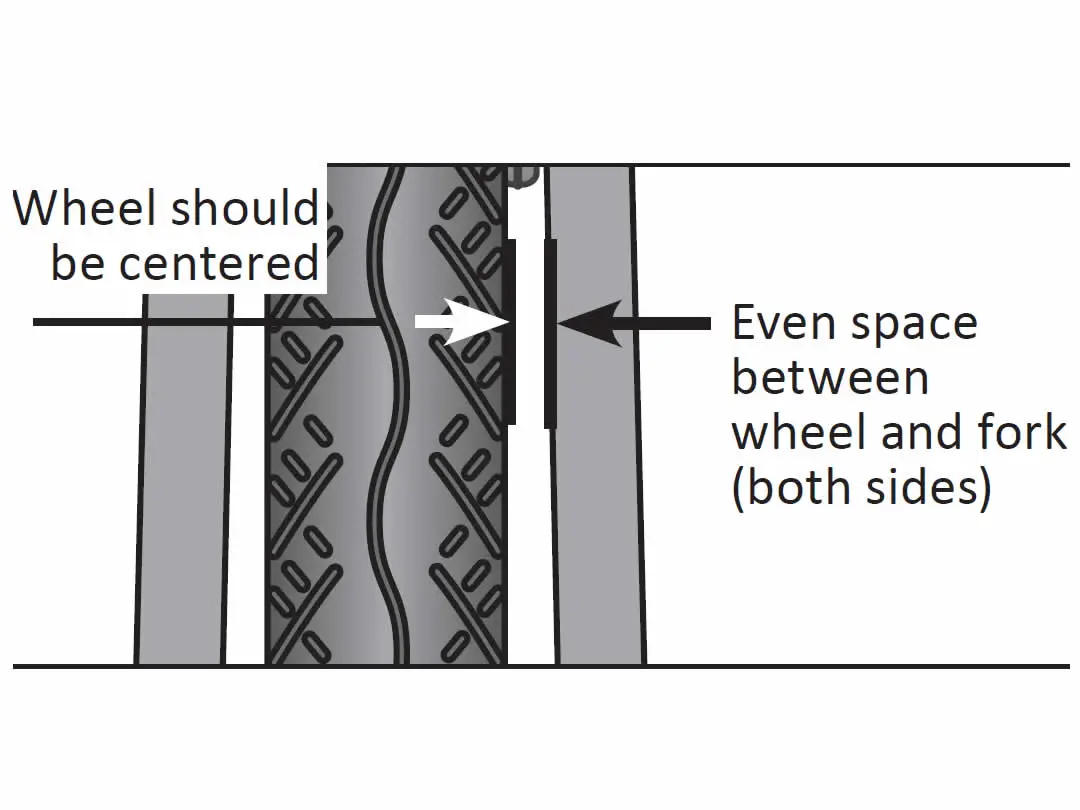
Step # 3 – Once the nut is loose, you can gently slide off the wheel/tire from the frame; carefully store it away from the work area. Just remember that when you re-install the wheel, it needs to be centered between the fork.
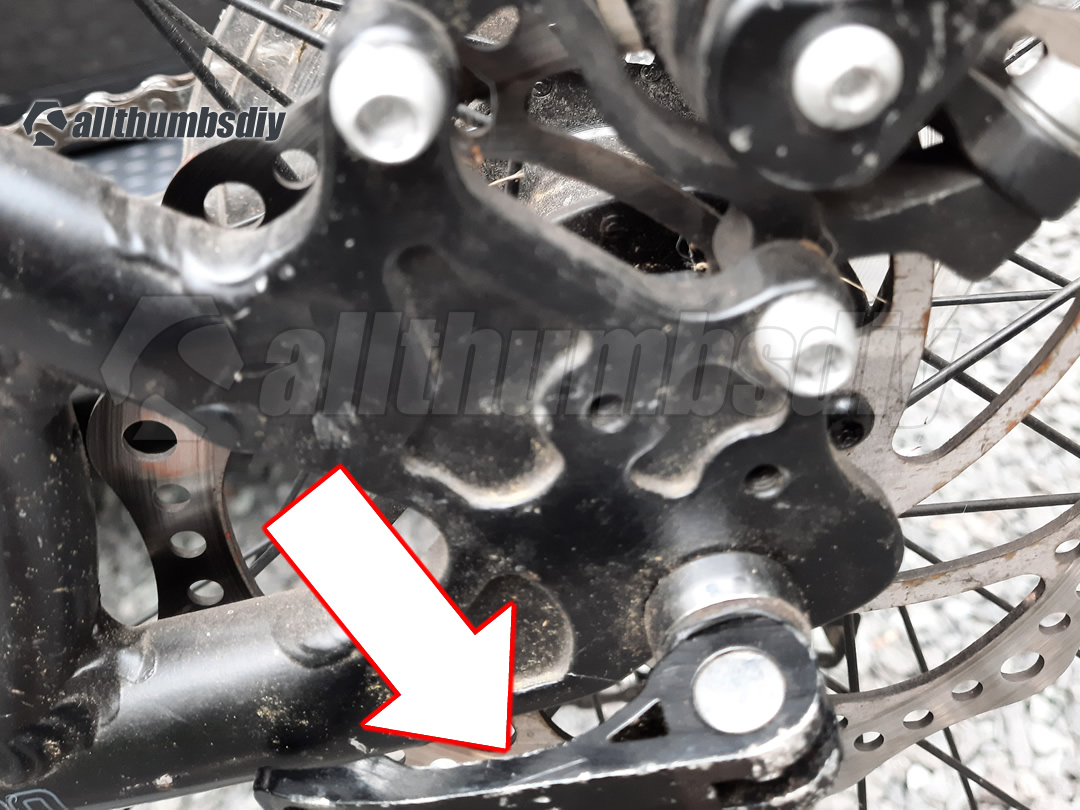
Step # 4 – Brake pads are held in place by magnets so it’s much easier to detach the caliper assembly from the bike frame before replacing brake pads. There are two bolts used to attach the brake assembly to the gram. Using a 3mm Allen wrench, remove 2 bolts as shown. The bolt has a locking nut so make sure you don’t lose it.
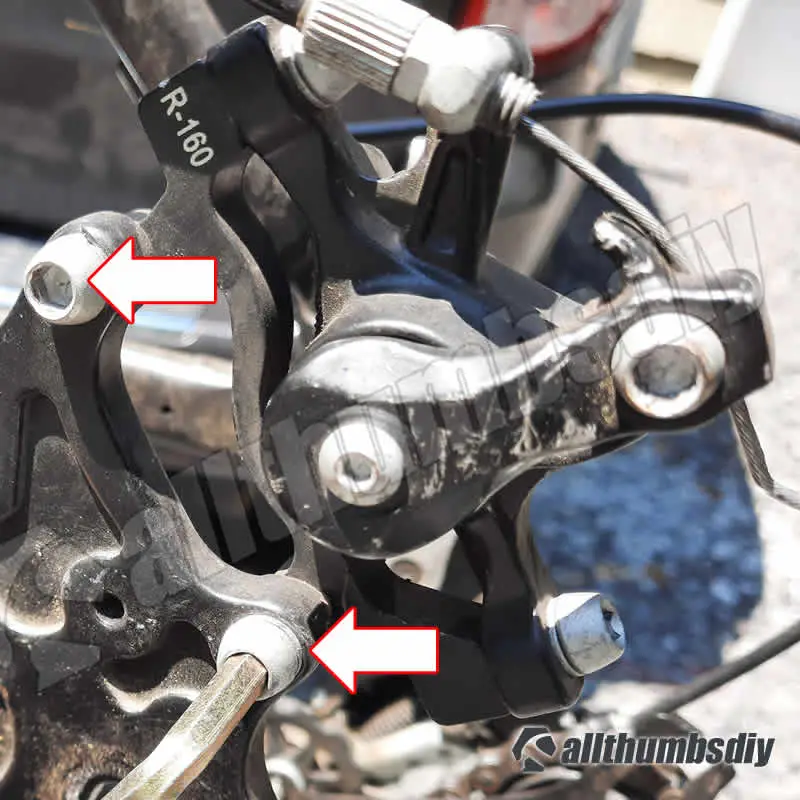

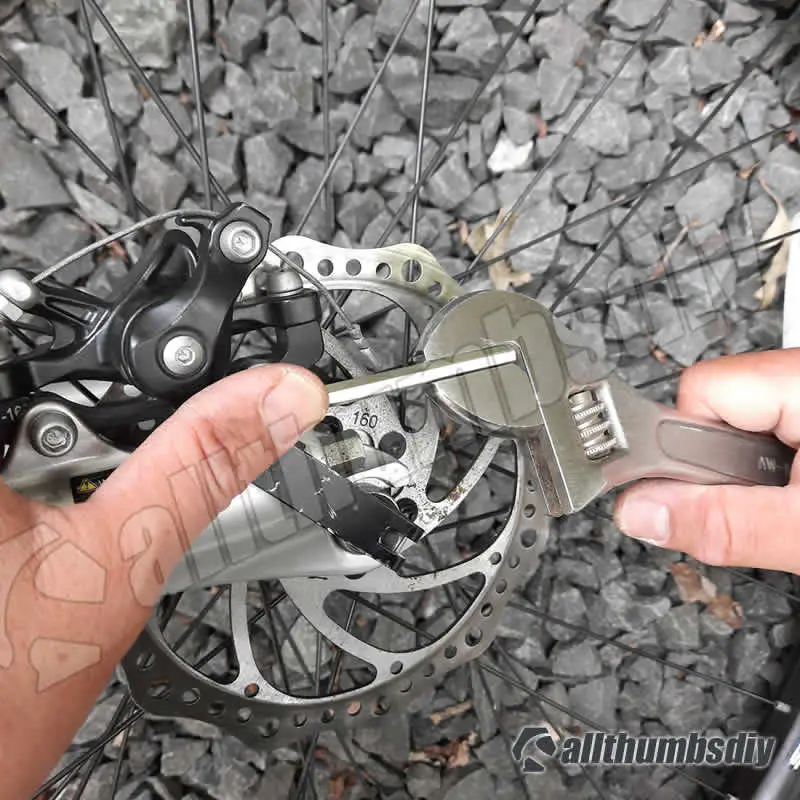
Step # 5 – If a bolt is stuck, use the adjustable wrench to use it as a “breaking bar”. If the bolt is really stuck, spray some WD-40 around it. You may just end up snapping the Allen wrench so make sure you have a spare Allen wrench on hand (and wear eye protection and gloves)
Step # 6 – With the rear brake assembly detached, gently flip it upside down to locate the brake pads.
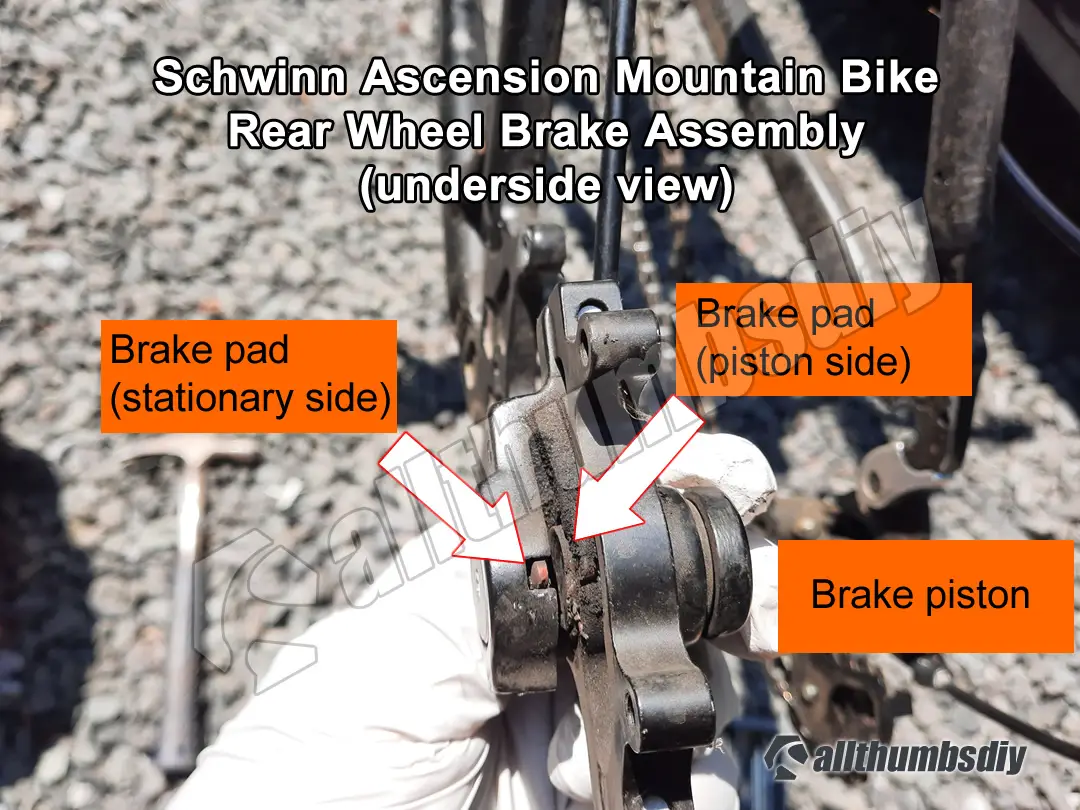
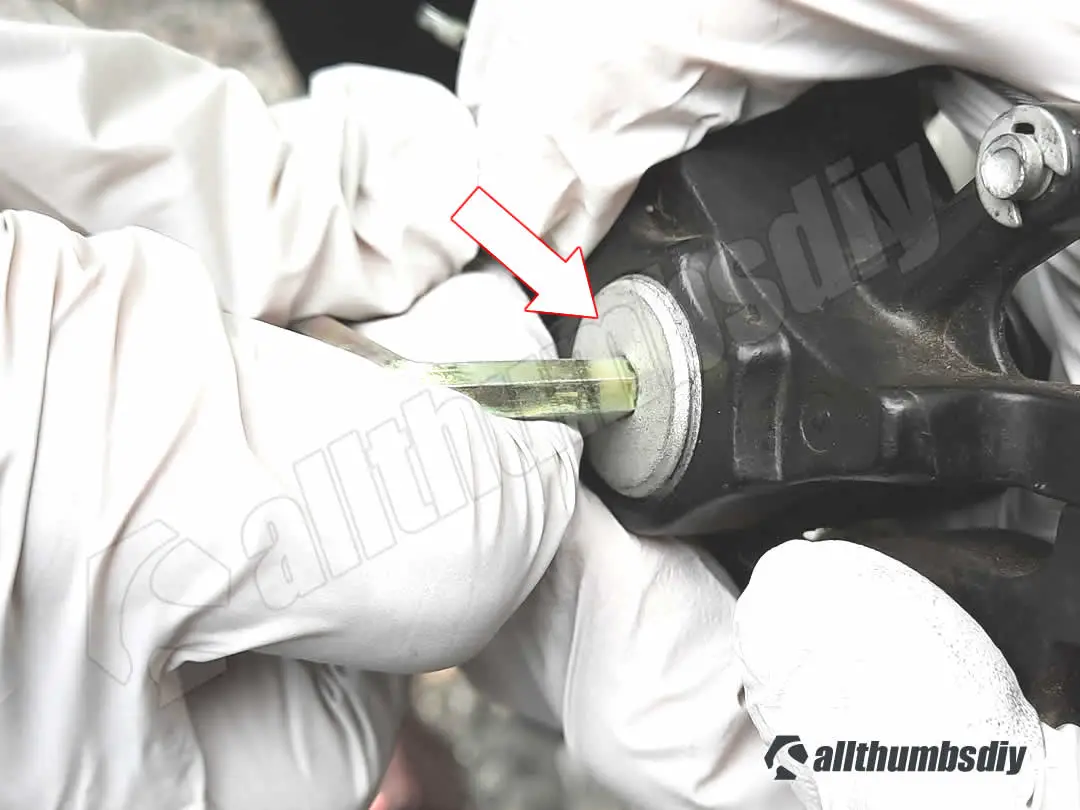
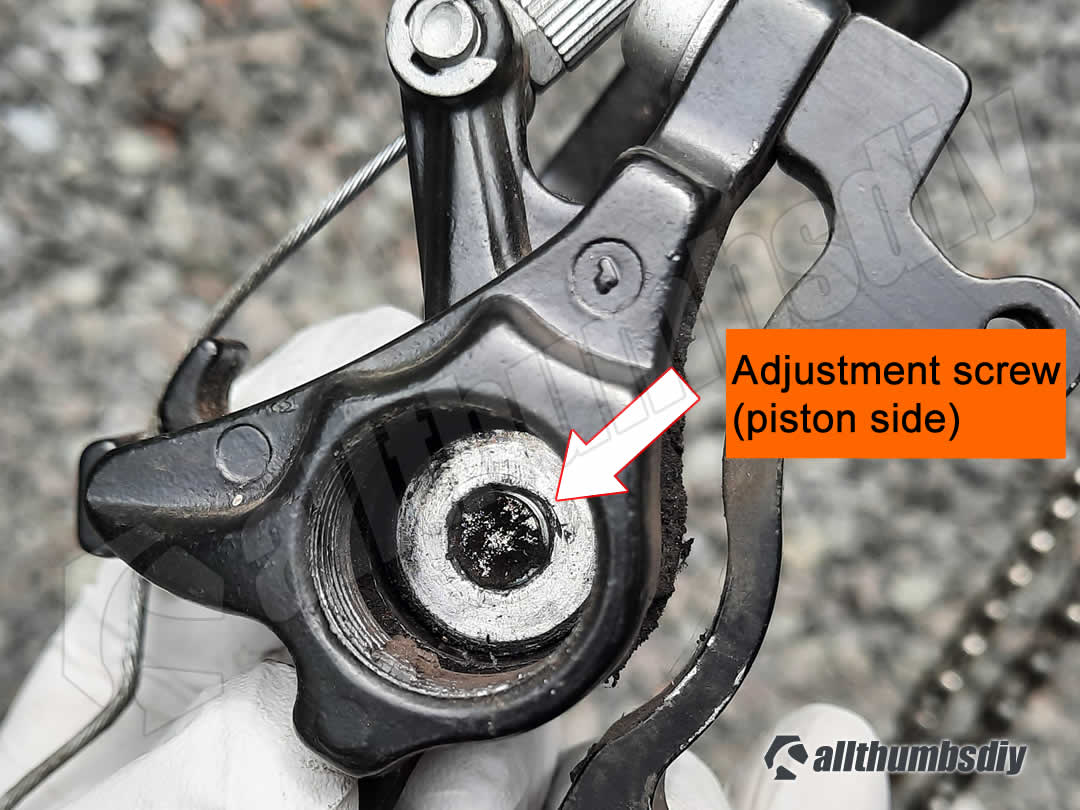
Step # 7 – Using a 5 mm Allen wrench, remove the brake adjustment screw from the caliper assembly. You can then remove the brake pad from the piston side, followed by the brake pad from the stationary side. I removed the adjustment screw from the stationary side so that I can clean the debris inside as well as any metal shavings attached to the piston side adjustment screw (both magnetic surfaces should be cleaned well)

Step # 8 – Note the braking material coming apart on the old braking pad as well as how thin it is compared to the new one below.
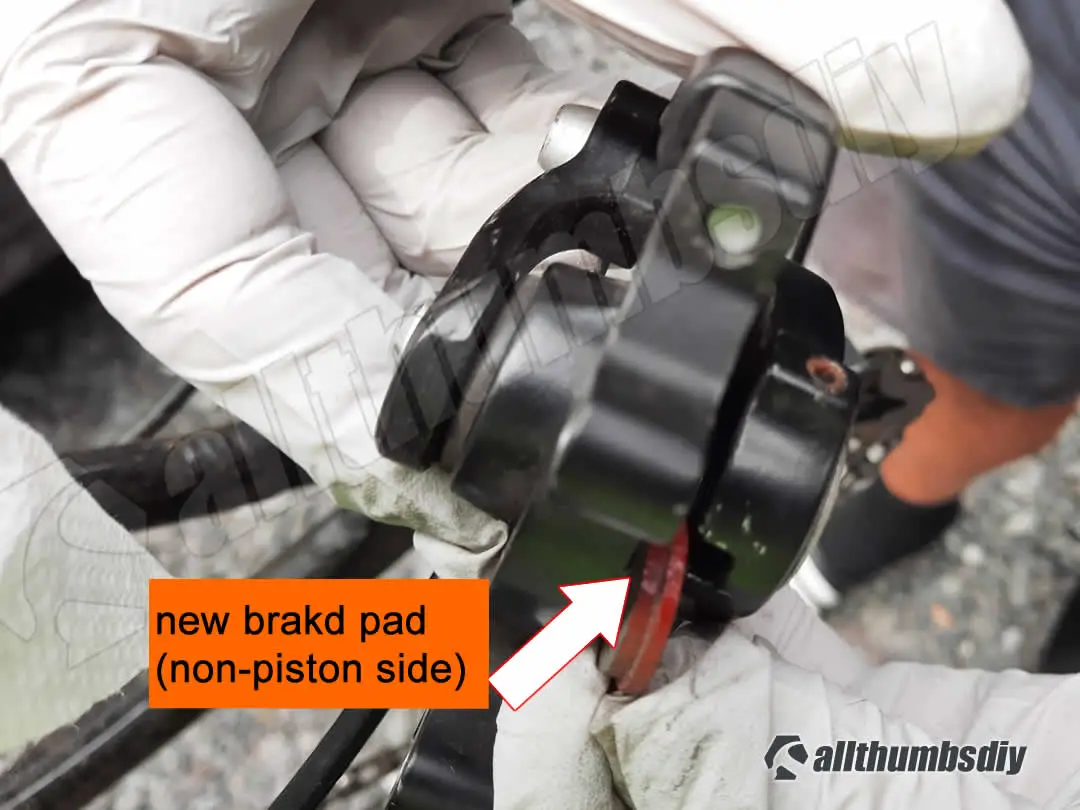
Step # 9 – With everything cleaned up, install your new brake pads (first slide in the non-piston brake pad followed by the piston side)

Step-by-Step Instructions (Wheel and Caliper adjustments)
After re-installing the wheel, we need spend some time centering the wheel. Brake disc mis-aligment is usually caused by the wheel not being centered, the caliper body is off-centered or the brake pads are not installed properly.
Step # 1 (Center the Wheel) – Re-install the wheel, making sure that the rotor is properly placed between the brake pads; rotate the wheel and look at the gap between the rim and fork; the gap on both sides should be even; if not, loosen the axle nuts and adjust until the wheel and disc rotor are centered; please remember to use the nut, not the quick release lever, to tighten the wheel;
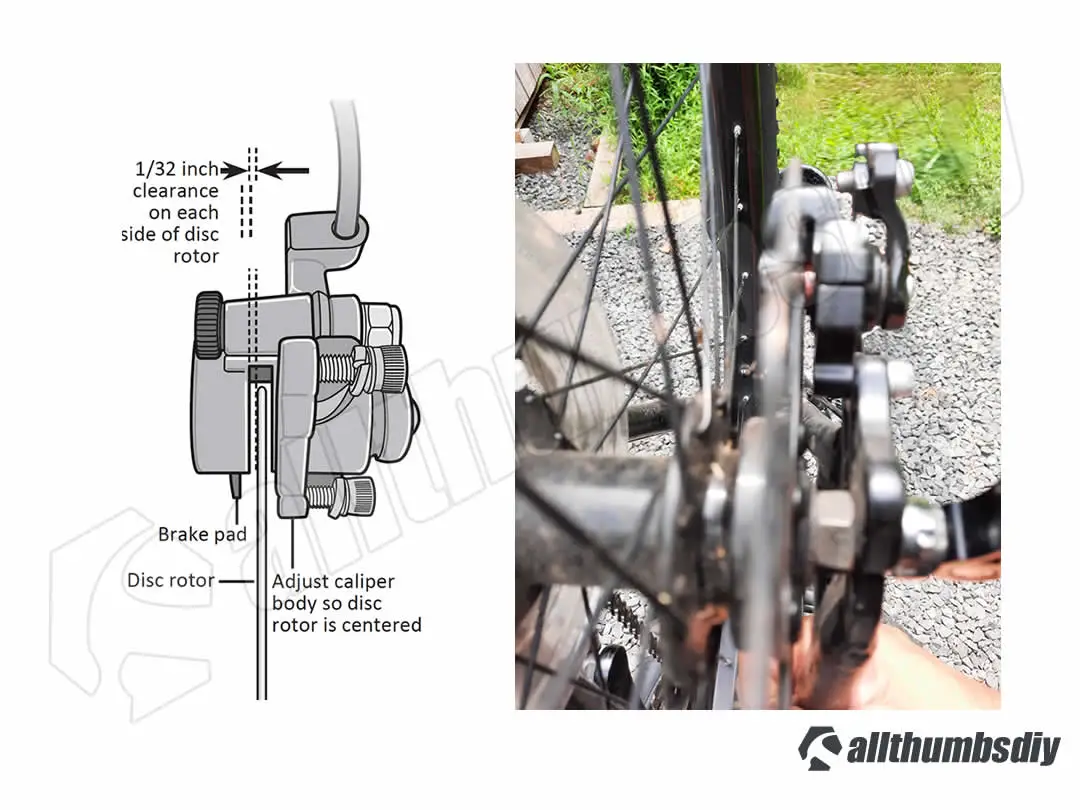
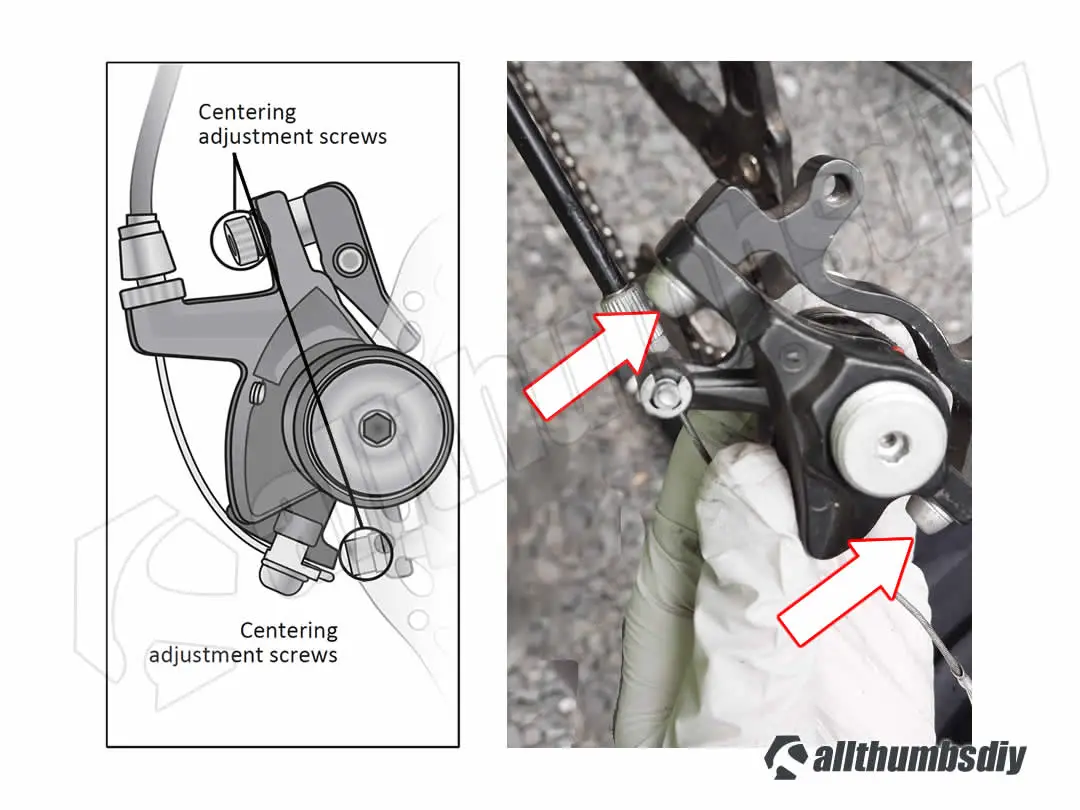
Step # 2 (Rotor Alignment) – Using a 5 mm Allen wrench, loosen the two centering adjustment screws. Adjust the caliper assembly until the gap between the disc rotor and the brake pads are 1/32″ per side; tighten the centering adjustment screws;
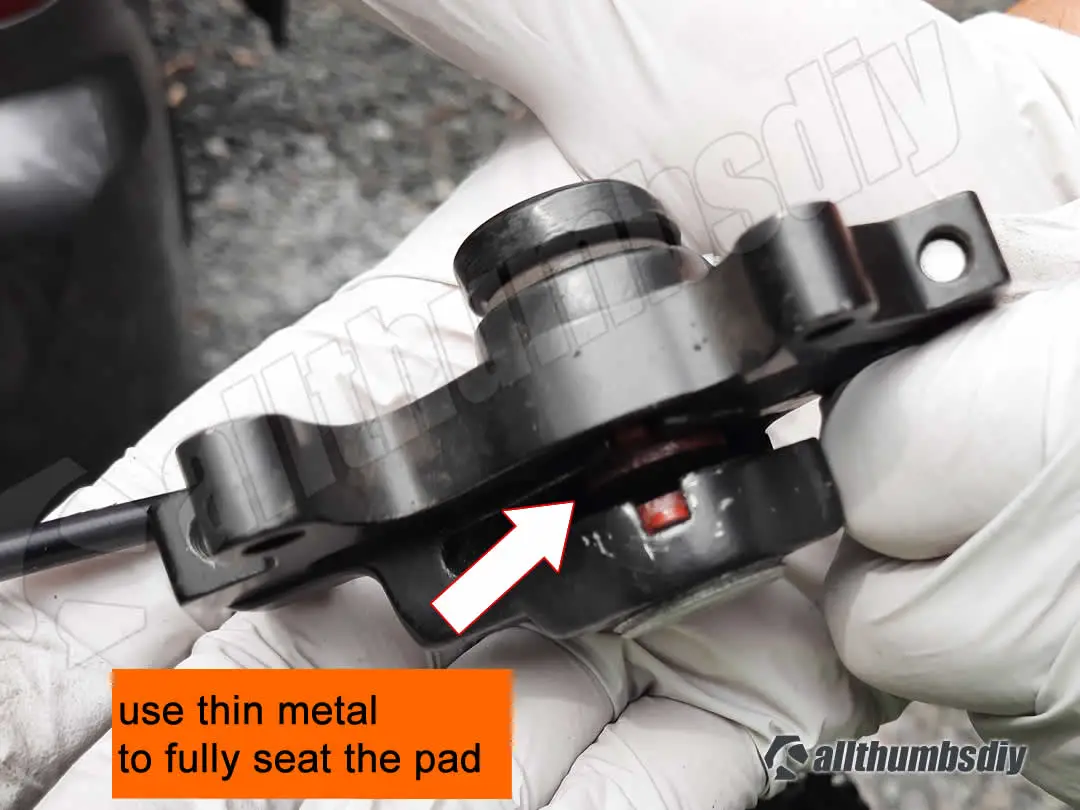
Step # 3 (Center the brake pads) – either insert a thin metal spacer (1/32″ thick) or a business card between the disc rotor and brake pad
Step # 4 – using a 2.5 mm Allen wrench, loosen the set screw
Step # 5 – using a 5 mm Allen wrench, turn the brake pad adjustment screw to move the brake pad. Turning the adjustment screw clockwise moves the pad towards the disc rotor; turning the screw counterclockwise moves the pad away from the disc rotor;
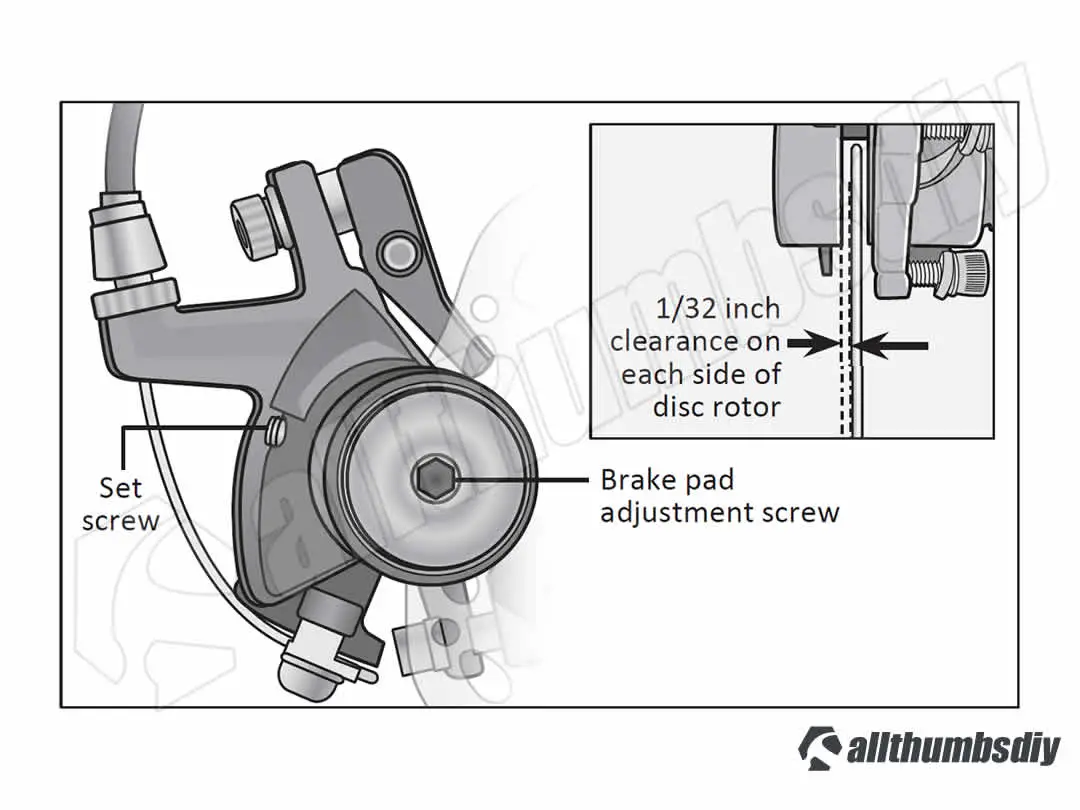
Step # 6 – Adjust the pad until the gap between the disc rotor and the brake pads are even (1/32″ per side); re-tighten the set screw
Step-by-Step Instructions (Attaching/Adjusting the Brake Cable and Cable Tension)
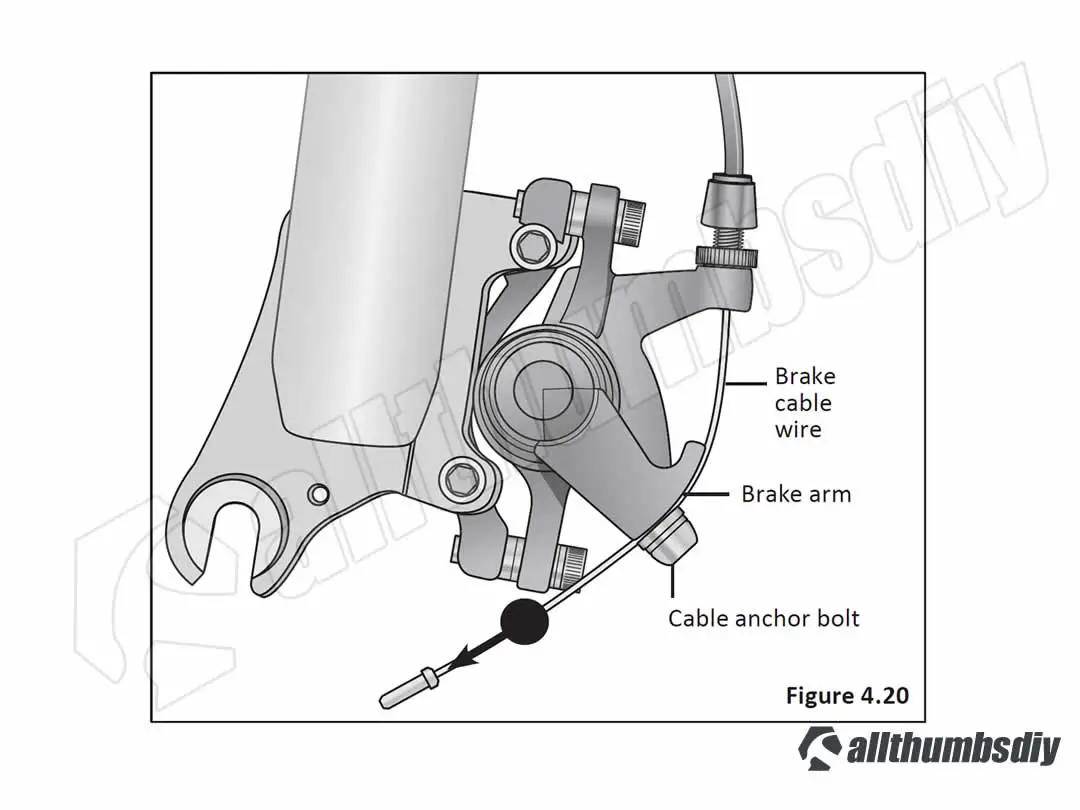
Step # 1 – If the brake cable is not attached to the brake arm assembly, then loosen the cable anchor bolt then pull on the brake cable and place the wire under the cable anchor bolt
Step # 2 – Tighten the cable anchor bolt (note: the brake cable should not be pulling so the brake arm should be “at rest”;
Step # 3 – Check that the brake cable tension allows the brake lever about 1/3 of the travel before the brake pads contact the disc rotor; if the cable has stretched or slipped, re-adjust the brake cable tension
Step # 4 – at the caliper assembly or brake lever, slightly loosen the jam nut that is next to the adjustment barrel
Step # 5 – Turn the adjustment barrel to adjust the cable tension; turning clockwise will loosen the brake cable tension, counter-clockwise will tighten the brake cable tension
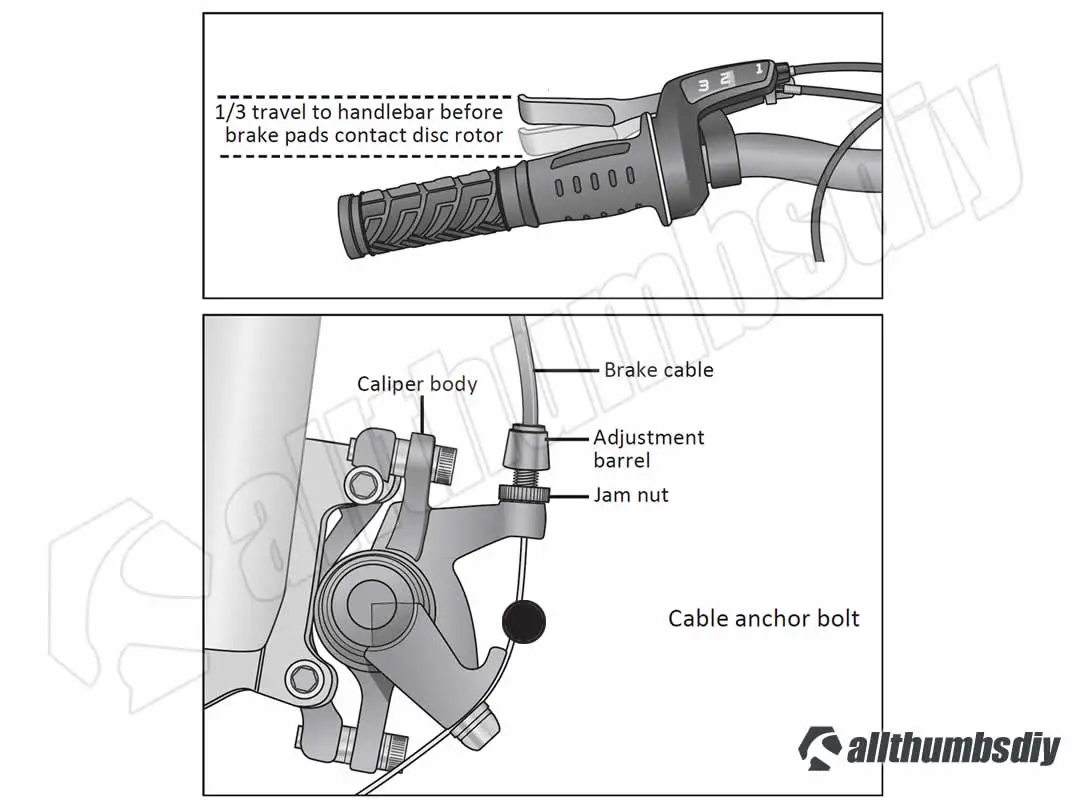
Step # 6 – Recheck that the brake cable tension allows the brake lever about 1/3 of the travel before the brake pads contact the dis rotor. When you have the brake tension you want, then tighten the jam nut
Brake is correctly adjusted when:
- The brake pads do not drag on the disc rotor;
- Both brake pads move away from the disc rotor equally when the brake is released
- When the brake is applied, the brake pads contact the disc rotor before the brake lever reaches about 1/3 of the way to the handlebar
After brake adjustment, squeeze the brake lever as hard as you can several times and re-inspect if the wheel and brake pads are centered. If necessary, repeat brake adjustments.
Reference Links
- How to Check and Adjust Bike Disc Brakes (REI)
- How long should MTB disc brake pads last? (Stack Exchange)
- Are Schwinn bikes really that bad, or have I been getting bad information? (reddit)
- On average, how much does it cost to get bike brakes replaced (completely broken and worn, need to be done by a professional)? (Quora)
- What is the benefit of disc brakes on bicycles? From a physics standpoint, don’t rim brakes provide more torque? (Quora)
- Are most disc brakes and rotors interchangeable on a mountain bike? (Quora)
- ow do you maintain disc brakes on a mountain bike?(Quora)
Allen
Thursday 10th of February 2022
Good job y'all excellent step by step! Now I need you to do me a favor and show me how to and what part I need to replace the derailleur, model number and how to step by step because I got and Ascension yesterday and the derailleur is all jacked up and I don't want to tear it up anymore, so I'd like to replace it and and tell me how to adjust it that's the big thing