
KEY POINTS
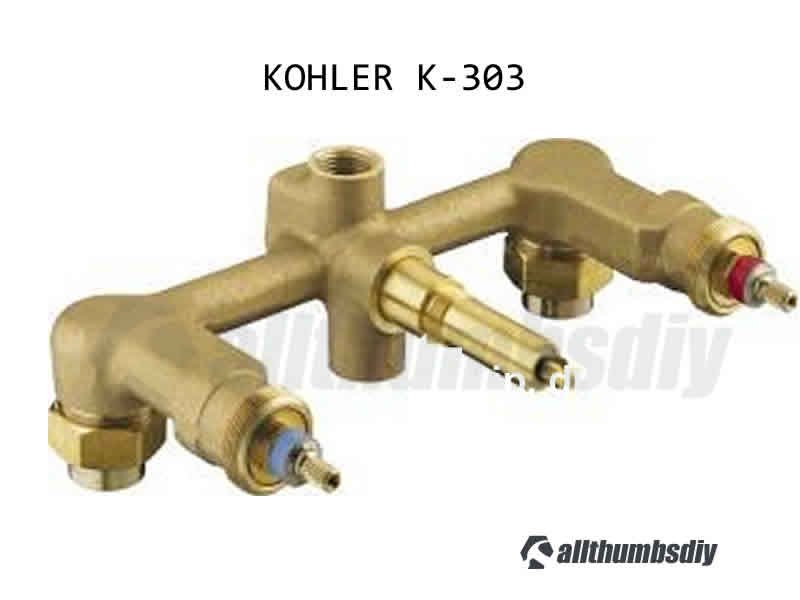
- Applicable to Kohler Wall-Mount Shower (hot, cold, diverter setup) Model # K-302 or K-303
- The most recent version of this product is Model # K-303-K-NA; some parts from K-303-K-NA may be used for K-302 or K-303
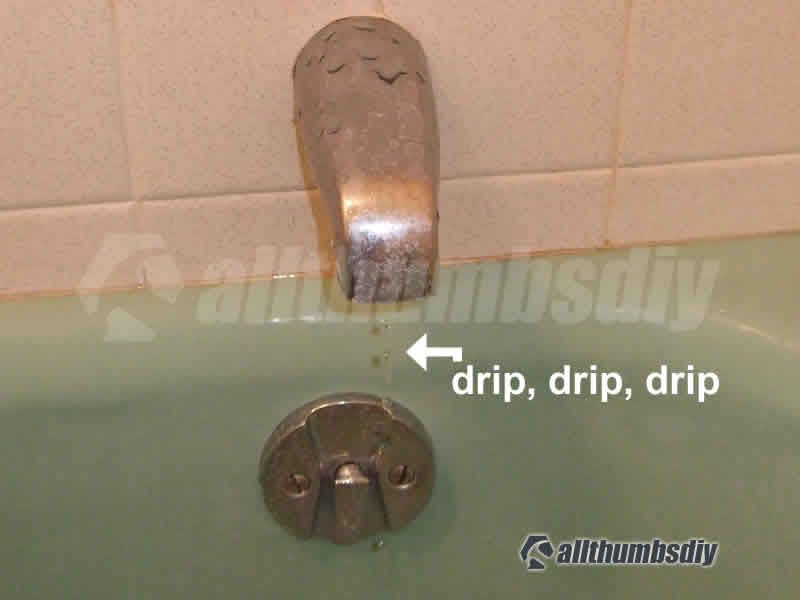
Table of Contents
Introduction
My house was built in the late 60’s so I am not surprised to find that my faucets are starting to leak.
Kohler Wall-Mount setup is in my tub shower and these valves have already been replaced once back in 2008.
Because I live in an area with hard water, I have a lot of issues with mineral deposit in my faucets as well as appliances.
I don’t want to install a water softener (due to raised salt content), I am stuck with repairing (if I can) or replacing my leaky faucets.
It’s been about 14 years since my last replacement and my hot water faucet developed a leak so I decided to check it out and decide what to do. This bathroom is heavily used by my kids so I purchased the parts ahead of time, thinking if I did not need it, I can simply return them.
Required Parts
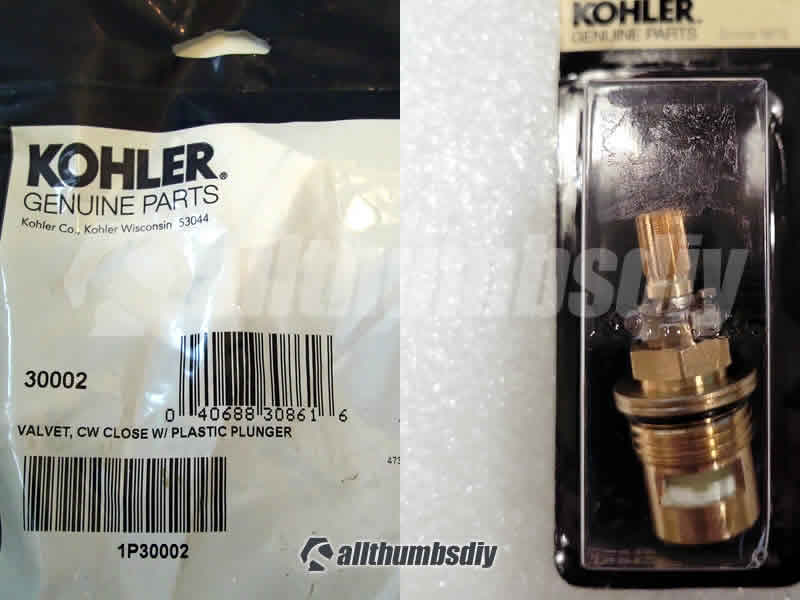
KOHLER replacement cartridges
IMPORTANT: Kohler K-302 shower/tub model dates all the way back to 1990s. Since then multiple replacement valves parts were made and subsequently discontinued but you may be able to find older inventory parts.
| Version | Hot | Cold | Where to Buy |
|---|---|---|---|
| 1 | 1P30002 | 1P30004 | Discontinued |
| 2 | GP30002 | GP30004 | Check price for hot valve Check price for cold valve |
| 3 | GP330002 | GP330004 | Check price for GP330002 (hot valve) Check price for GP330004 (cold valve) |
| 4 | K-GP77005-RP | K-GP77006-RP | Check price for GP77005 Hot valve Check price for GP77006 Cold valve |
**** Both GP30002 and GP30004 faucet stems have identical physical specifications with the only difference being that they turn in the opposite direction. So why do you see higher cost for hot water faucet cartridges than cold faucet cartridges? I am just guessing but I think hot water faucets fail faster than cold water faucets and people tend to replace only one, thereby creating more demand for the hot valves. I recommend replacing both at the same time.
Other parts
- Small tube of white bathroom caulk (Red Devil single tube is a good choice)
- Roll of black electrical tape (just need about 6 inches so don’t buy a new roll if you already have some)
Required Tools
- Adjustable pliers (don’t have one? read my review of two best adjustable pliers here)
- Utility Knife (if you need an awesome utility knife, I recommend this one)
- Scraper
- Towel
- Scrap piece of cloth
- Phillips Screwdriver (#2)
- Old toothbrush
- Plumber’s putty (Aqua Plumb Blackswan Stay Soft has no chemical smells) – plumber’s putty is supposed to be like Crayola’s silly putty. If you receive a one that is hard, it has been cured already so you need the store to replace it for you
^ Return to top
Knowing the Names of Parts for K-303-K-NA
The parts diagram show below are for the K-303-K-NA (for the USA market) which is the most recent model number from Kohler.
It shares many similar parts as K-302 and K-303.
Parts Diagram for K-303-K 1/2″ Ceramic in-wall three handle valve system with diverter
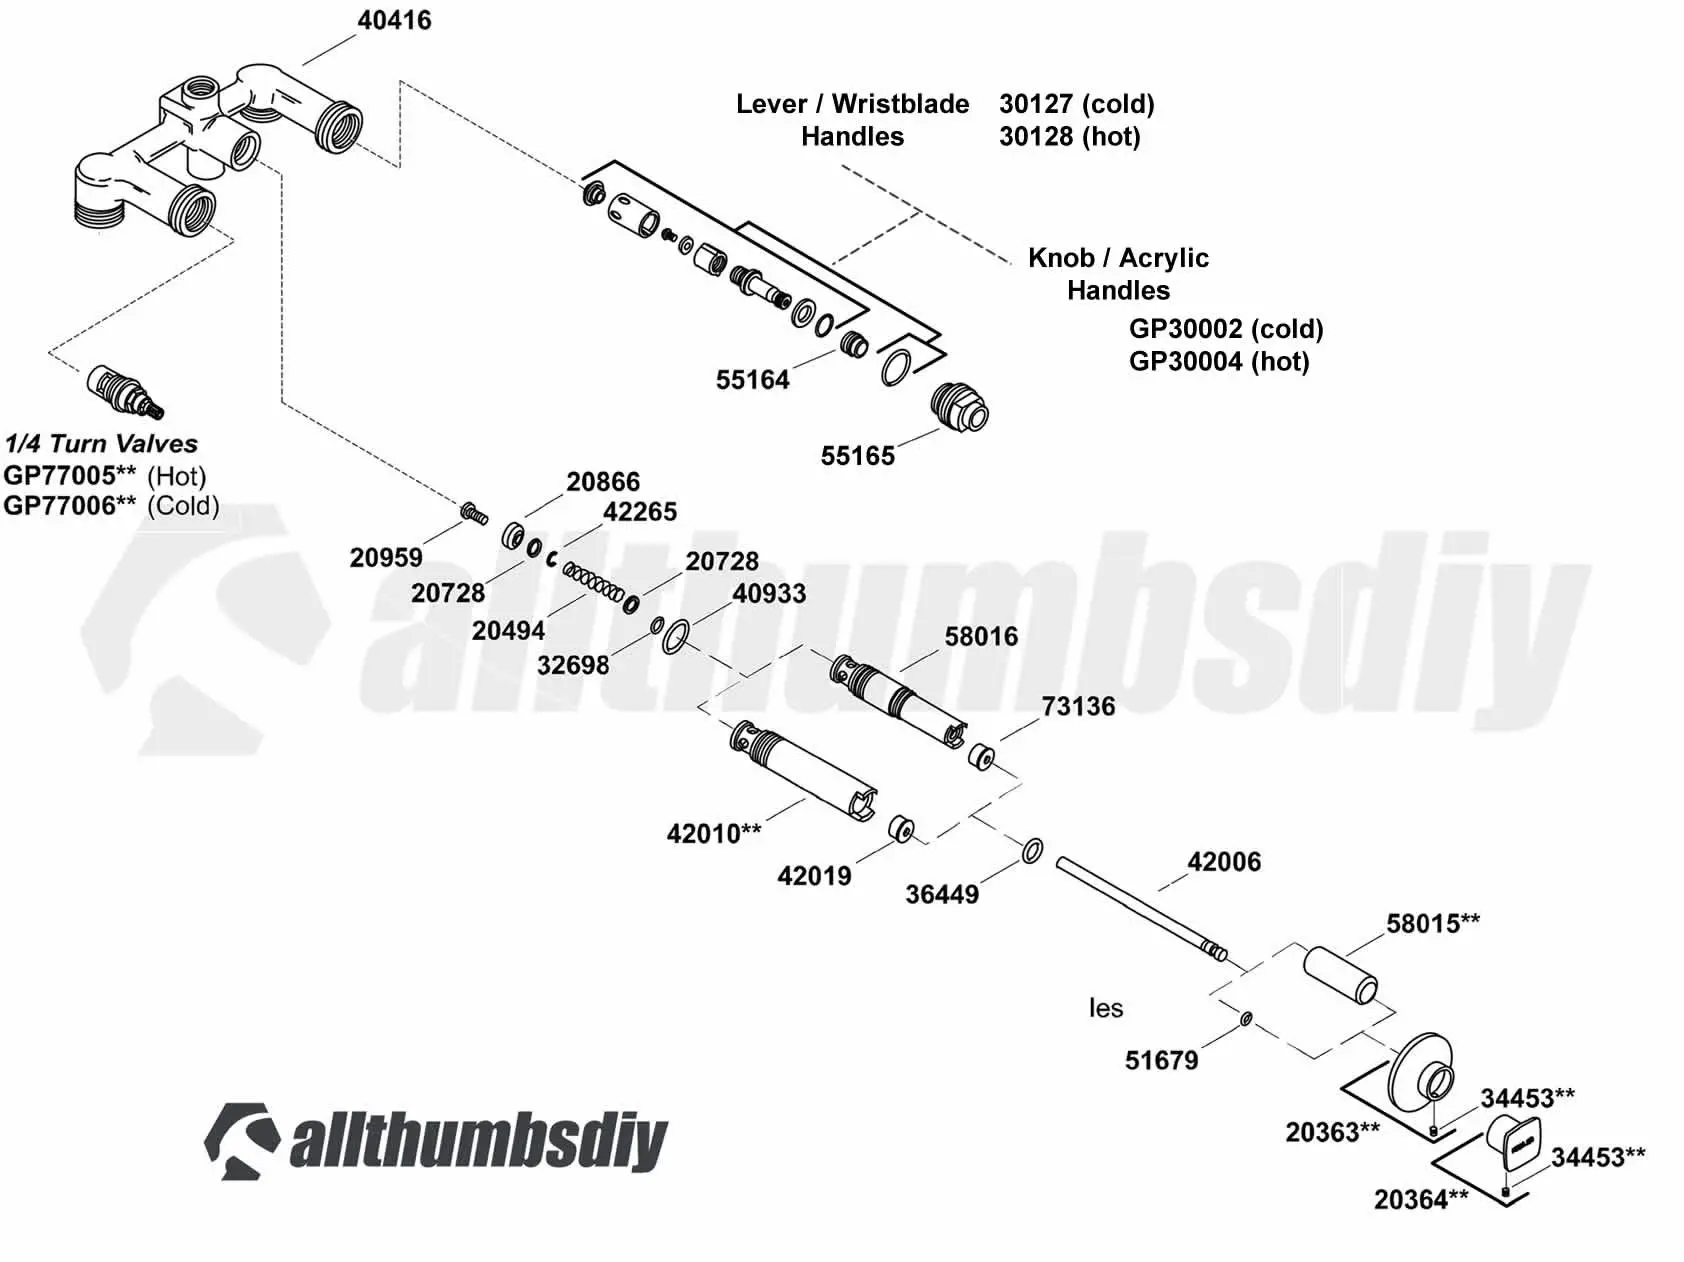
Parts List for K-303-K
| Part Name | Part # | Price | Where to buy |
|---|---|---|---|
| 40416, K-40416 | Yoke Assembly | $380.00 | TBD |
| GP77005, GP77005-RP | Ceramic Valve, 1/4 turn, Hot | $16.20 | TBD |
| GP77006, GP77006-RP | Ceramic Valve, 1/4 turn, Cold | $16.20 | TBD |
| 55164, K-55164 | Nut, 687-20UNS-2A | N/A | Discontinued |
| 55165, K-55165 | Bonnet | $53.30 | TBD |
| 30127, K-30127-BC | Clockwise Close with Brass Plunger Valve, Cold | N/A | Discontinued |
| 30128, K-30128-BC | Clockwise Close with Brass Plunger Valve, Hot | $65.90 | TBD |
| GP30002 | Refer to K-GP330002 | N/A | Discontinued |
| GP30004 | N/A | TBD | |
| GP330002, K-GP330002 | 1/4 Turn Ceramic Valve, Hot | $21.30 | TBD |
| 20959, K-20959 | Screw, 8-32×0.5 | $1.80 | TBD |
| 20866, K-20866 | Seat | $2.80 | TBD |
| 20728, K-20728 | Washer, 0.270 x 3/8 | $1.80 | TBD |
| 42265, K-42265 | Ring, Retaining | $1.80 | TBD |
| 20494, K-20494 | Spring | $1.80 | TBD |
| 32698, K-32698 | O-ring | $1.80 | TBD |
| 40933, K-40933 | O-ring | $1.90 | TBD |
| 58016, K-58016 | Body, diverter | $67.60 | TBD |
| 73136, K-73136 | Bushing, centering | $1.80 | TBD |
| 42010 | Discontinued | N/A | Discontinued |
| 42019, K-42019 | Bushing | $2.00 | TBD |
| 36449, K-36449 | O-ring | $1.80 | TBD |
| 42006, K-42006 | Stem, diverter | $17.70 | TBD |
| 51769, K-51679 | O-ring | $2.10 | TBD |
| 20363 | Escutcheon cover and screw | N/A | Discontinued |
| 20364 | Knob, diverter | N/A | Discontinued |
| 34453, K34453-BKB | Screw, 8-32 x 0.188 | $15.40 | TBD |
| 58015 | Discontinued | N/A | Discontinued |
Step-by-Step Instructions
- STEP # 1 – Unscrew the handle using your #2 screwdriver
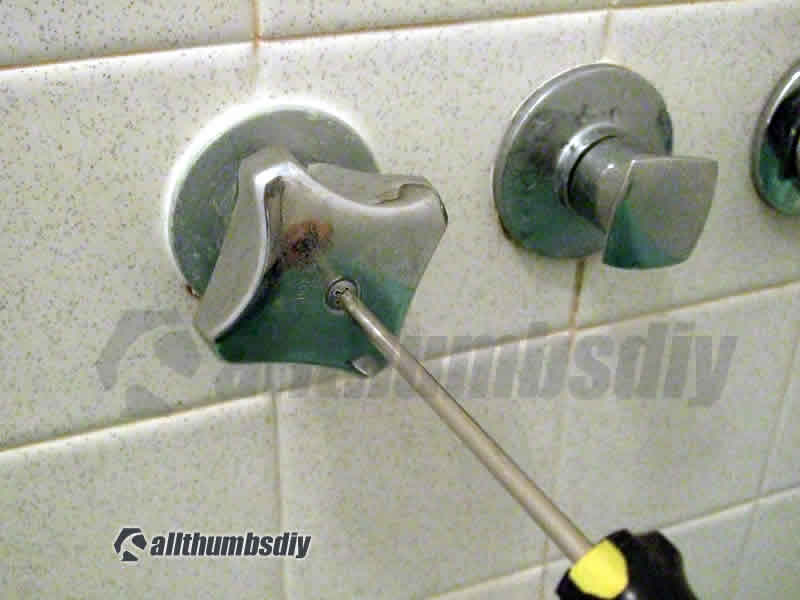

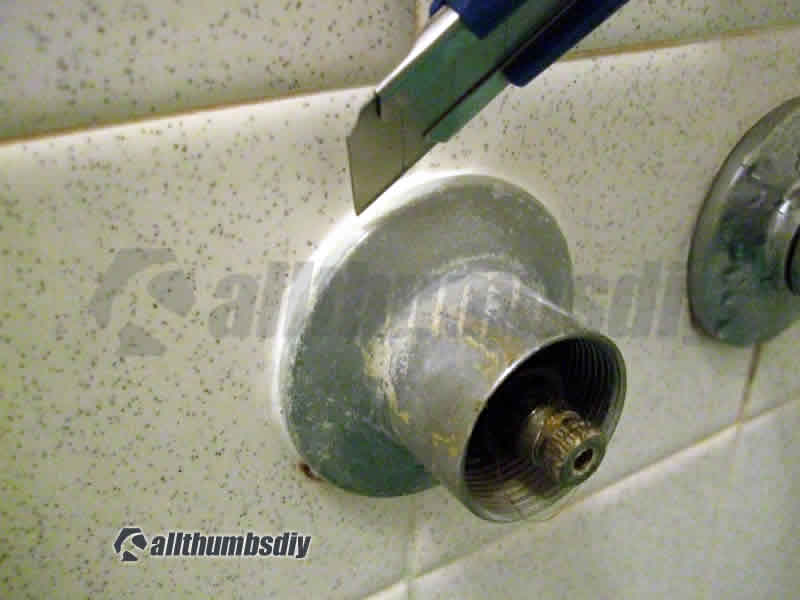
- STEP # 2 – Using your sharp utility knife, gently score around the escutcheon (cover plate) to separate caulking
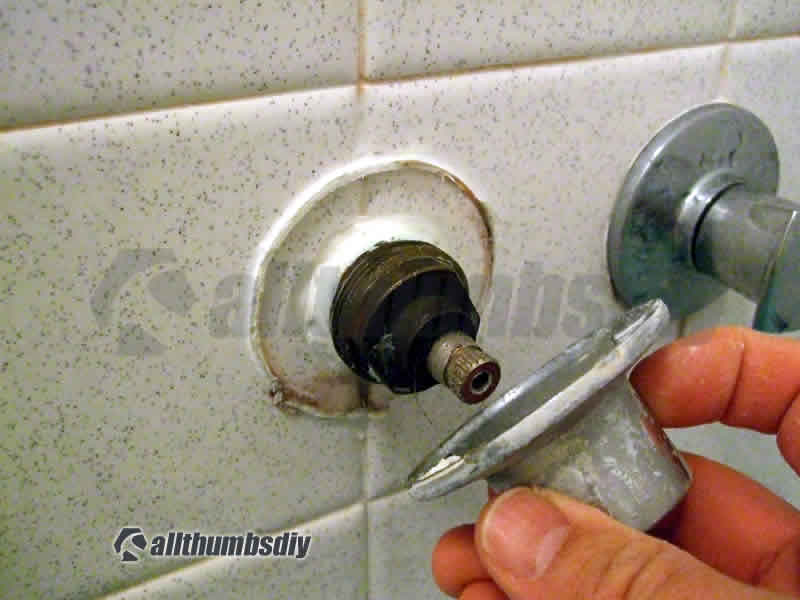
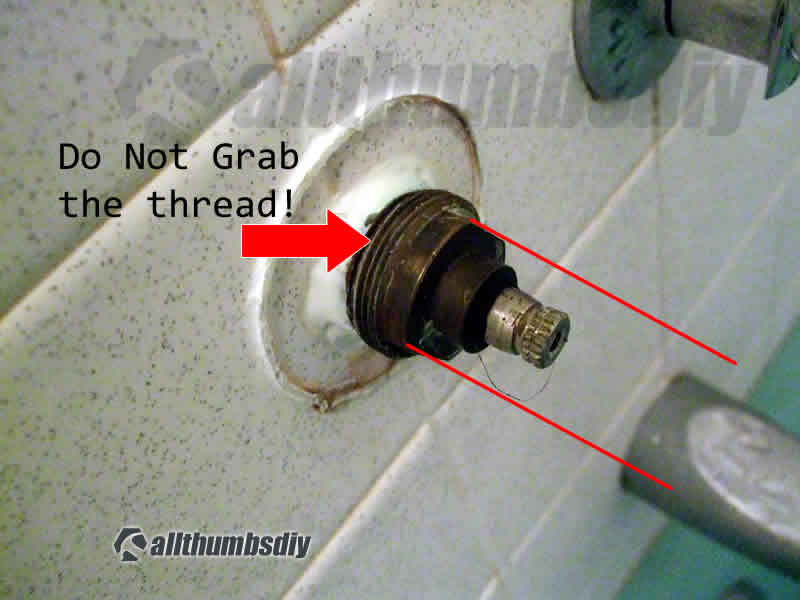
- STEP # 3 – Grab the NUT part of the bonnet using your adjustable pliers and turn clockwise. Please do NOT grab the thread as your bonnet will be re-used.

- STEP # 4 – Once you break the seal, use your hand turn to remove the bonnet and cartridge assembly from the wall
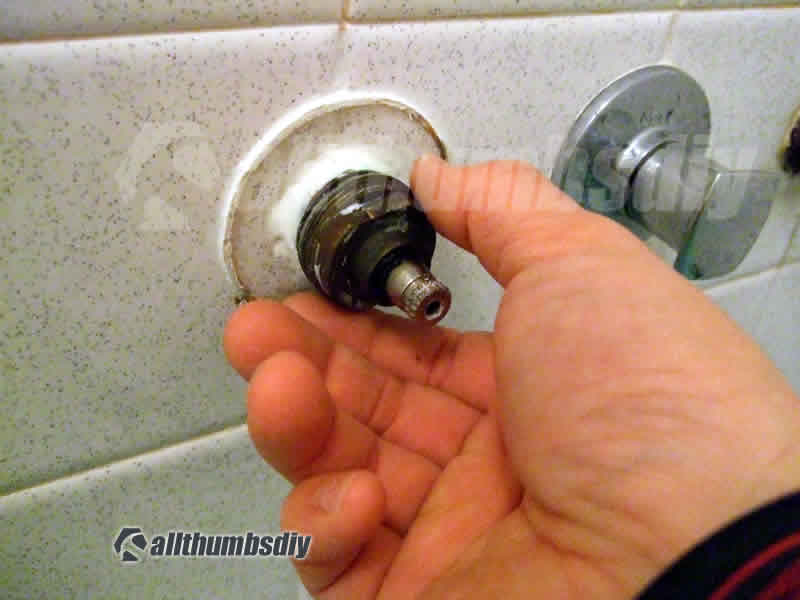
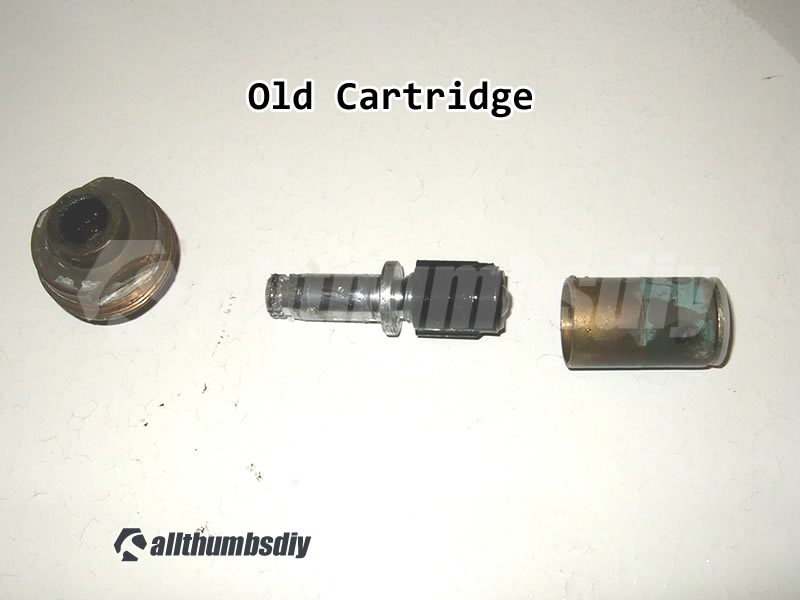
- STEP # 5 – You can see the O-ring has failed (being squeezed out near the stem) as well as a cracked compression washer on the bottom. Unfortunately, these small parts are not individually available so you have to replace the entire cartridge assembly


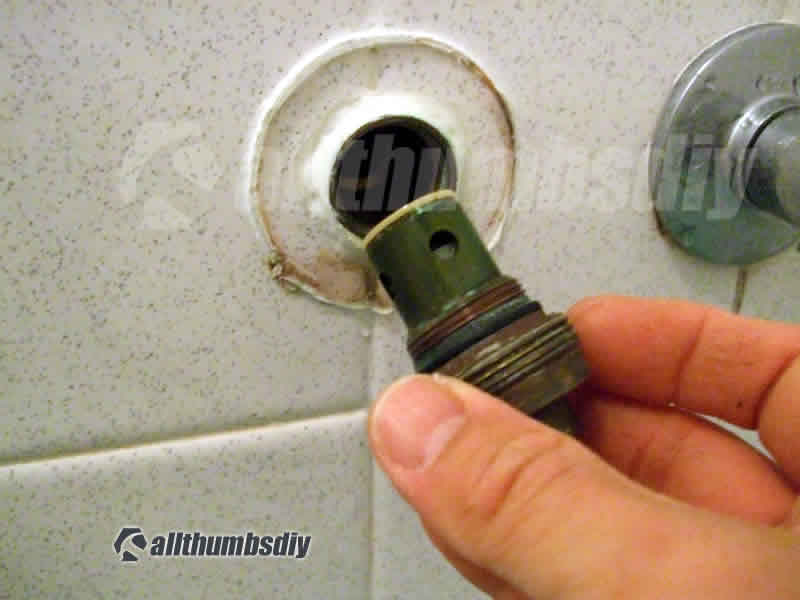
- STEP # 6 – Slide out the cartridge from the bonnet. If it seems to be stuck, turn the assembly upside down so the step is facing the ground/desk. While grabbing the bonnet, gently tap the stem against the surface couple of times to get it unstuck
- STEP # 7 – Clean the bonnet using an old toothbrush. Pay special attention to the exterior thread as well as the inside surface. DO NOT use CLR or other caustic chemicals to clean as doing so will create small pits that will cause leaks.
- STEP # 8 – Inside the packaging, you should find the cartridge, with three O-rings and a guide

- STEP # 9 – The largest (and thin) O-ring should be installed on the outer rim of your bonnet
- STEP # 10 – Medium sized O-Ring should be installed inside the bonnet
- STEP # 11 – Small (thicker) O-ring sits on the stem base
- STEP # 12 – Hand screw the assembly into the shower yoke assembly
- STEP # 13 – Grabbing the nut portion of the bonnet, tighten the bonnet using your adjustable pliers
- STEP # 14 – If there are large gaps between the hole in the wall and cartridge assembly, apply some plumber’s putty to seal it off
- STEP # 15 – Screw back on the escutcheon cover plates
- STEP # 17 – If desired, apply a small bead of caulking around the cover plate for extra waterproofing
Summary
I am happy to report that replacing both hot and cold faucet cartridges eliminated that annoying and wasteful drips.
I am also very impressed with Kohler’s quality so I highly recommend that you only the OEM parts for your repair project.
Good luck!
Related Posts
- How to Identify A Faucet Brand
- Now my powder room’s faucet is leaking!
- How I Installed High Flow Under Sink Water Filter Filtration System for My Kitchen – Installation Steps
- SharkBite vs GatorBite vs TecTite
- Installing A New Hot Water Heater – Part 1
Gregory Durniak
Wednesday 15th of February 2023
My Cartridges came with no instructions, however your photo seems to show a paper diagram. Can you send to me, or scan and post that ? I would like a better view of just the Bonnet and Cartridge. Thanks !