• Skip to main content
  • Skip to secondary menu
  • Skip to primary sidebar
  • Skip to footer
  • Storage Shed
  • Portable Generator Shed
  • Backyard Batting Cage
  • Backyard Swing Set
cropped-allthumbsdiy-header-v78-fl.jpg

AllThumbsDIY.com

home improvement projects for do-it-youselfers

Header Advertisement HappyOodles.com
  • Appliances
    • Dishwashers
    • Dryers
    • Refrigerators
    • Washers
  • Building
  • Elect
  • HVAC
  • Outdoor
    • Backyard Batting Cage
    • Backyard Ice Rink
    • Backyard Swing Set
    • Bicycles
    • Geo Dome Play Climber
    • Landscaping
  • Plumbing
  • Power Equip
    • DIY Gaskets
    • Leaf Blowers
    • Generators
    • Snowblowers
  • Tools

How to Repair Cedar Shingles to Minimize Woodpeckers from Damaging The Same Spot Again

October 10 by kevin Leave a Comment

allthumbsdiy-woodpecker-cedar-single-repair-header-fl

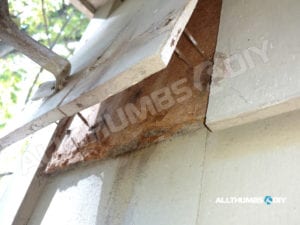
Before implementing different methods to solve my woodpecker problems, I first need to make siding repairs to all the damage my lovely woodpeckers caused.

In order to minimize the possibly of them returning to the same spot, I came up with what I think is a solid solution using asphalt roofing tiles.

Required Materials

  • Bundle of Western Cedar Siding (like this one)
  • Bundle of asphalt siding (you need to buy this locally as it is too heavy to purchase online; any brand is fine as long as it has a decent amount of granules)(
  • 2-3 caulking tubes (I prefer the transparent ones like this one but you can also match it to your siding color)
  • Siding nails

Required Tools

  • Ladder (make sure to use a ladder cleat if setting the ladder on a smooth surface like a deck)
  • Utility knife
  • Flat crow bar (I use Stanley 55-045 7-1/2-Inch Wonder Bar II Pry Bar)
  • Hammer

Repair Steps

  • Gently pry nails off from the siding directly above the damaged siding;
  • You want to use this damaged siding as a template for the new siding so carefully wiggle it side-to-side in small increments to minimize breaking it
  • Once 5-6 siding nails are removed (usually 2-3 nails per shingle which means the shingle just above what you are working on has 2-3 nails. These nails secure both shingles), then proceed to remove nails from the damaged siding
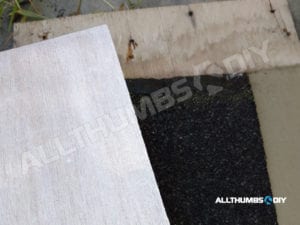
  • Use the damaged siding as a template against the new siding; trim off the excess on the new siding using a sharp utility knife;
  • Use the damaged siding as a template against the roofing tab; trim off the excess on the roofing tab;
allthumbsdiy-woodpecker-problem-cedar-shingle-repairs-nail-removal-fl
allthumbsdiy-woodpecker-problem-cedar-shingle-repairs-templates-fl
  • If there are damages to under-layment, either repair or replace it; in my case, I used clear caulking to fill in the holes
  • Carefully slide the roofing tab into place, making sure that granular (stone) side is facing you (this is important to ensure that if a woodpecker starts to peck again, it’s beak will hit against the stones)
  • Place the new cedar siding in place (roofing tile is thin enough so that new cedar shingle will not protrude when compared to existing shingles)
  • Nail in the siding directly above the damaged siding
  • Nail in the replacement siding

By using roofing tabs, I am looking to change the drumming sound to make it less appealing to woodpeckers. If a woodpecker chooses to return and peck the same area, I am hoping that it would encounter the unpleasant stones.

Click here read all articles related to Woodpecker issues.

Final Words

*** UPDATE 2016-11-14 *** I am happy to report that my woodpeckers have NOT attacked the same spot with asphalt roofing tiles

I hope you found this article to be useful and if you agree, may I ask for a small favor and ask you to sign up for my newsletter? The sign up form is found on the upper right screen. I promise it will be spam free.

Thanks and good luck with your woodpecker(s)!

allthumbsdiy-images-kevin-sig


Filed Under: Pests, Woodpeckers Tagged With: woodpecker cedar shingle repair

Affiliate Programs Keeps AllThumbsDIY Free

AllThumbsDIY.com participates in the Amazon Services LLC Associates Program, an affiliate advertising program designed to provide a means for sites to earn advertising fees by advertising and linking to Amazon.com.

Additionally, AllThumbsDIY.com participates in various other affiliate programs, and we sometimes get a commission through purchases made through our links.

*Amazon and the Amazon logo are trademarks of Amazon.com, Inc., or its affiliates

Reader Interactions

Leave a Reply

Your email address will not be published. Required fields are marked *

Primary Sidebar

E-mail Newsletter

Outdoor Power Equipment

allthumbsdiy-snowthrower-silicone-spraycan-header-v3-fl

A Must-Have Spray Can for Your Snowblower

search light-fl

Searching for a Powerful Portable Tri-Fuel Generator

allthumbsdiy-portable-gen-connect-to-house-part-2-featured-fl

Connecting a Portable Generator to the Home Main Electric Panel – Part 2

allthumbsdiy-snow-thrower-john-deere-1330se-wiring-harness-layout-featured-image-1-fl

John Deere 1330se Snowblower – Wiring Harness for the Handle Group

allthumbsdiy-gasket-make-your-own-header-fl

Make Your Own Carburetor Gasket and Save Money

Popular

allthumbsdiy-swing-set-parts-updated-for-ebook-featured-fl

Swing Set Parts – updated for ebook

Backyard Batting Cage Delayed by a Snow Storm in November

Building a Backyard Batting Cage

allthumbsdiy-bike-rack-calculate-seat-post-diameter-header-fl

How to Calculate the Diameter of a Bike Seat Post

allthumbsdiy-bike-rack-rear-featured-fl

LOPEZ Alloy Rear Bike Rack Pannier Review

Footer

Recent

  • How To Fix Brake Problems on Schwinn Ascension Mountain Bikes
  • How to Troubleshoot and Replace the Main Control Board #WR55X10956 in GE Refrigerator
  • How To Test and Replace Thermistor Temperature Sensors
  • How to Know If Your Refrigerator Door Seal is Good or Bad
  • Maintaining a GE Profile PFCF1NFW Refrigerator

Categories

Search

Copyright © 2022 · Magazine Pro On Genesis Framework · WordPress · Log in