
- The best solution is a standby, natural gas-powered generator (not portable)
- Intermediate solution is to install a conduit from a portable generator to your main electrical panel
- In a crutch, you can run extension cords directly to a portable generator
INTRODUCTION
With hurricanes coming ashore more often, I wanted a better solution than running multiple extensions cords to my portable generator whenever we experienced a power outage. If you have used this setup, you know those windows and door gaps (where the extension cords are routed) tend to let in water and/or freezing cold air.
Instead, I was looking for a flexible setup that was simple (i.e. minimal failure risk) to operate and maintain.
CHOICES
I quickly eliminated the standby generator (comes with an automatic transfer switch) for three main reasons:
- Cost was out of my budget (average quote was around $12,000);
- I did not like having yet another electronic part (i.e.brain of the standyby gen) to worry about;
- I wanted a flexibility to quickly change out a faulty generator (if needed);
I also eliminated the dedicated manual transfer switch (used with a portable generator) because:
- The cost was high ($800 – $ 1,000);
- I did not want choose a limited number of backup circuits in advance;
I ended up going with a simple Generator Interlock kit ($~250 for parts).
SOLUTION
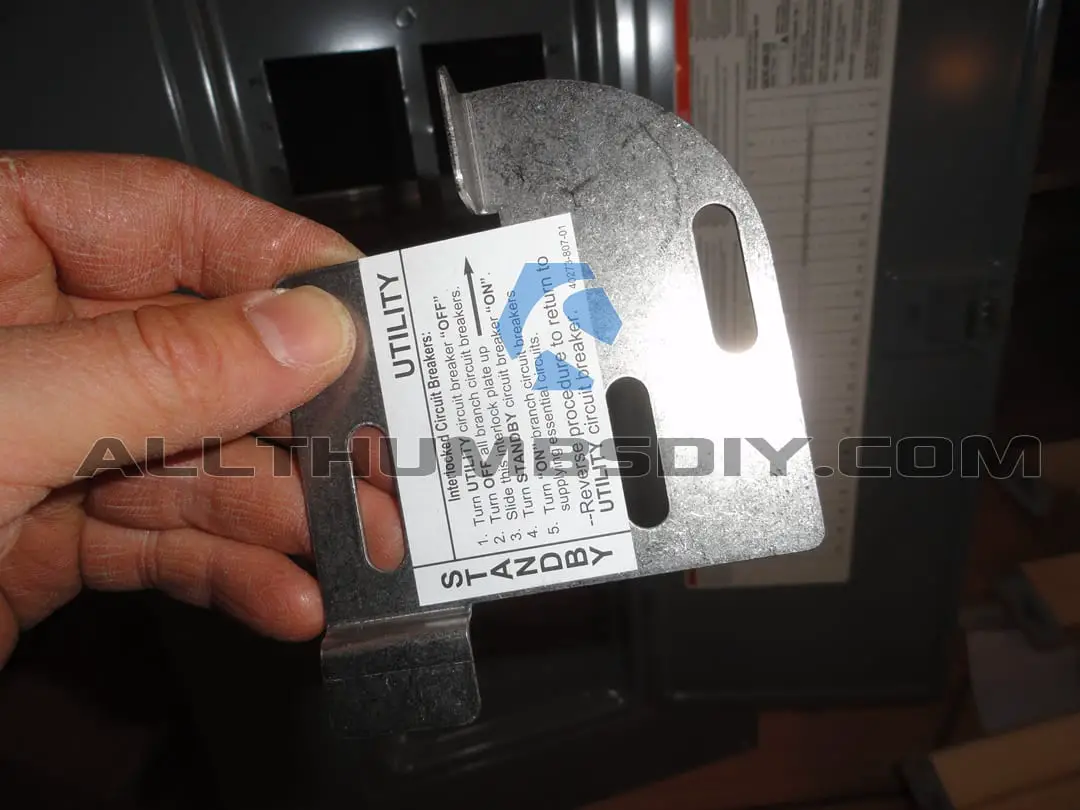
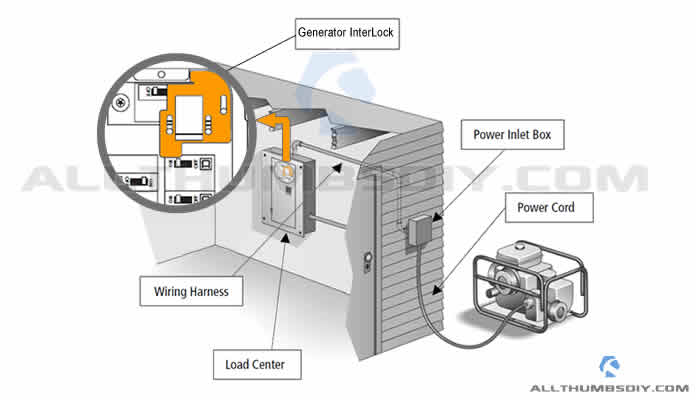
Generator interlock is nothing more than a sliding metal locking mechanism that allows a user to either turn on the main breaker or the generator backfeed circuit breaker. This method only allows either circuit breaker to be ON one at a time.
This simple, but elegant solution prevents a user from accidentally sending electricity from his portable generator back out to utility lines, where it can possibly electrocute and/or kill an utility worker.
In this article, I am going to show you how I installed a Square D Generator InterLock kit, for my Square D QO load center.
SAFETY WARNING – WORKING INSIDE AN ELECTRICAL MAIN PANEL (LOAD CENTER)
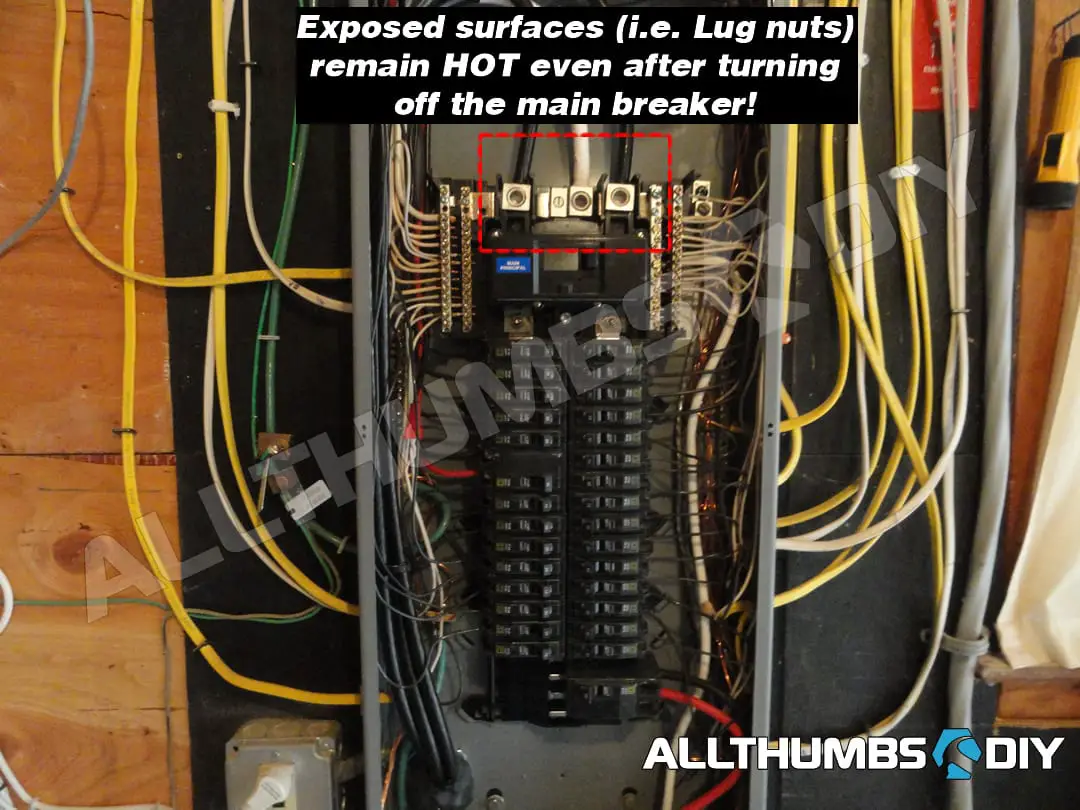
Installing a generator interlock involves working inside the load center (a.k.a. main electric panel).
You need to remember that when you turn off the main breaker, conductors (a.k.a. cables or “legs”) from the outside meter will remain “HOT” OR ENERGIZED.
Touching them directly (conductors) or indirectly (lug nuts) will result in serious injury or death so extreme caution is absolutely necessary.
So please be honest with yourself about your skills when working with electricity. This article shows you how I did it with 20+ years of experience as a DIYer. When in doubt, please consult with an electrician instead.
SAFETY WARNING – WHERE TO PLACE YOUR PORTABLE GENERATOR
The placement of your portable generator is critical to avoid deadly exhaust gas (i.e. carbon monoxide).
I placed my generator in a well ventilated area approximately 45 feet away from the house. You need to make sure that the generator is away from nearby windows, doors and ventilation intakes where exhaust gas could enter the house!
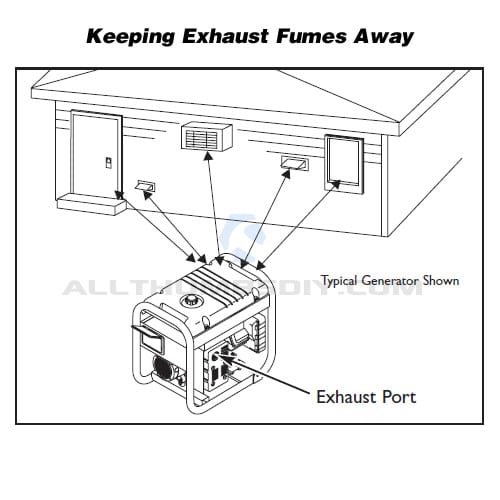
Remember, carbon monoxide is a silent killer because it is odorless and colorless. Being paranoid, I installed a carbon monoxide detector by the mudroom door nearest to the generator. You may want to do the same.
PARTS
This project assumes that your portable generator has a 30 Amp interlocking receptacle (NEMA L-14-30 male receptacle – click here to see). Double check to make sure that your generator has this plug.
- Power Inlet Box;
- Portable Generator Power cord
- Wiring harness (a.k.a. service entrance cable);
- Generator InterLock Kit;
- Backfeed circuit breaker;
PORTABLE GENERATOR
I currently own a Briggs & Stratton 5500 Storm Responder generator which comes with a 120/240 Volt AC, 30 Amp, locking receptacle that accepts NEMA L14-30 male receptacle.
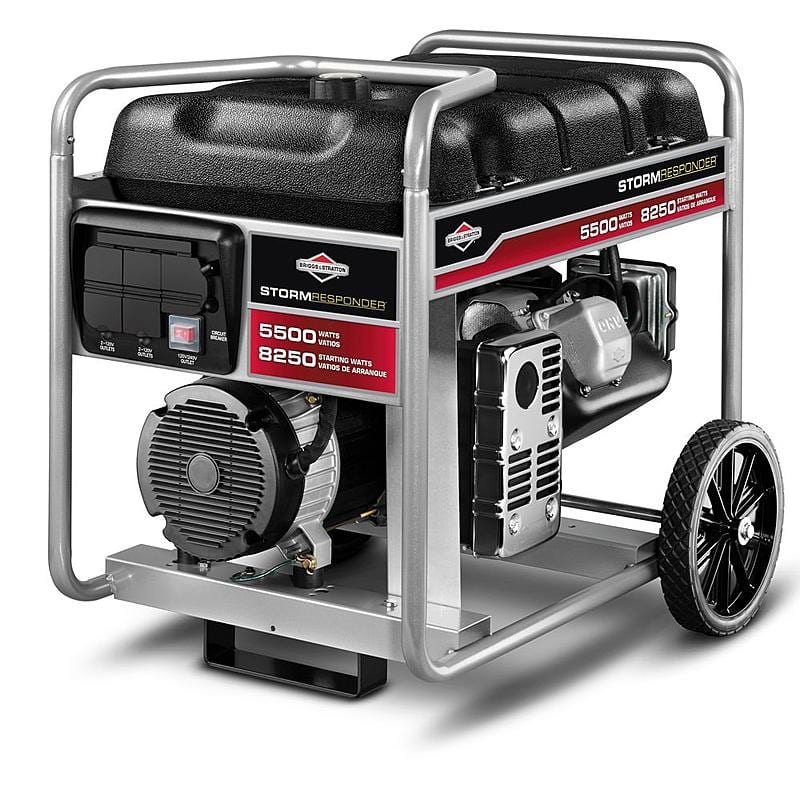
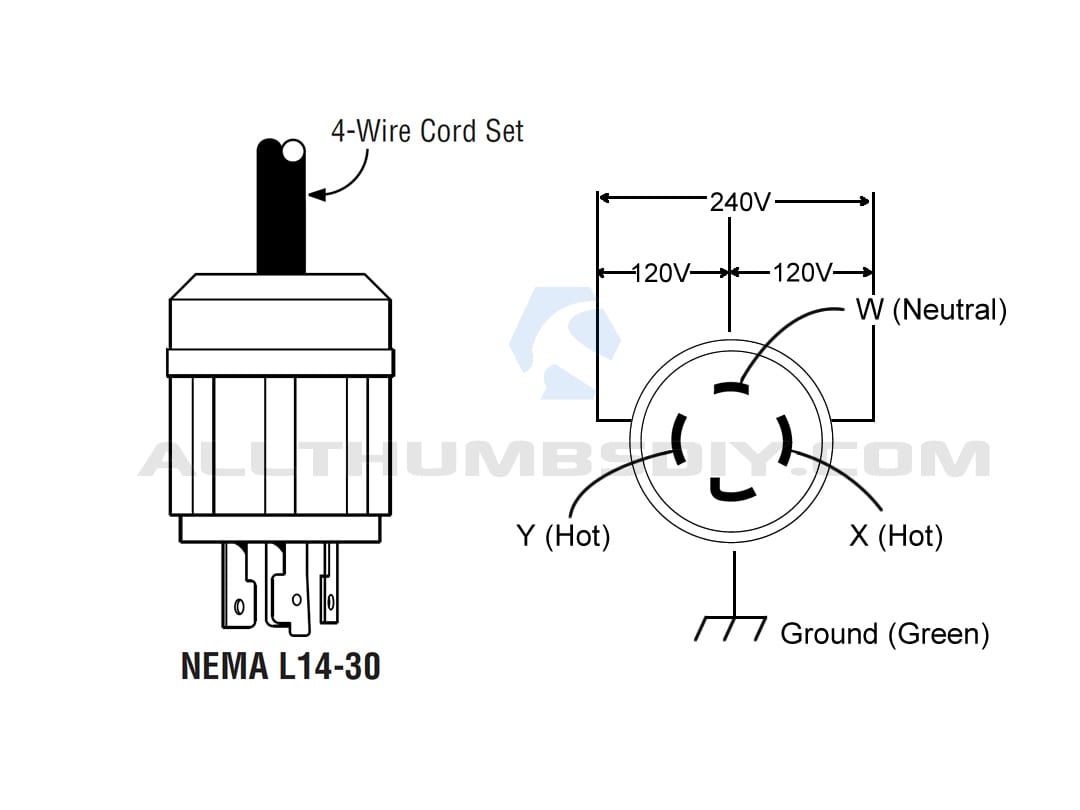
According to B&S, this receptacle accepts a 4-wire cord set rated for 240 Volt AC loads at 30 Amps (or greater) and powers 60 Hz, single phase loads requiring up to 5,500 watts of power at 22.9 Amps for 240 Volts or two independent 120 Volt loads at 22.9 Amps each. The outlet is protect by a two pole rocker switch circuit breaker.
My 5-year-old B&S Storm Responder 5500 blew a valve so I ended up purchasing a CAT RP7500E portable generator. I will do a review of it soon
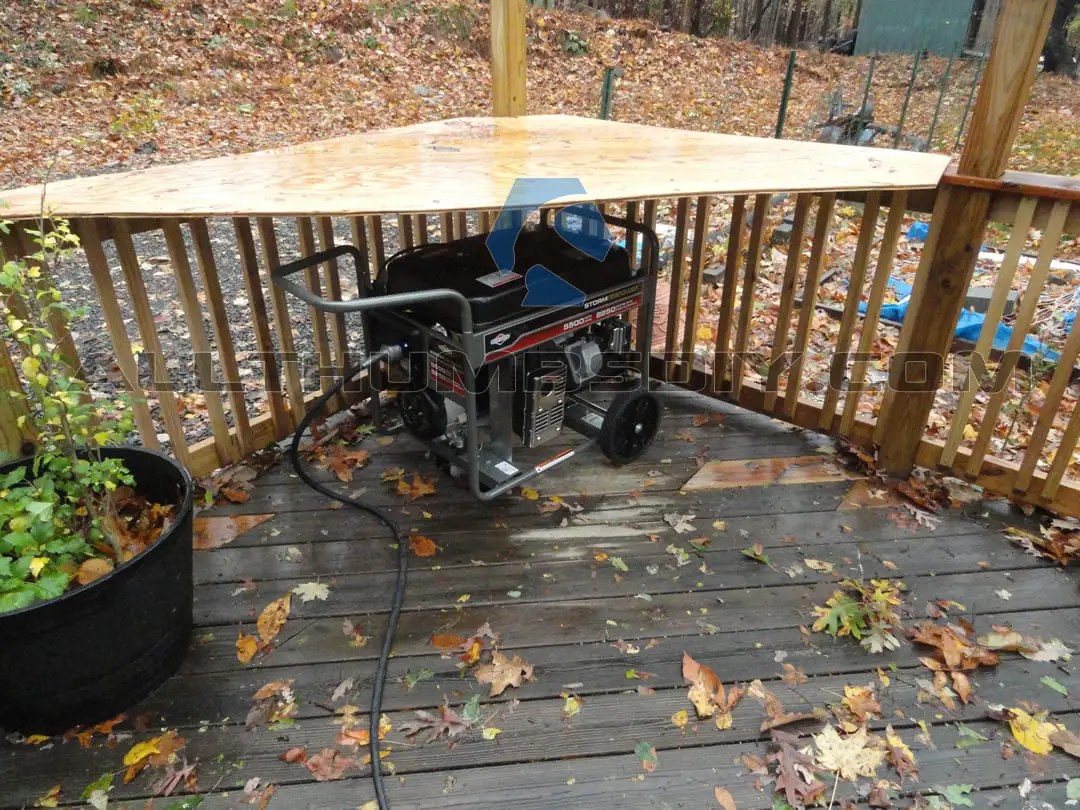
SHELTERING A PORTABLE GENERATOR
Although portable generators are designed to operate in the open, I found that I tend to have less issues when it is well protected from rain and snow, even if it is a temporary structure (like my “roof” in the corner of my deck).
I will be building a more permanent enclosure so look for my post soon.
POWER INLET BOX
I installed a Reliance Controls PR30/PB30 power inlet box (click here) to connect to the generator. It is an excellent, all-metal box which makes it super durable.
However, if I had to buy a replacement, I would spend the few extra $ and buy a Reliance Controls PBN30 Plastic Case Power Inlet Box, 30-Amp.
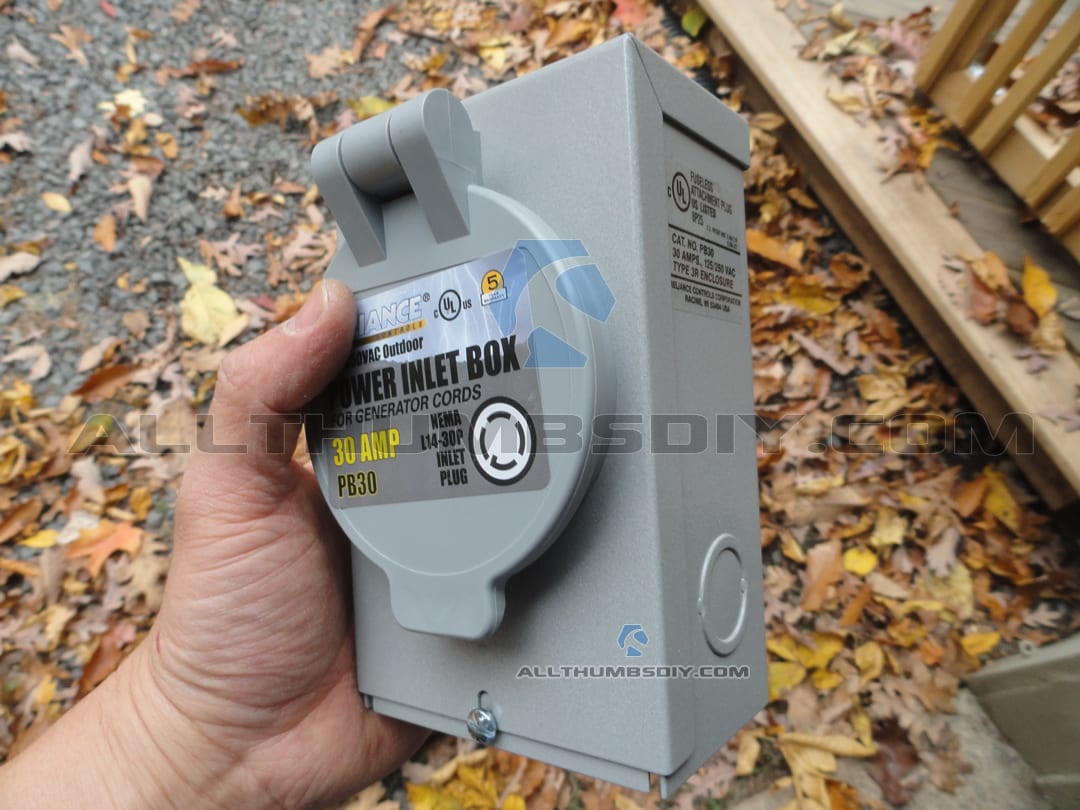
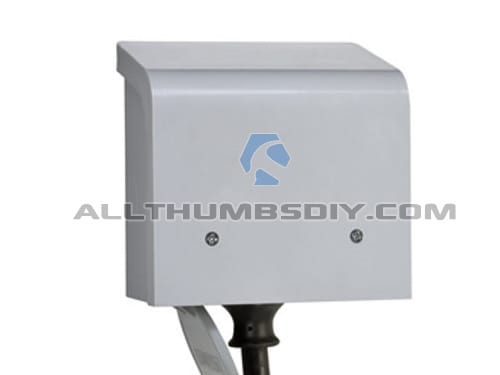
Although PBN30 is made of plastic, it has a large interior capacity which makes it easier to bend and route the heavy duty wires inside. More importantly, NEMA connector hookup is located on the bottom so you never have to worry about water dripping in.
POWER CORD (GENSET CORD)

This cord is how the generator gets connected to the Power Inlet Box. It’s a heavy duty electric cable designed to be use with portable appliances, tools and equipment.
I made my own cable (made by Carol Cable, FT-2-P-7K-123033) along with NEMA L14-30 male and female connectors because at the time, I could not find one that was 35 feet long.
But honestly, if I had to do it over, I would just purchase a pre-made cord like this Reliance Controls PC3040 40-Feet 30-Amp L14-30 Generator Power Cord for Up to 7500-Watt Generators. It’s actually better than my custom made cord (slightly cheaper and NEMA connectors are water-tight).
If you want to know more about wiring sizes, check out my post Indoor Electric Cable Types
Also, I would make sure to get a longer cord than necessary so you have the flexibility to move your generator around without having to buy another cord.
WIRING HARNESS / CABLE

This cable connects the Power Inlet Box to the backfeed circuit breaker.
The size of the cable roughly depends on the amps, voltage and the distance from the receptacle to the main panel.
I was in a hurry at the time so I ended up purchasing a cable that was larger than I needed: AWG 8/3 with AWG 10 ground (cable can handle up to 45 Amps)
GENERATOR INTERLOCK KIT
I specifically chose the Square D generator interlock kit over other solutions because it is:
- Simpler to install – You just need to add a circuit breaker and a metal slider that will act as a transfer switch in the main panel;
- More Flexible – No need to pre-identify which circuits you want to use during an emergency. You can turn on or off any circuit breakers installed in your main or subpanel, as long as you remain within your portable generator’s capacity;
- More Reliable – The whole setup has just two simple parts so it is less likely to fail than other solutions. In the unlikely event when a backfeed circuit breaker fails, you simply need to yank it out and replace it with a new one. A failure involving a manual transfer switch (which by the way has many internal electronic components) would most likely require you to disconnect all wires and replace the entire unit. Not a good scenario when you don’t have power.
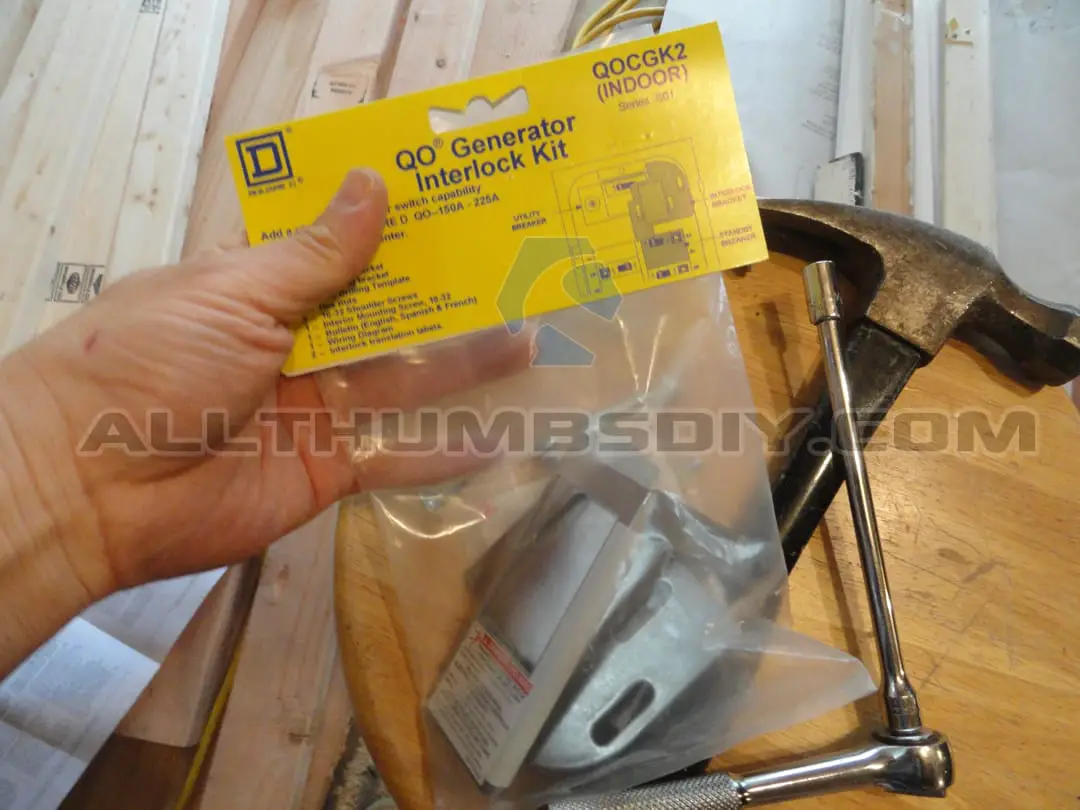
Please keep in mind that in most situations, you will be required install a generator interlock kit that is from the same manufacturer as that of your load center. For example, I have Square D QO Series 200 amp load center so I needed to purchase a Square D QO Series generator interlock kit.
BACKFEED CIRCUIT BREAKER
I chose the Square D Circuit Breaker, 60 Amp, 2-Pole, QO260 instead of the QO230CP QO 30-Amp Two-Pole Circuit Breaker because the price difference was negligible and I always liked the concept of over-sizing specifications.
Although the breaker is rated at 60 amps, please remember that the power inlet box has NEMA-30 connector that can only accept 30 amps.
Should I decide the upgrade to a 50 or 60 amp service, I would need to replace both the power inlet box and the service cable between the inlet box and the main load center.
NEXT STEPS
After purchasing all necessary parts and tools, head over to How I Connected My Portable Generator to My Home – Part 2 to see how I installed my setup.
If you have any questions, please leave a comment below.
Thanks and good luck with your DIY project!

REFERENCE LINKS
- Buying a Portable Generator Shed – Lifetime Horizontal Shed
- Building a Custom Portable Generator Shed
- Engine Tune up for Generac Wheelhouse 5500 / 5550 Portable Generator
- Fast and Easy Fix for Your Generac Wheelhouse 5500 / 5550 Portable Generator – Part 1
- Fast and Easy Fix for Your Generac Wheelhouse 5500 / 5550 Portable Generator – Part 2
- How to Properly Store Flammable Fuel
- What Fuel is Best for Small Engines
- Make Your Own Carburetor Gasket and Save Money
- Review – Neiko 10070A Torx Bit and External Torx Socket 35-piece Set
- Need a new generator? Consider DuroMax XP13000EH
james walker
Tuesday 27th of December 2022
THis looks great, but I have an old panel box. To follow your instructions (I like your suggested generator interlock) it will have to be a square d panel box - right?
kevin
Wednesday 28th of December 2022
Hi James,
My town was very particular and said that my interlock had to be the same brand as my main panel (also Square D).
I would ask your town code enforcement just to be sure..
Good luck!
lightning
Tuesday 15th of February 2022
You made a big mistake. The circuit breaker for the generator should be rated for 30A, not 60! Bigger isn't better when it comes to breakers. The 10ga wire and connector can only handle 30A of current so being able to draw more than that is a serious safety hazard and could melt the cable or damage the generator
Adam
Sunday 30th of January 2022
I was surprised to see that you put in a larger amp breaker than the what the cord amperage is. Pretty sure the it’s supposed to be the other way around so the breaker trips before the wire catches fire.
D.S.
Tuesday 19th of January 2021
The main thing I noticed was that you used a 60-Amp breaker feeding a 30-amp circuit. Although the generator also has a breaker on it rated at 30A to protect the wiring, I would only provide a 30-A breaker in the breaker box generator supply circuit. This would properly protect the wiring, as well as providing an added benefit of placing the nearest breaker inside the house. It might be inconvenient to go outside to reset a breaker on the generator compared to resetting the one in the house. Always use the correct rated breaker in the circuit. It will be cheap enough to upgrade the breaker if you want to up-size the circuit. Depending on your jurisdiction, your local inspector may require an arc-fault or GFCI breaker as well.
Ronald Hritz
Wednesday 16th of December 2020
Dumb question but my generator has 120/240V NEMA L14-30R output 120V TT-30R output. I do not have any 240V items in my house. Can I use a 240V on my house panel or should I stick with the 120V TT-30R connector ?
Will 120 output into a 30 amp circuit breaker service both side of my panel ?
Thanks, Ronald