
KEY POINTS
- The temperature display/control panel can be used to access self-diagnostic mode to help the technician (in this case, you)
- Self-diagnostic mode can be used to identify failed or improper operation of components (i.e. defrost heater, damper, fans, temperature sensors, etc.)
- Simple test to see if the main electronic board is working
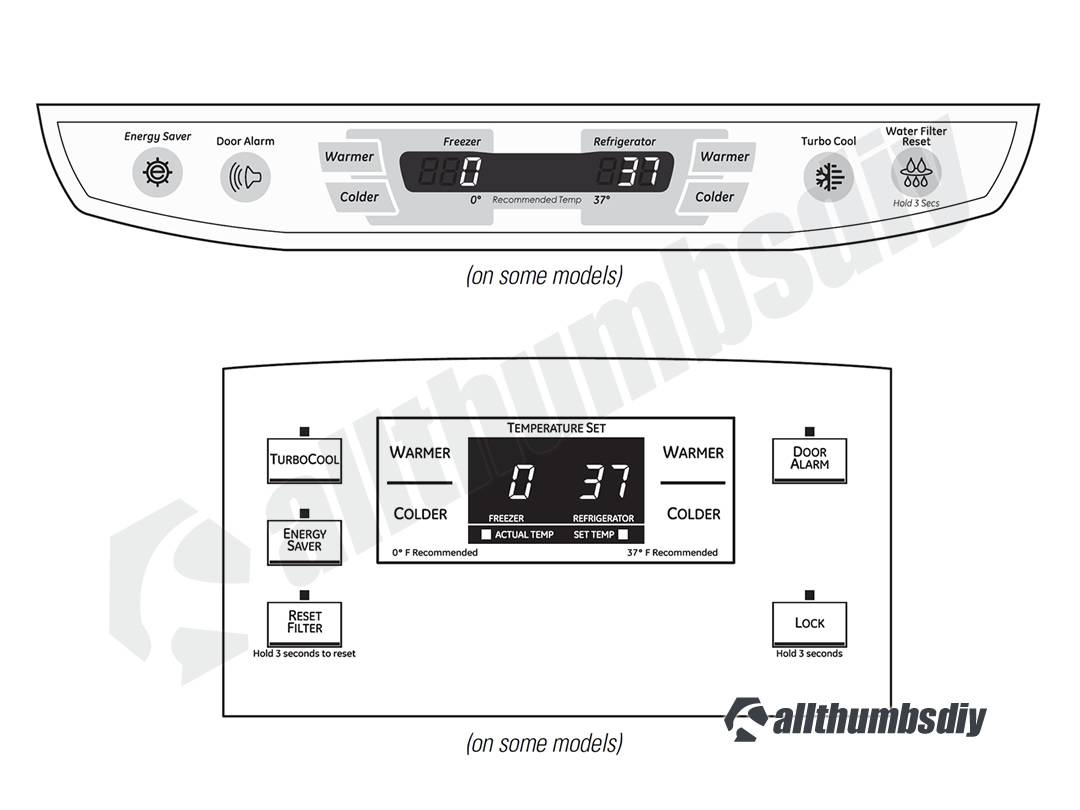
Table of Contents
Intro to Self-Diagnostic Mode
GE Profile French-Style Refrigerator (Model PFCF1NFW; PFCF1NFWABB, PFCF1NFAWW, PFCF1NFWASS) comes with a dual temperature display/control panel. In addition to controlling temperatures for the freezer and fresh food compartments, it also controls door alarm, Turbo Cool, water filter alarm and other features.
More importantly, this LED panel can be used to access the refrigerator’s internal diagnostics mode that is used by GE technicians. Please note that this control diagnostic function does not identify problems you may be experiencing with your refrigerator (i.e. symptoms like refrigerator being warm).
So how is this useful? Instead of forcing you to test each individual components, the diagnostic module will test and display the component status (i.e. Pass or Fail). You can then take this information to further triage your problem show in my post “How to Diagnose and Fix Your GE Profile Refrigerator”
Components That Can be Tested
The internal control diagnostics mode can test to see if the following four (4) components are in working order (“P” or pass) or not (“F” or fail):
- Thermistors
- Evaporator Fan
- Defrost heater
- Damper
Thermistors
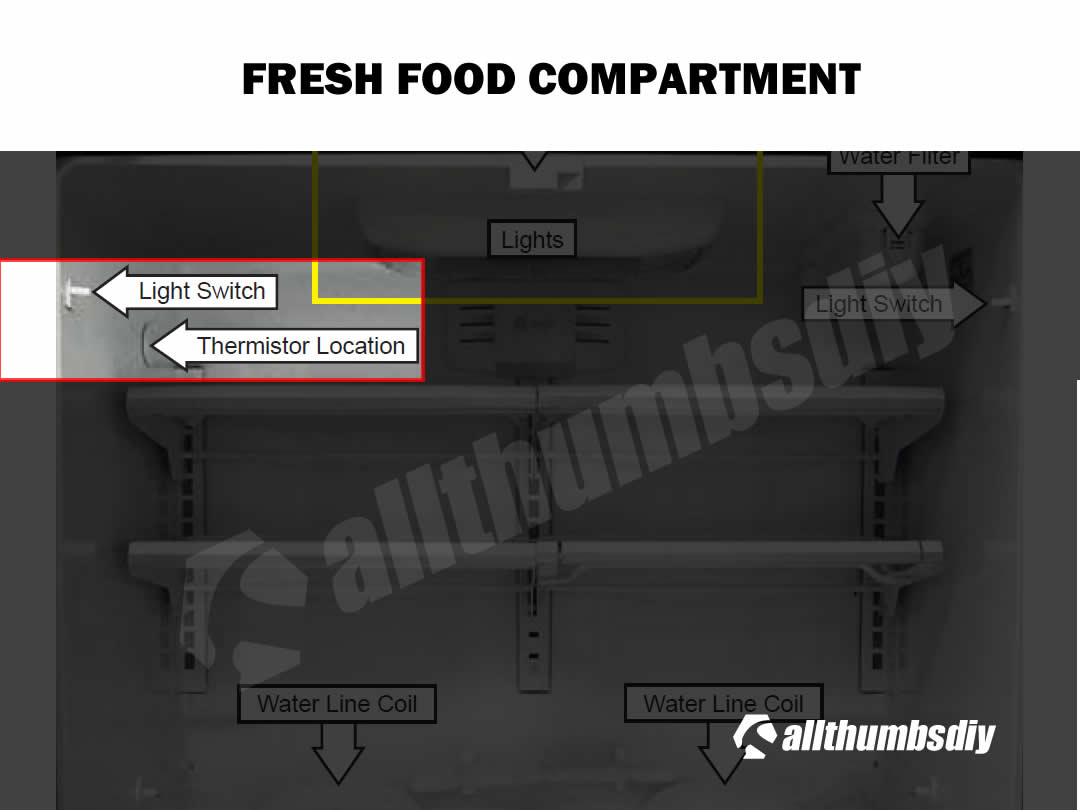
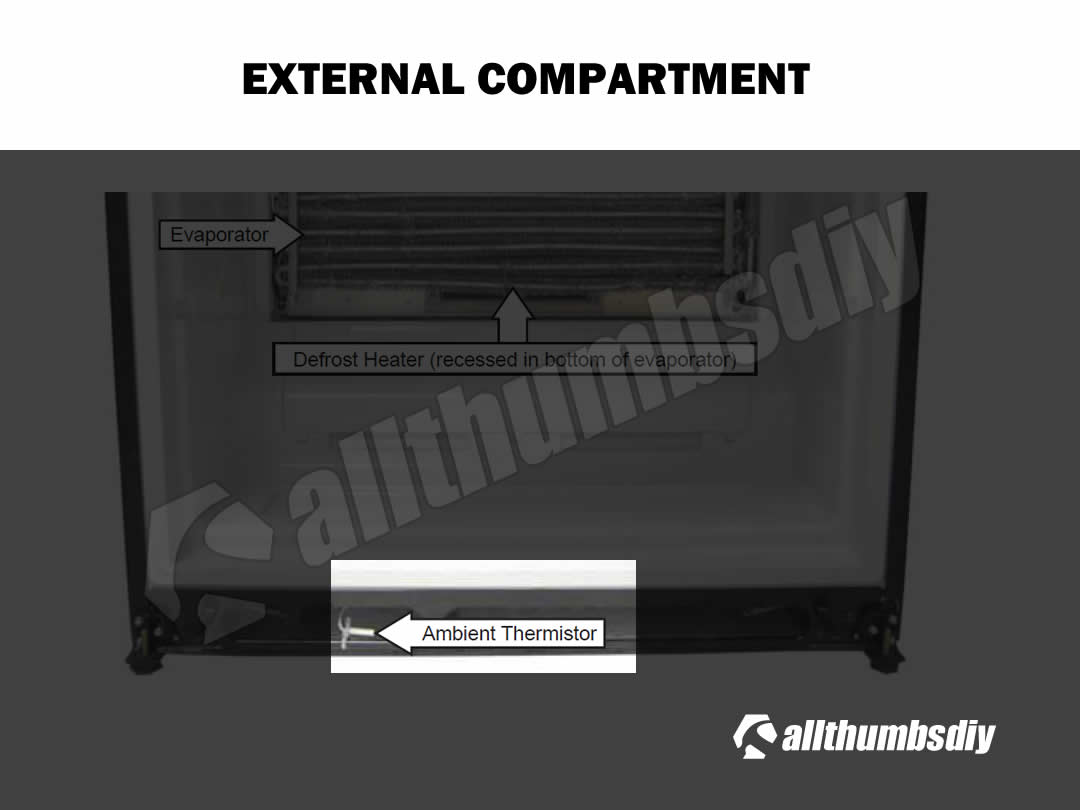
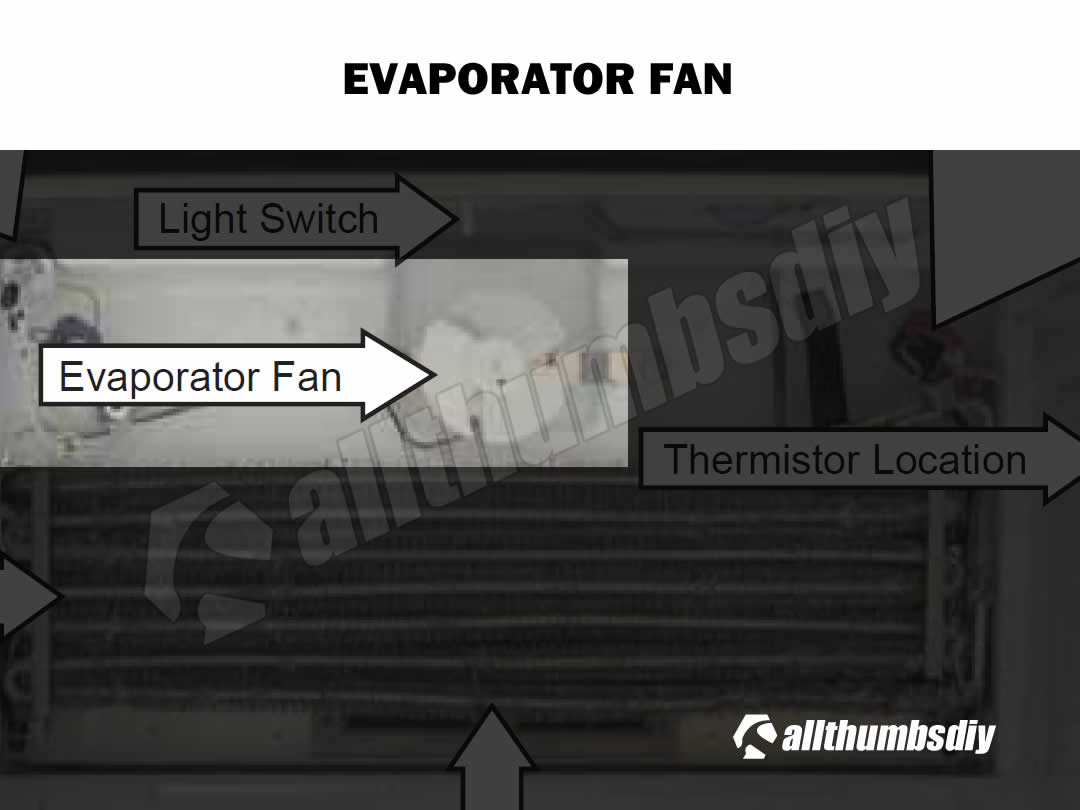
Thermistors are sensors that provide temperature information to the main PCB. There are four thermistors located in:
- One, Fresh Food (FF) compartment – located on the upper left wall
- One, Freezer (FZ) compartment – located on the right lower wall
- One, Evaporator capillary tube – located on the rear (cover panel must be removed)
- One, Ambient – located on the front bottom (toe kick panel must be removed)

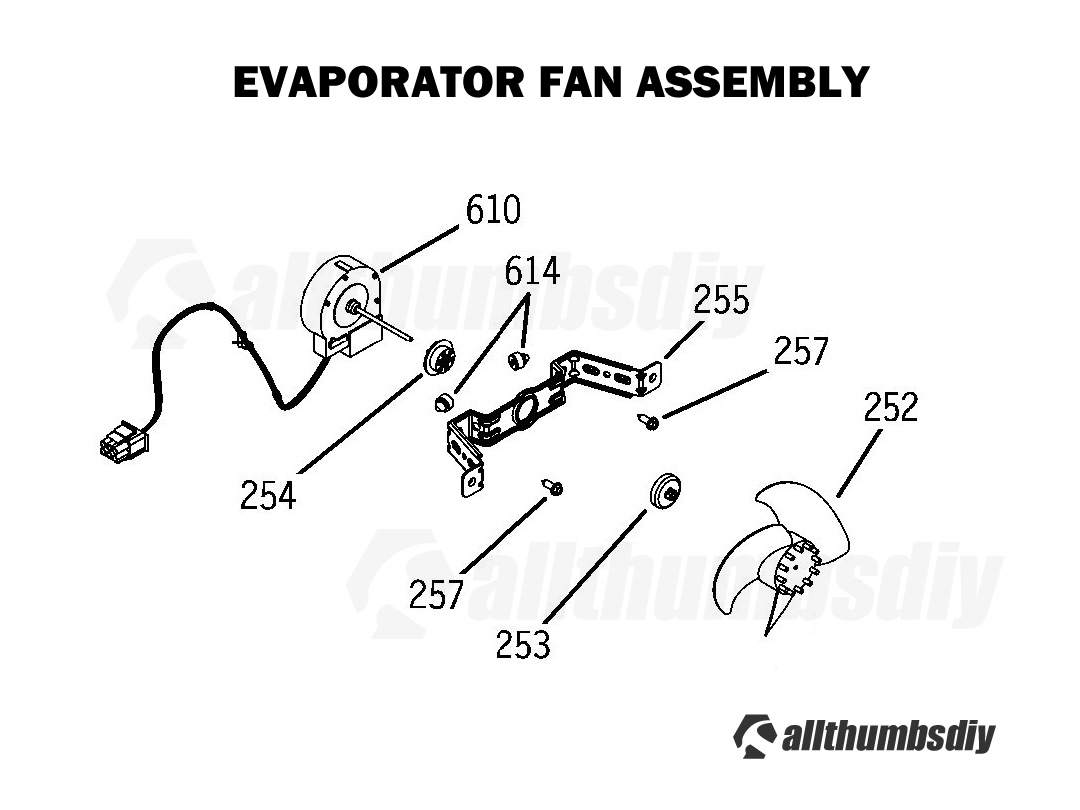
Evaporator Fan
Evaporator fan (consisting of a motor and fan blade) is responsible for pushing air around for both fresh food and freezer compartments. Because the motor operates in a very cold environment, it is susceptible to failure, especially during ice build up.
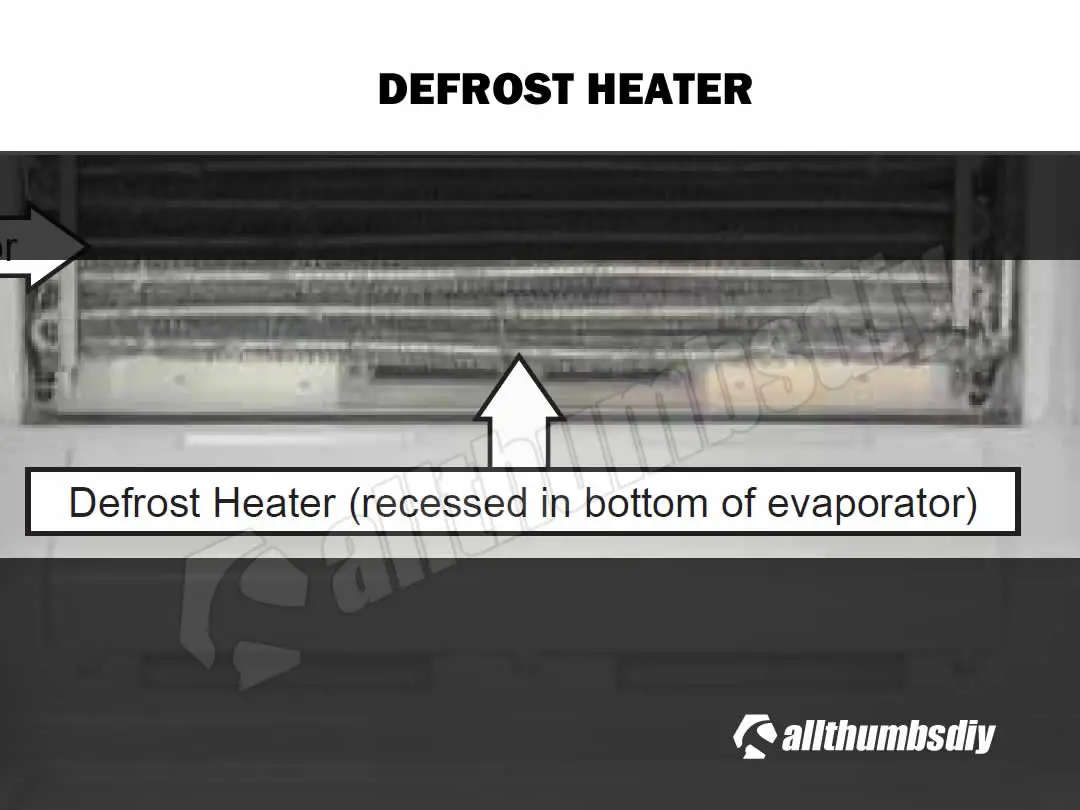
Defrost Heater
Defrost heater is used to remove ice build up on the evaporator located in the freezer section. GE PFCF1NFW performs up to 4 defrost cycles per day with each cycle lasting anywhere between 30 -45 minutes.

Damper
Damper controls how much cold air is drawn from the freezer into the fresh food compartment
When using the self-diagnostic mode to test the damper opening/closing, you should hear a “whirring” sound for 2-3 seconds, followed by a short pause, then another whirring sound for 2-3 seconds. Since don’t hear any sounds or hear clicking sounds, you will need to replace the damper (which is part of the Air Tower Assembly)

What About Other Important Parts?
Critical external components such as the inverter board, compressor, condenser, condenser fan and logic board (main computer) cannot be tested by the internal self-diagnostic module.
Each of these components must be tested individually (please refer to the “How to Diagnose and Fix a GE PFCF1NFW Refrigerator” post)
Instructions
- Step # 1 – Open the refrigerator. If the temperature display is blank, press any temperature buttons once so that you can see the current temperature for both compartments (the temperature display must be in this “active” mode in order to enter the self-diagnostic mode)
- Step # 2 – Enter the diagnostic mode by pressing both the freezer temperature (COLDER and WARMER) pads and the refrigerator temperature (COLDER and WARMER) pads simultaneously. You need to firmly press and hold all four pads at the same time for approximately 3-5 seconds. It’s quite tricky so you will have to try several times.
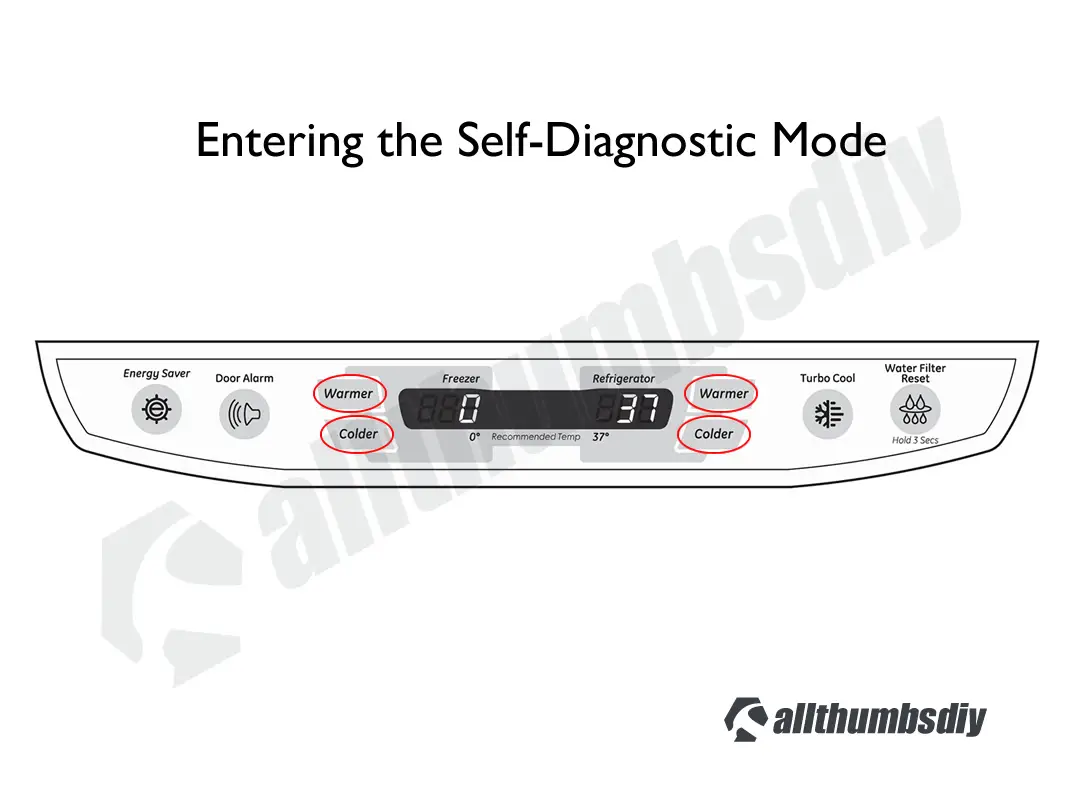
- Step # 3 – You have successfully entered the test mode if you see blinking “0”s (zeroes) for both refrigerator displays;
- Step # 4 – Quickly remove your fingers within 5 seconds of flashing “0”s and press any temperature buttons to lock-in the test mode
- Step # 5 – If you see blinking “0”s changing to non-blinking “0”s, you have successfully entered into the steady-state test mode; failure to lock-in the test mode within 30 seconds will time out the test and return the refrigerator to the normal cooling mode
- Step # 6 – “FZ display” is for the freezer temp display. Use Warmer or Colder buttons to increase or decrease the displayed number
- Step # 7 – “FF display” is for the fresh food (i.e. refrigerator) temp display. Use Warmer or Colder buttons to increase or decrease the displayed number
- Step # 8 – Match the numbers in the DIAGNOSTIC CODES table below to enter that specific test mode (numbers will show in a steady state)
- Step # 9 – Press down the “Water Filter Reset Button” for approximately 3 seconds to EXECUTE the test
- Step # 10 – Test is confirmed when the FF and FZ displays blink
- Step # 11 – Displays will go blank and test will begin; once the test is complete, the refrigerator will return to normal operation
- Step # 12 – To manually terminate the diagnostic mode, enter “1” in the FZ display and “5” in the FF display and press any key (i.e. water filter reset button). Screen will go blank about 3 seconds and temperatures will be displayed again to confirm that you have successfully existed the diagnostics mode
Diagnostic Codes
On some devices, the code table may not be displayed correctly so I am posting a screenshot as well (directly below).
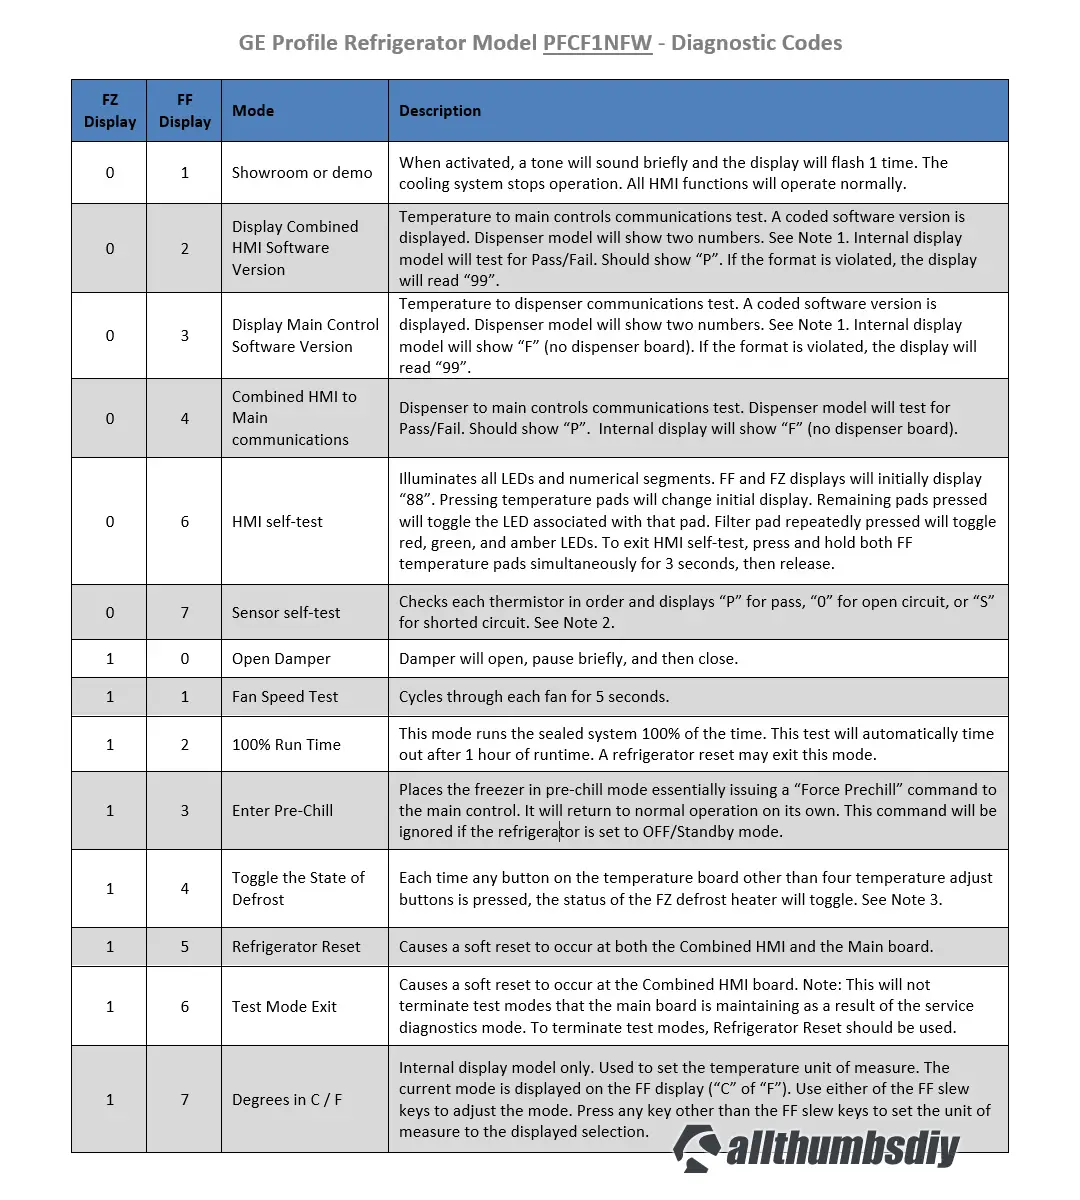
| FZ Display | FF Display | Mode | Description |
|---|---|---|---|
| 0 | 1 | Showroom or demo | When activated, a tone will sound briefly and the display will flash 1 time. The cooling system stops operation. All HMI functions will operate normally. |
| 0 | 2 | Display Combined HMI Software Version | Temperature to main controls communications test. A coded software version is displayed. Dispenser model will show two numbers. See Note 1. Internal display model will test for Pass/Fail. Should show “P”. If the format is violated, the display will read “99”. |
| 0 | 3 | Display Main Control Software Version | Temperature to dispenser communications test. A coded software version is displayed. Dispenser model will show two numbers. See Note 1. Internal display model will show “F” (no dispenser board). If the format is violated, the display will read “99”. |
| 0 | 4 | Combined HMI to Main communications | Dispenser to main controls communications test. Dispenser model will test for Pass/Fail. Should show “P”. Internal display will show “F” (no dispenser board). |
| 0 | 6 | HMI self-test | Illuminates all LEDs and numerical segments. FF and FZ displays will initially display “88”. Pressing temperature pads will change initial display. Remaining pads pressed will toggle the LED associated with that pad. Filter pad repeatedly pressed will toggle red, green, and amber LEDs. To exit HMI Self Test, press and hold both FF temperature pads simultaneously for 3 seconds, then release. |
| 0 | 7 | Sensor self-test | Checks each thermistor in order and displays “P” for pass, “0” for open circuit, or “S” for shorted circuit. See Note 2. |
| 1 | 0 | Open Damper | Damper will open, pause briefly, and then close. |
| 1 | 1 | Fan Speed Test | Cycles through each fan for 5 seconds. |
| 1 | 2 | 100% Run Time | This mode runs the sealed system 100% of the time. This test will automatically time out after 1 hour of run time. A refrigerator reset may exit this mode. |
| 1 | 3 | Enter Pre-Chill | This places the freezer in pre-chill mode essentially issuing a “Force Prechill” command to the main control. It will return to normal operation on its own. This command will be ignored if the refrigerator is set to OFF/Standby mode. |
| 1 | 4 | Toggle the State of Defrost | Each time any button on the temperature board other than four temperature adjust buttons is pressed, the status of the FZ defrost heater will toggle. See Note 3. |
| 1 | 5 | Refrigerator Reset | Causes a soft reset to occur at both the Combined HMI and the Main board. |
| 1 | 6 | Test Mode Exit | Causes a soft reset to occur at the Combined HMI board. Note: This will not terminate test modes that the main board is maintaining as a result of the service diagnostics mode. To terminate test modes, Refrigerator Reset should be used. |
| 1 | 7 | Degrees in C / F | Internal display model only. Used to set the temperature unit of measure. The current mode is displayed on the FF display (“C” of “F”). Use either of the FF slew keys to adjust the mode. Press any key other than the FF slew keys to set the unit of measure to the displayed selection. |
- Note 1: The first two digits are numbers. The second two digits are numbers that correspond to a letter (01=a, 02=b, 03=c,…26=z). For example, 61 and 9= a software version of 61i. 41 and 10=a software version of 41j.
- Note 2: Display order: #1 = Fresh Food Thermistor, #2 = Air Thermistor, #3 = Freezer Thermistor, #4 = Evaporator Thermistor. 05 displayed = No Thermistor installed at this location.
- Note 3: The heater will not come on if the evaporator thermistor is above 70°F.
Simple Test to see if the Main Electronic Board is Working
- One simple way to check your logic board is to open the freezer door, then hold-and-release the door switch three times (freezer light should flicker). If the evaporator fan stops at this point, we can confirm that the main computer board is functioning
- This is a simple macro test, meaning you may still need to test certain components on the logic board to verify that it is in working order
Rafael
Sunday 5th of November 2023
Just want to say thanks for sharing this information. Very helpful in troubleshooting my darn fridge.. my control bad went bad, and after many hrs troubleshooting without schematics and limited information I found online.. I determined it had to be a bad “new” control board I was sent. It was alway at 65, yet freezer worked, but damper fan never operated.
2nd one came in, damper operates, FF now drops and holds at set temp 37, but now it seems it continuously runs… The only way it stops for a bit, is after I do a soft reset (code 1 6 ) and since the temp is at the set point of 37, fridge finally stops. Otherwise it fluctuates from 36 - 38, but the fridge fans never stop when set temp of 37 is reached. Doesn’t seem evaporator always running, but fridge fans always runnings, never goes to standby quiet. I feel I was sent another bad board.. ughhh
NORMA
Monday 21st of November 2022
MY FREEZER IS WORKING GOOD BUT THE FRESH FOOD PART IS COOLING BUT NOT COLD. ACTUAL TEMPS ARE AT 22/55 WITH SET TEMPS AT O/37.. FRIDGE IS NEW SO CANT FIGURE OUT WHATS GOING ON..AFTER A FEW RESETS FAILING.. THIS MORNING THE FREEZER TEMP RESET TO O/55.. COOLER THAN BEFORE BUT NOT COLD. ANY IDEAS AS TO WAHT TO DO..?
kevin
Wednesday 23rd of November 2022
Hi Norma,
Three options (none of which are quick to solve):
1) Option A - your compressor is failing; You can test it by following my post (https://allthumbsdiy.com/appliances/how-to-fix-a-ge-profile-refrigerator-that-is-not-cooling-ugh-again). The cost to replace your compressor and coolant is quite high so if this is the case, you will need to get a new fridge
2) Option B - your inverter board is bad; unless you have a set of test equipment, you cannot test this board directly; if your compressor is good, all you can do is buy a new inverter board (Compressor Inverter Control Board – click here to buy GE OEM, Part # WR49X10283) and test it out (around $200)
3) Option C - your main computer board is bad - again, you cannot test this board without testing equipment. If your compressor is good and you just replaced your inverter board but your refrigerator is still not working, you will want to replace the main computer board. This part costs around $300.
Good luck
Don jElder
Tuesday 4th of October 2022
Does forced run command 12 bypass the starter relay? Other significance of success with this command in insufficiently cooling fridge following power outages?
kevin
Tuesday 4th of October 2022
Hi Don,
I don't believe that FF FZ command combination bypasses the starter relay.
Are you having cooling problems just with your fridge (meaning your freezer is operating)?
Brandon Slater
Tuesday 20th of September 2022
Where would the air thermistor be located in a ge French door fridge?
Michael McClanen
Wednesday 17th of August 2022
Our GE Profile refrigerator has started "humming", making a noise that is quite discernable over its normal running mode which is silent. I am concerned and after reading all the material you provide I do not see anything that adresses this issue. The refrigerator seems to be cooling just fine. Twice I opened the upper doors and the "humming" stopped. Trying it today and it continues with the same noise. Thoughts??
kevin
Wednesday 17th of August 2022
Hey Mike,
That sound is coming from the compressor which normally has a humming sound....if the noise is getting louder, it PROBABLY means the compressor is working harder due to dust/dirt build-up. Dust build up prevents the compressor from dissipating heat. Get your vacuum and soft-brush to remove dirt/dust... you can buy something like this long brush (https://www.amazon.com/Vanitek-26-Inch-Flexible-Refrigerator-Condenser/dp/B0778RFGQ2).. just make sure to take time to thoroughly clean and not blindly "jab" the brush aroun.
Good luck!
Kevin