
OBTAINING PERMIT
Now that I have mapped out what needed to be done, I visited my town hall and with the help from the counter lady, I completed the permit application and attached several drawings along with a check for $43.
Once submitted, I waited approximately 3 days to receive the permit approval before purchasing my materials.
I fully expect that upon final inspection, my township will raise my property taxes but rather than doing this project “off-the-books”, I decided to do it the right way because it would potentially cause problems down the road if I decide to sell this house.
Of course, as a novice do-it-yourselfer, I definitely wanted a professional checking over my work to ensure that I was not endangering me or my family.
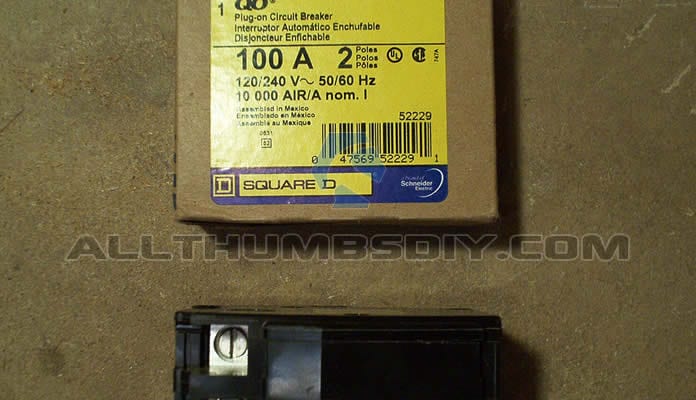
PURCHASE
As previously stated, I decided to go with a service entrance cable made of aluminum cable. That meant I needed to use anti-corrosion lube called Noalox. This lube is NOT necessary should you decide to proceed with copper feeder cable.
Everything on the list below was purchased from a local home improvement retailer, with the exception of the service entrance cable and Noalox. These two items were purchased from a electric contractor supply store (Hughs Turtle in Somerville, NJ).
| Manufacturer | Description | SKU | Qty | Retail Price (each) |
| SQUARE D | 100amp Circuit Breaker | QO2100CP | 1 |
$79.99 |
| SQUARE D | Value Pack Panel (1) | QO2100CP | 1 |
$132.99 |
| NEXANS | Aluminum SE Cable 2-2-2-4 (2) | QO2100CP | 70 ft |
$125.00 |
| None | 2×2 lumber | QO2100CP | 2 |
$30.00 |
| LEVITON | GFCI | QO2100CP | 1 |
$12.99 |
| SQUARE D | Equipment Grounding Bar Kit | PK18GTA | 2 |
$8.99 |
| HUBBELL | Electrical Box | QO2100CP | 1 | $12.99 |
| HUBBELL | Box Cover | QO2100CP | 1 | $12.99 |
| Generic | Bolt & Nut, 2 washers | QO2100CP | 8 | $12.99 |
| Generic | NM Connector (1”) | QO2100CP | 1 | $12.99 |
| Generic | Wire Tight (3/4”) | QO2100CP | 1 | $12.99 |
| DECKMATE | 1.5” Screws | QO2100CP | 8 | $12.99 |
| Generic | 3×5 ¾” Plywood (3) | QO2100CP | 2 | $12.99 |
| Generic | Small Can of Black paint | QO2100CP | 1 | $12.99 |
| SQUARE D | Neutral Lug Kit | QO70AN | 1 | $12.99 |
| Generic | 200 grit sand paper | QO2100CP | 1 | $12.99 |
| IDEALS | Noalox Anti-Oxidant Compound | #30-024 | 1 | $12.99 |
| HUBBELL | ¾” Offset connector | QO2100CP | 1 | $12.99 |
| HUBBELL | Offset connector washers | v | 1 | $12.99 |
| ROMEX | 12 AWG wire (20 amp) | v | 4 ft | v |
NOTES
- Came with 5 circuit breakers (Four 20 amp, One 15 amp)
- 2-2-2-4 stands for AWG2-AWG2-AWG2-AWG4 wire sizes. Two AWG2 are used as “hot” conductors, One AWG2 is used as a “neutral” conductor and AWG4 is used as a “ground” conductor
- Plywood size should be customized to your needs. My township required that each side had 6 inches of clearance and the top side had 8 inches of clearance
TOOLS NEEDED
- Various screwdrivers
- Pliers
- Electric wire stripper
- Electric wire cutter
- Knife
- Magnetic torpedo level
NEXT >>Installing a new Subpanel – Part 4
RELATED ARTICLES
- Installing a new Subpanel – Part 1
- Installing a new Subpanel – Part 2
- Installing a new Subpanel – Part 3
- Installing a new Subpanel – Part 4
- Installing a new Subpanel – Part 5
Installing a new Subpanel – Part 1
Sunday 15th of July 2012
[...] Installing a new Subpanel – Part 3 [...]
Installing a New Subpanel – Part 5
Sunday 15th of July 2012
[...] Installing a new Subpanel – Part 3 [...]
Installing a New Subpanel – Part 4
Saturday 14th of July 2012
[...] Installing a new Subpanel – Part 3 [...]
Installing a New Subpanel – Part 2
Saturday 14th of July 2012
[...] Installing a new Subpanel – Part 3 [...]