
SCOPE
This article will explain how to diagnose a heat-related issues for Whirpool Duet Gas Dryer (model GGW9250SU0) that had problems with low or no heat.
You can go here to see how I replaced fixed my Whirlpool gas dryer by replacing the thermal fuse and gas valve coils.
| Warning |
|---|
| As is the case with most DIY projects, this task may involve handling electricity and/or natural gas which are dangerous and if improperly handled, can cause serious injury or death. If you are unsure, please STOP and seek professional help. |
REQUIRED TOOLS
- Small and medium sized Phillips and Flat screw drivers
- 1/4″ socket + mini ratchet (Don’t have one? Pick up one of these (SATA 25-Piece Ratcheting Stubby Screwdriver Set – ST09342SJ);
- Phillips drill bit
- Digital Multimeter (DMM) – I don’t recommend using cheap $10 multimeters from Radioshack because more often than not, these will give you erroneous readouts. Although I did use one such cheapo analog unit in the beginning, I have since upgraded to a DMM. If you do not have one, you can buy a decent one for around $25 like this one (Mastech MS8268 Digital AC/DC Auto/Manual Range Digital Multimeter Meter). Not as good as a Fluke units ($150+) but as a home DIYer, I simply did not need all those bells and whistles found in a Fluke unit. If you want to see more options, read my post How to Buy a Multimeter
- Test Lead Kit – Why do you need it? Though most multimeters come with a standard set of probes, I found that certain in-place component testings inside appliances require contortionist acts. This is where alligator clips come in handy (if you don’t already own one, I recommend this (Extech TL809 Electronic Test Lead Kit)
- Disposable baby wipes – Don’t laugh; you can clean some amazingly tight spaces with baby wipes and a stick!
ISSUES
During one week in cold November, my wife complained that our dryer was taking too much time in drying clothes. She said the drying time was so slow, it would sometimes require 3 to 4 cycles to dry a small load with clothes staying relatively cool.
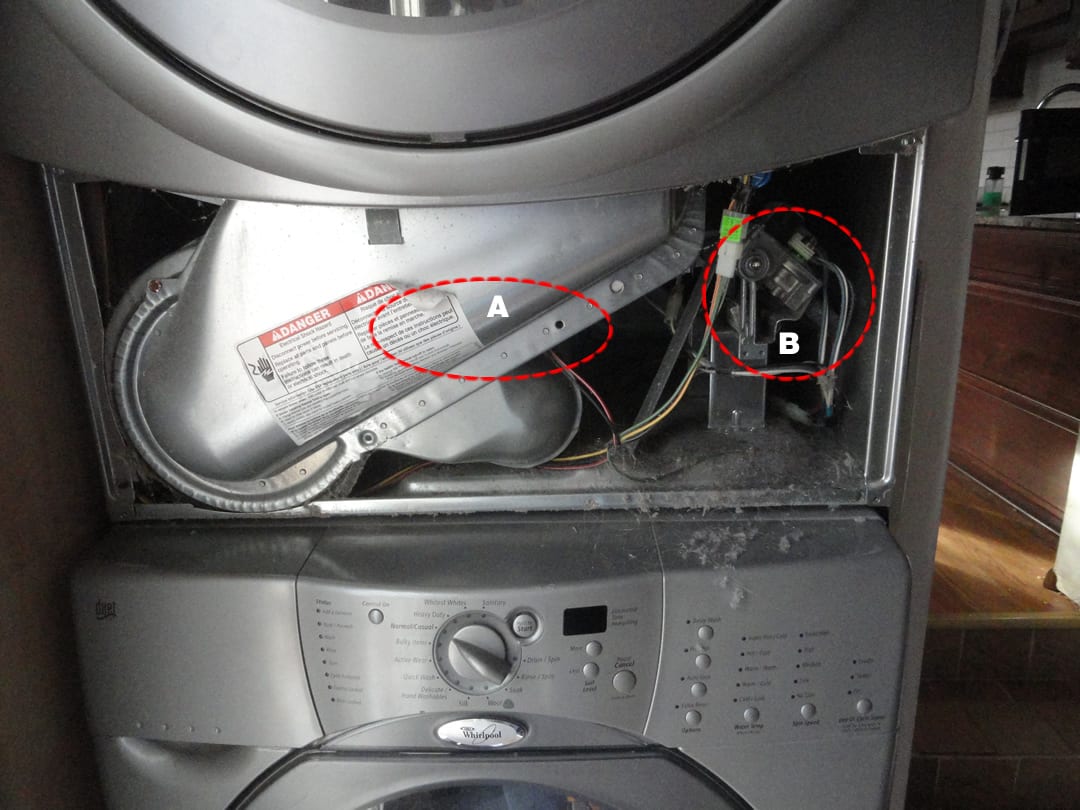
To investigate, I removed the toe kick panel (Fig. 1) and observed while trying different drying cycles. The only thing that stood out was that a glow stick (i.e. lighting match) would repeatedly come on for about 4 times without being able to light the gas.
So basically at this point, I had a very expensive gas dryer, air drying my clothes, wasting lots of electricity and time.
DIAGNOSTICS
STEP 0 – Check lint screen and exhaust pipe for excessive lint / debris / obstructions;
STEP 1 – Activate the diagnostic test mode (note: ironically, diagnostic test cannot detect faults with certain components like thermal fuse, gas valve coils, etc. These components need to be tested directly with a multimeter).
- Dryer is plugged in and all indicators are off;
- Press the following button sequence within 5 seconds: More Time –> Less Time –> More Time –> Less Time
- At this point, all indicator on the coles are illuminated with “88” showing in the “Estimated Time Remaining” display. This confirms that the test mode has been entered successfully.
- Display Fault / Error Codes:
- Code PF – Power Failure has occurred while the dryer was runninng. Press START to continue the cycle or press PAUSE/CANCEL to clear the display;
- Code E1 – Thermistor Open; Execute Test #3a;
- Code E2 – Thermistor Shorted; Execute test #3a;
- Code E3 – User Interface or Software Mismatch; Execute Test #5;
- Moisture Sensor Test – Locate two metal strips on teh face of the lint screen housing; Bridge these strips with wet cloth; If a beep is heard and a software revision number is displayed on the console, the sensor is OK (confirmed with my dryer);
STEP 2 – Diagnostic tests in STEP 1 did not indicate any fault so I moved on to the next troubleshooting steps;
STEP 3 – Verified that natural gas was present;
STEP 4 – Proceed to checking wiring harness:
- Unplug the dryer from the power source;
- Shutoff natural gas;
- Remove the toe kick panel to access various sensors (Use a 1/4″ socket + ratchet to remove two small sheetmetal screws);
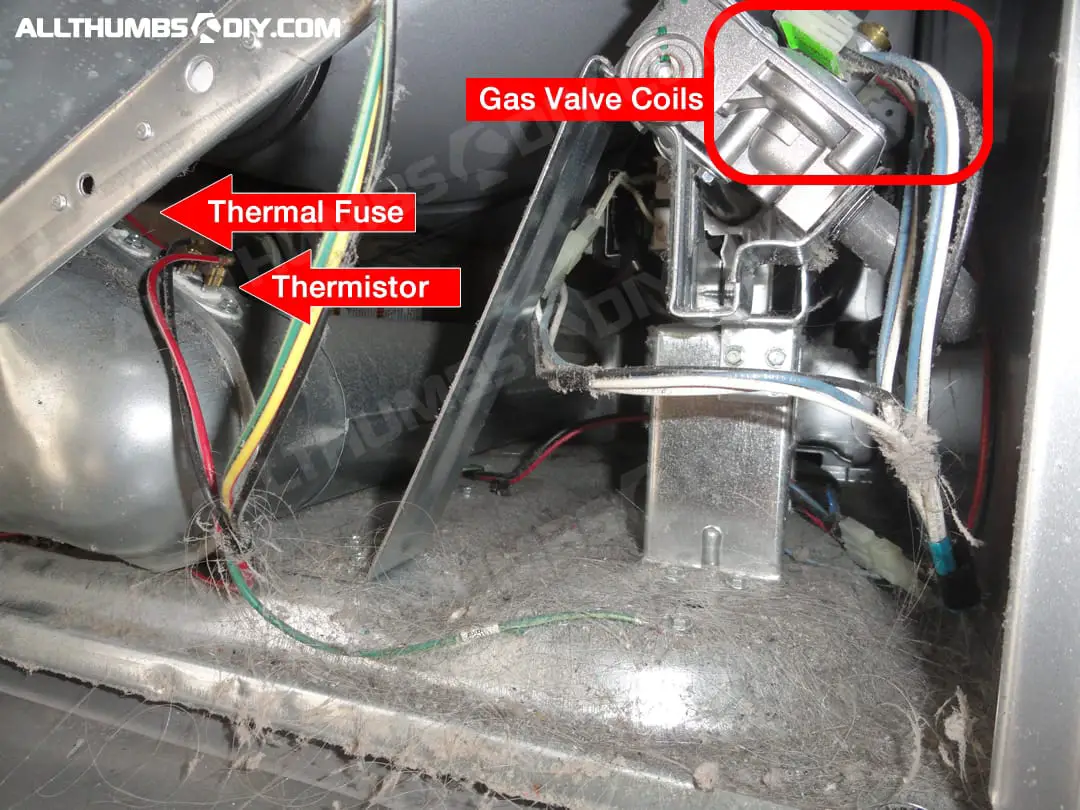
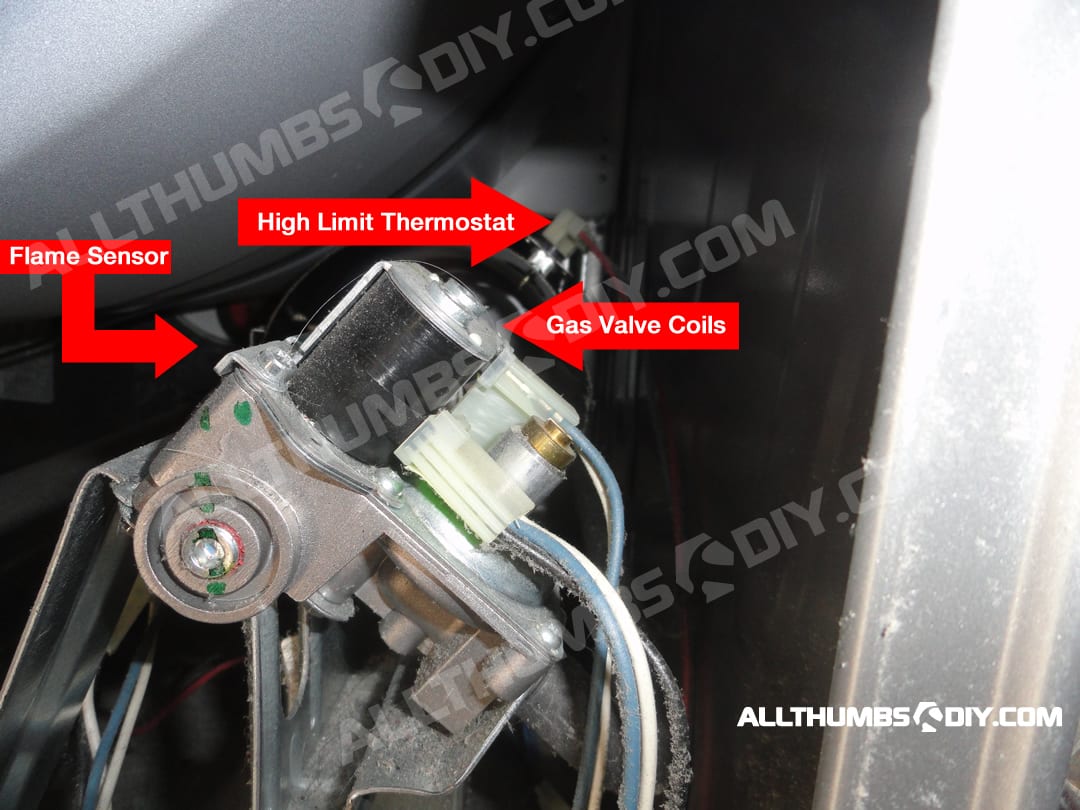
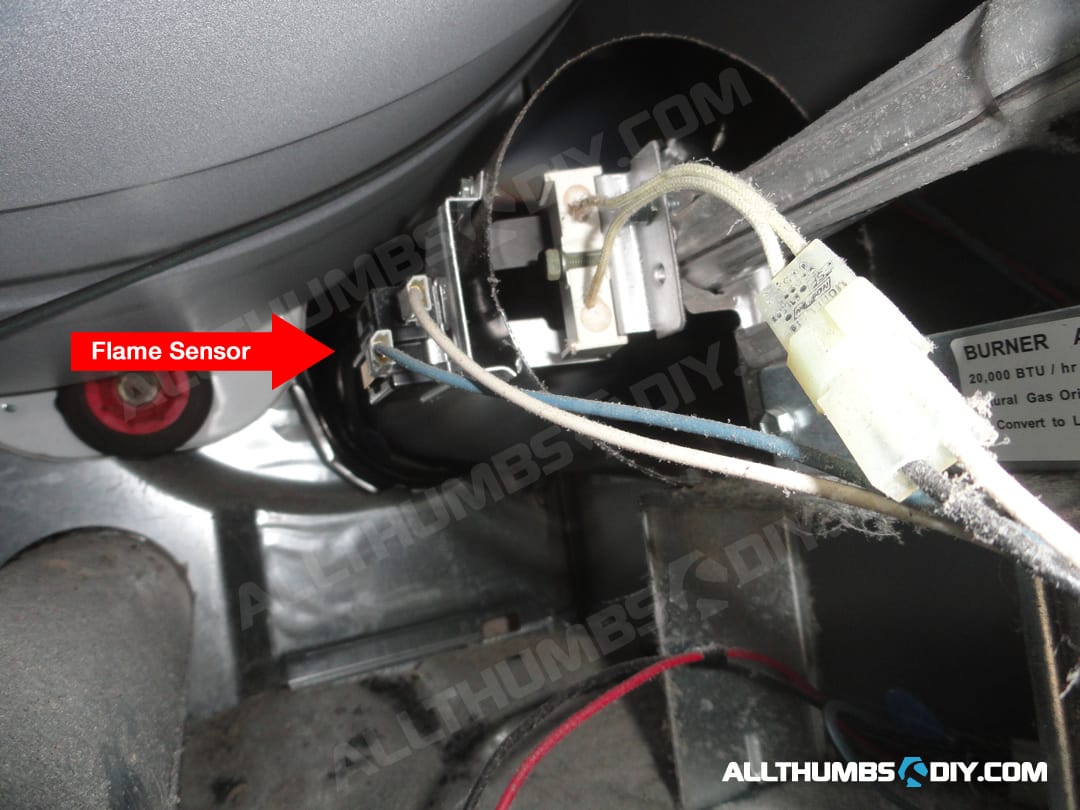
- Visually identify thermal fuse, thermistor, and heater assembly (high limit thermostat, flame sensor and gas valve coils) locations
- Check all connections for broken or loose wires, failed terminals (corrosion or black heat marks), or wires not pressed into connector far enough;
- Check for corrosion on connectors by disconnecting and reconnecting wires
- Look at top of connectors to check for broken or loose wires
- If corroded terminals are found, use emery or fine sandpaper to carefully remove it without damaging the wire sheathing;
STEP 5 – No issues with visual inspections fro STEP 4; proceeding to resistance check (power cord must be unplugged from outlet);
STEP 6 – Mark the thermal fuse wiring harness (so we know which wires go into which terminals) then remove thermal fuse, using 1/4″ socket. My multimeter reading came in at infinite resistance (a.k.a. open circuit) so this part NEEDS TO BE REPLACED;
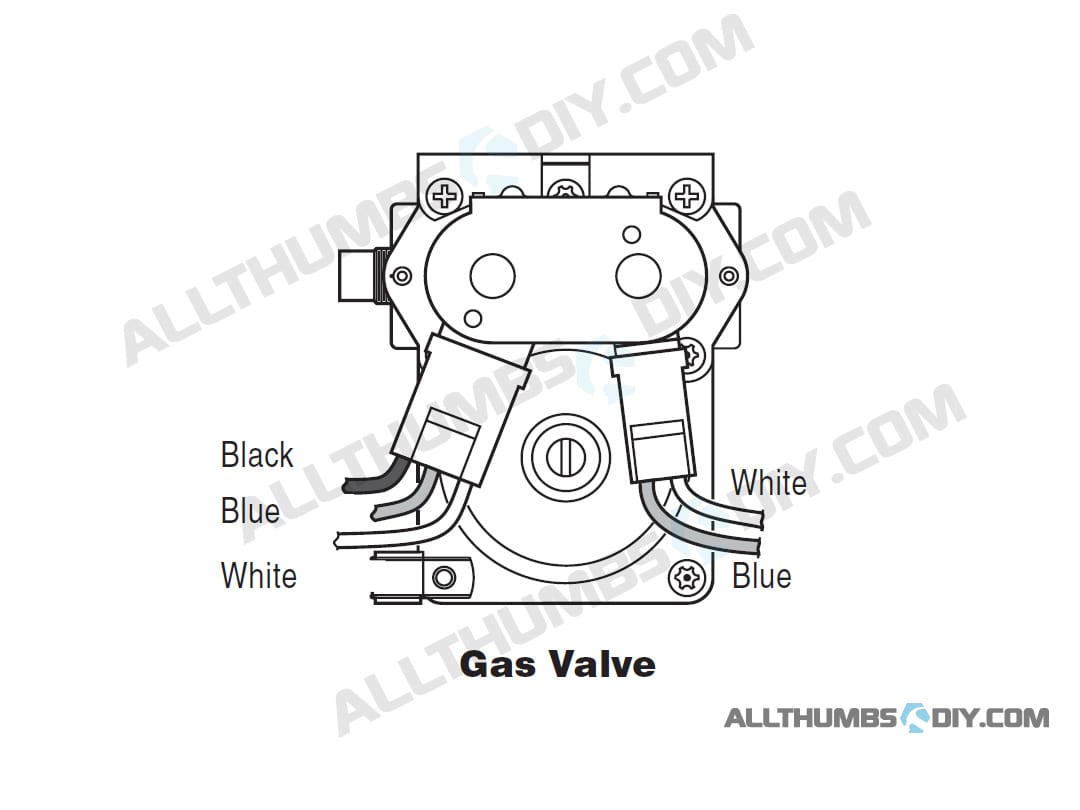
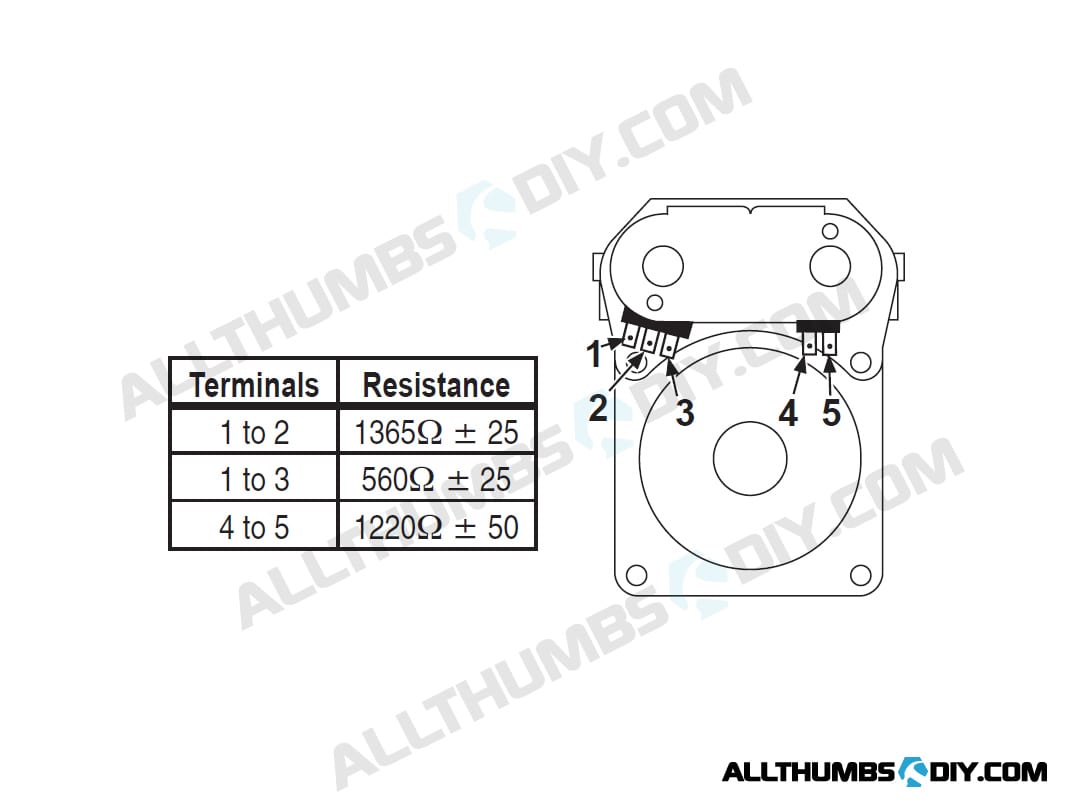
STEP 7 – To test the gas valve coils (there are two coils; one nearest to the toe kick panel has 3 prongs; the other has 2 prongs), I marked and removed all wiring harness and measured the resistance across terminals. Although the resistance readings fell in the normal (but higher) range, but I decided to replace them because they actually have moving parts inside;
STEP 8 – At this point, I was fairly confident that thermal fuse and gas valve coils were causing my dryer to not heat properly, so I placed an order with AppliancePartsPros.com
NEXT STEPS
Depending on your situation, you may need to purchase some parts listed here.
Although these parts are available in multiple places, I highly recommend AppliancePartsPros.com because they provide 365 day unconditional refund policy where you can return unused parts for a 100% full refund (you are still responsible for return shipping).
I have had no trouble returning “just in case” extra parts and receiving prompt refunds.
- Wire Harness, Gas Valve, Part # 3401850
- Door Switch, Part # 8519323
- Wire and Door Switch Assembly, Part # 8283288
- Thermal Fuse, Part # 3392519
- Gas Burner Assembly, Part # 8318276
- High Limit Thermostat, Part # 3403140
- Thermistor – NTC 10k Ohms, Part # 3976615
- Wire Harness, Moisture Sensor, Part # 3406653
- Gas Valve Coils, Part # 279834
RECAP
My next article, How to Replace Thermal Fuse and Gas Valve Coils will show how I was able to fix my Whirlpool Gas Dryer with no heat problem.
I hope you found this article to be useful and I would love your comments. If you are interested in more DIY articles, I invite you to sign up for my newsletter. Just look for a signup form on the upper right hand side of your screen. Thanks!

REFERENCES
- Whirlpool Duet Gas Dryer (Covers Models GGW9200L & GEW9200L) – Service Manual
- Whirlpool Duet Sport Gas/Electric Dryer (Covers Models WED8300SW, WED8500SR, WGD8300SW & WGD8500SR) – Service Manual
- Whirlpool Duet Gas Dryer – Tech Sheet (part no. 8558273)
Kahna
Thursday 28th of July 2022
I was given a duet washer and dryer set model #GGW9250PWO (when my current whirlpool washer stopped draining with error code SUDS- replaced drain pump- didn’t work - probably the main board) only to discover that the previous owner (my sister) had not had the propane converter installed. (She’s on LP I’m on natural gas) Result? black soot every time I was drying a load. After multiple attempts to get rid of the soot by cleaning the inside, the vent (took off front kick plate etc) to no avail, I finally decided to take the heating element apart and clean the metal piece behind the back cover. I felt like a chimney sweep. Hours later - I finally get the whole thing reassembled AND now the heat is cycling off. (Mostly staying off and definitely not drying). ( no soot though. LOL ??) Between the hours put into this dryer (and the previous hours spent trying to repair my washing machine).. I’m ready to quit my DYI efforts. My question is … does this sound like something that is an easy repair for a appliance repair guy. ? I still have my dryer from the old set in my garage and could technically swap them out but this set is white and old set is silver… (it will annoy me) so I’d rather get the white duet one working IF it’s not too much money etc. I need to go back to being a mom apparently I’m much better at that. …sigh
FRANK MADEY
Monday 31st of January 2022
gas dryer got really hot several times, turned the temp knob to a lesser heat position, now the unit will not get hot, gas is feeding, and the temp is warm, but not hot enuff to dry my clothes, had the dryer for about 32 years, and replaced the heater unit 6 years ago., just cleaned the lint inside and out, concerned where to start replacing parts, any suggestions?
Scot
Wednesday 14th of July 2021
Hi Kevin,
This is a great blog!
I have a similarly related issue, but wanted to pass it by you before buying any parts. I have a WGD95HEDW0 Duet. The issue I am having is that the temperatures for any heating mode appear to be overheating. My wife was complaining that the dryer is getting too hot and has been running every load using extra low. I decided to test the temperatures by running the dryer in each mode to see how hot it was getting and testing the cutoff temperatures by measuring them with my digital trusty oven thermometer. I ran each mode and ran about 4 cycles of heat on and heat off to allow system to equilibrate. I then recorded my results below. All tests below were performed in an empty dryer and in timed mode only foe each heat mode. Here are my results for each heating mode with Minimum Heat on temp °F / Heat Cut Off temp °F respectively.
Air Only: No heat as expected Extra Low: 94°F / 135°F Low: 106°F / 162°F Medium: 114°F / 182°F High: 122°F / 204°F
It appears that the heat cycling process is about the same in all modes. However, the cut off temperatures appear to be very high but not so high that the safety High Heat sensor is shutting down the dryer. The heat would stay on ~15-20 seconds after the low heat limit was reached and shutting off heat when it reached the upper limits of each mode. The first cycle appeared to have a higher temperature limit in all modes, but then appeared to equilibrate after the second heat cycle
If I had to place a guess as to what the issue may be without running the ohm test, I would say the thermistor may be the culprit. I have my dryer ducts cleaned annually and always clean my lint filter between loads.
Do you have a link for the WGD95HEDW0 service manual, or do you think the Whirlpool Duet Sport Gas/Electric Dryer (Covers Models WED8300SW, WED8500SR, WGD8300SW & WGD8500SR) will have the same specs as the WGD95HEDW0? I am having trouble locating this manual without spending $15-20.
Do you know what the temperature limits should be for the different heat modes and/or the spread between Minimum Heat on temp °F / Heat Cut Off temp °F ?
Do you agree that the thermistor replacement is a good starting place?
Thank you,
Scot
Manny
Tuesday 11th of August 2020
Thanks for this article. It saved me a lot of money. Your instructions were great especially noting what the resistance reading on the coils should be. Replaced the coils and we're back in business. The 2 prong coil was bad but I replaced both!
Be Cox 49
Saturday 20th of October 2018
Hi, model is WED8500SR. I had gas with my last dryer. When I got this dryer it was electric so we tapped the gas off to use it. Everything was working fine until the day the dryer cycle wouldn't turn on. Your diagnostic test directions are precise and to the point. My dryer said 88 and no other code. I did push the start button opened the door with a beep to open and a beep to close it, yeh ! Wasn't sure if the thermal fuse CHECK is in the same place as the gas Dryer? Any suggestions would help. TY.